
Manual


Page Number - 10 Form 801625
Cap Pressure Test
For diagnosing:
Proper function of pressure cap
Set-up & Procedure:
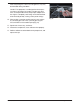
1. Ensure the cooling system is cool and not pressurized.
Carefully remove the radiator or coolant bottle pressure cap
(Fig. 11).
2. Compare the pressure cap to each end of the two cap
adapters to determine the appropriate matching end.
3. Apply water or coolant to the rubber gasket and/or o-ring
on the cap, and assemble the cap to the cap adapter
(Fig. 12).
4. Assemble the opposite end of the cap adapter to the
appropriate cooling system test adapter (Fig. 13).
5. Secure one end of the clear hose to the pressure pump
using the compression nut (Fig. 14).
6. Secure the second end of the hose to the cooling system
test adapter using the compression nut (Fig. 15).
7. Determine the rated cap pressure. It will be printed on the
cap or in the vehicle manual. Compare this value to the
chart below (see Chart A) to determine the acceptable
pressure test range.
8. Operate the Pressure Pump until the cap releases pres-
sure. The pressure should relieve when the needle is in the
colored band on the gauge face corresponding to the test
range of the cap. Discard and replace the cap if it fails to
relieve pressure in the indicated range.
9. When testing is complete, release the pressure by pressing
the Pressure Relief Lever located on pump (Fig. 16 ).
10. Disconnect the components, clean, and store them
properly.
Chart A: Cooling System Cap Pressure Test Ranges
Rated Pressure (PSI) Pressure Range (PSI) Arrow/Band Color
4 3 - 5 Yellow
7 6 - 8 Green
10 9 - 11 White
13 or 14 12 - 16 Blue
15 or 16 14 - 18 Yellow
18 16 - 20 Black
20 18 - 22 Green
30 28 - 30 Red
Fig. 12
Fig. 13
Fig. 15
Fig. 11
Fig. 16
Fig. 14