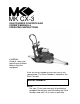
MK CX-3 GAS POWERED CONCRETE SAW OWNER’S MANUAL & OPERATING INSTRUCTIONS CAUTION: Read all safety and operating instructions before using this equipment Enter the Serial Number of your new saw in the space below. The Serial Number is located on the Rear Crossbar SERIAL NUMBER: NOTE: For your (1) one year warranty to be effective complete the warranty card (including the Serial Number) and mail it in as soon as possible.
INTRODUCTION and TABLE OF CONTENTS INTRODUCTION: We at MK Diamond want to congratulate you on selecting the MK CX-3 Concrete Saw. We are certain that you will be pleased with your purchase. MK Diamond takes pride in producing the finest products in the industry. Operated correctly, your MK CX-3 should provide you with years of quality service. In order to help you, we have included this manual. This owner’s manual contains information necessary to operate and maintain your MK CX-3 safely and correctly.
SAFETY Read and follow all safety, operating and maintenance instructions. Failure to read and follow these instructions could result in injury or death to you or others. Failure to read and follow these instructions could also result in damage and/or reduced equipment life. SAFETY MESSAGES: Safety messages inform the user about potential hazards that could lead to injury, death and/or equipment damage.
SAFETY ACCIDENTAL STARTS! on Before starting the engine, be sure the ON/OFF switch is in the "OFF" position to prevent accidental starting. Place the ON/OFF switch in the OFF position before performing any service operation. ROTATING OR MOVING PARTS! Keep hands, feet, hair, and clothing away from all moving parts to prevent injury. Never operate a power tool with shrouds or guards removed. HOT PARTS! Engine components can become extremely hot from operation.
SAFETY DO NOT OVERREACH. Keep proper footing and balance at all times by not overreaching. MAINTAIN TOOLS WITH CARE. Keep tools sharp and clean for the best and safest performance. Always follow maintenance instructions for lubricating and when changing accessories. SHUTDOWN TOOL. The saw should always be shutdown before servicing or when changing accessories such as blades, bits, cutters, and the like. USE RECOMMENDED ACCESSORIES. Consult the owner's manual for recommended accessories.
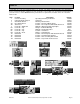
SAFETY SAFETY LABEL LOCATIONS: Safety labels are located according to Figures 1 to 7 below. The labels contain important safety information. Please read the information contained on each safety label. These labels are considered a permanent part of your saw. Please, contact MK Diamond or your dealer for a replacement, if a label comes off or becomes hard to read.
SAFETY CX-3 SPECIFIC WARNINGS: Read Owners Manual Wear Protective Gear for – Lungs Ear Eye PRODUCT SPECIFICATIONS: The MK CX-3 is a versatile Concrete Saw. Operated and used according to this manual, the MK CX-3 will provide years of dependable service. General Description: The MK CX – 3 is engineered as a portable concrete saw powered by a 6 horsepower, Robin gas engine or a 6.5 horsepower Honda gas engine. The saw is capable of cutting up to five (5) inches in depth.
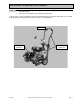
UNPACKING, TRANSPORT and ASSEMBLY UNPACKING: Your MK CX-3 has been shipped from the factory thoroughly inspected. Only minimal assembly is required. If not already done, remove the MK CX-3 from the pallet and place it on a flat surface (lift the Concrete Saw using the lifting points shown below.
UNPACKING, TRANSPORT and ASSEMBLY TRANSPORT: 1. The MK CX-3 weighs approximately one hundred and eighty-five (185) pounds), use care when transporting. 2. Two people are required to lift and transport the MK CX-3. To lift the CX-3, one person will lift by grasping the Handlebar (either extended or folded) and one person will lift by grasping the Lifting Rung on the front of the CX-3 as identified below.
UNPACKING, TRANSPORT and ASSEMBLY ASSEMBLY: Follow the assembly instructions to prepare your MK CX-3 for operation. 1.
UNPACKING, TRANSPORT and ASSEMBLY 2.
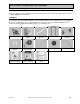
UNPACKING, TRANSPORT and ASSEMBLY Retaining Nut Wrench Shaft Shaft Wrench Shaft Wrench (D) Place the Blade Shaft Wrench onto the flat section of the Blade Shaft Outer Flange Retaining Nut Removed (E) Loosen the Blade Retaining Screw while holding the Shaft Wrench steady Diamond Blade (G) Remove the Outer Flange (F) Remove the Blade Retaining Screw Rotational Arrow (H) Install the Diamond Blade onto the Blade Shaft (I) Verify the direction of rotation arrow of the Blade matches the direction of
UNPACKING, TRANSPORT and ASSEMBLY 4. Filling Oil Reservoir: NOTE: SAE 10W-30 is recommended for general use in temperatures of – 4ºF (20ºC) and above. If you are operating outside of this range, consult the chart in this manual. Engine Oil Capacity is 0.63 US qt (0.6l).
UNPACKING, TRANSPORT and ASSEMBLY 5. Filling Fuel Tank: 1. Gasoline is highly flammable and explosive. You can be burned or seriously injured when handling fuel. 2. To fuel, stop engine if running, and allow it to cool. 3. Refuel in a well-ventilated area. 4. Keep gasoline away from appliance pilot lights, barbecues, electric appliances, power tools, etc. 5. Wipe up spills immediately. NOTES: 1. Fuel can damage paint and plastic. Be careful not to spill fuel when filling the fuel tank.
SETUP, STARTUP, ADJUSTMENT, OPERATION and SHUTDOWN SETUP: 1. Pre-start Inspection: The pre-start inspection should be performed before beginning any job. If Diamond Blade is worn, replace the blade before starting work.
SETUP, STARTUP, ADJUSTMENT, OPERATION and SHUTDOWN STARTUP: 2. Engine Start: 1. Carbon monoxide gas is toxic breathing it can cause unconsciousness and/or death. 2. Avoid any areas or actions that expose you to carbon monoxide. NOTE: If restarting a warm engine the Choke Lever may be left in the Half Open or in the OPEN position.
SETUP, STARTUP, ADJUSTMENT, OPERATION and SHUTDOWN OPERATION: 3. Standard Operation: The following is a brief overview of operating the CX-3.
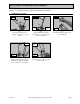
SETUP, STARTUP, ADJUSTMENT, OPERATION and SHUTDOWN Cooling Supply Valve Throttle Lever Direction to Open Direction of Movement (J) Open Cooling Supply Valve (I) With the engine running adjust the throttle approximately half way Rotate Counterclockwise to Lower Throttle Lever (L) Adjust the throttle as needed to make the cut (M) Slowly lower the Blade until the desired level is reached and begin the cut Rotate clockwise to raise (K) Verify proper cooling flow and adjust the water flow on the blade
SETUP, STARTUP, ADJUSTMENT, OPERATION and SHUTDOWN SHUTDOWN: 4.
SETUP, STARTUP, ADJUSTMENT, OPERATION and SHUTDOWN Rotate clockwise to raise Lower Pointer Raise Pointer Blade Raised (D) Raise the Blade (E) Raise the Pointer Assembly (F) Rotate the Pointer downward 6. Cleanup: Engine parts are extremely hot following use, allow engine to cool 1/2-hour before cleaning. Use care during cleanup to avoid injury. NOTE: 1. To extend operating life, the Concrete Saw should be cleaned following every use. 2.
MAINTENANCE AND TROUBLESHOOTING MAINTENANCE: 1. New Maintenance: Perform the following after initial purchase and operation of the saw. Inspect V-belt Change Oil (A) Change engine oil after 1st month or 1st 20 operating hours (See Engine Oil Change) (B) Check and adjust tension on all Vbelts following 1st 48 hours of operation (See V-belt Inspection) 2. Maintenance Following Use: The following maintenance should be performed following each use.
MAINTENANCE AND TROUBLESHOOTING Throttle Linkage Tighten all bolts and screws Wheel Assemblies (G) Lubricate the engine Throttle Linkage (H) Lubricate the Wheel Assemblies (I) Verify the tightness of all bolts and screws found on the CX-3 3. Weekly (50 Hours) and Monthly (200 Hours) Maintenance: The following should be performed monthly. Items should be lubricated using waterproof grease.
MAINTENANCE AND TROUBLESHOOTING Clean Shaft Spark Plug Remove (G) Clean Spark Plug Weekly and Readjust Spark Plug Monthly (See Spark Plug Adjustment and Replacement) Lubricate Shaft (J) Lubricate the Blade Shaft (H) Remove the Diamond Blade (See Blade Removal /Installation section) Clean Screw (K) Clean the Blade Retaining Screw (I) Clean the Blade Shaft Lubricate Screw (L) Lubricate the Blade Retaining Screw Replace (M) Replace the Diamond Blade (See Blade Removal /Installation section) MK CX
MAINTENANCE AND TROUBLESHOOTING 4. 500 Hour and 1000 Hour Maintenance: Perform the following maintenance every 500 hours. Spark Plug (A) Replace Spark Plug (See Spark Plug Adjustment and Replacement) (B) Have Authorized Repair Shop perform remainder of 500-hour maintenance (See Robin Owners Manual) (B) Have Authorized Repair Shop perform remainder of 1000-hour maintenance (See Robin Owners Manual) 5. Yearly and Two-Year Maintenance: Perform the following maintenance every year.
MAINTENANCE AND TROUBLESHOOTING 6. Check Fuel Level: 1. 2. 3. 4. 5. Gasoline is highly flammable and explosive. You can be burned or seriously injured when handling fuel. To fuel, stop engine if running and allow it to cool. Refuel in a well-ventilated area. Keep gasoline away from appliance pilot lights, barbecues, electric appliances, power tools, etc. Wipe up spills immediately. NOTES: 1. Fuel can damage paint and plastic. Be careful not to spill fuel when filling the fuel tank.
MAINTENANCE AND TROUBLESHOOTING Bottom Edge Turn clockwise to tighten Fill through Reservoir oil level hole (D) Fill Oil Reservoir Dipstick (E) Add Oil until level reaches The bottom edge of fill hole (F) Install Dipstick Wipe up excess oil (G) Clean up excess oil MK CX-3 Revision 09/04, Effective Date September 17, 2004 Page 26
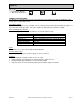
MAINTENANCE AND TROUBLESHOOTING 8. Changing Oil: Oil is a major factor affecting performance and service life. Use 4-stroke automotive detergent oil. SAE 10W-30 is recommended for general use. Other viscosity oil shown in the chart below may be used when the average temperature in your area is within the recommended range. 30 10W-30 5W-30 -20ºF -30ºC NOTES: 0ºF -20ºC 20ºF -10ºC 40ºF 0ºC 60ºF 10ºC 80ºF 20ºC 100ºF 30ºC 40ºC 1. Drain used oil while the engine is warm. 2.
MAINTENANCE AND TROUBLESHOOTING Wrench Fill through Reservoir oil level hole Wrench (G) Using two 1/2 – inch or adjustable wrenches, install the Drain Cap onto the Oil Drain Line (Ensure the Cap is tight) (H) Fill the Oil Reservoir (See Checking Oil Level for filling instructions) 9.
MAINTENANCE AND TROUBLESHOOTING Turn counterclockwise to loosen Paper Filter Submerge with Oil Tap to Clean or use compressed air (G) Dip the Foam Filter in clean engine oil – Squeeze out excess oil (H) Inspect Paper Filter, tap on hard surface to clean or use 30psi air (direct air inside filter to clean) Air Guide Cyclone Filter Assembly (J) Remove the Cyclone Filter Assembly from the Air Filter Cover Cyclone Housing (K) Separate the Air Guide from the Cyclone Housing and clean using soap and wate
MAINTENANCE AND TROUBLESHOOTING 10.
MAINTENANCE AND TROUBLESHOOTING Outer Flange Retaining Nut Wrench Flush Against Blade Retaining Screw Blade (H) Install the Outer Flange and verify it is seated against the Blade (I) Install the Blade Retaining Screw Shaft Wrench (J) Install the Blade Retaining Screw Wrench and the Blade Shaft Wrench and tighten the Retaining Screw 11. Fuel Sediment Cup Cleaning: 1. Gasoline is highly flammable and explosive. You can be burned or seriously injured when handling fuel. 2.
MAINTENANCE AND TROUBLESHOOTING 12. Spark Plug Adjustments and Replacement: DO NOT work around the engine while hot. NOTE: 1. Recommended spark plugs are: NGK – BPR6ES or DENSO – W20EPR-U 2. When installing the Spark Plug, ensure the threads of the are aligned with the threads in the engine so as not to “cross-thread" the plug.
MAINTENANCE AND TROUBLESHOOTING 13. Handlebar Repositioning for Storage: Handlebar Tri-Knob Tri-Knob Pivot Turn counterclockwise to loosen Turn clockwise to tighten (A) Loosen the Tri-Knobs on both sides of the Handlebar (B) Pivot the Handlebar in the forward direction towards the motor (C) Tighten the Tri-Knobs on both sides of the Handlebar 14.
MAINTENANCE AND TROUBLESHOOTING Protection Screw 7/16” Wrench Turn counterclockwise to loosen (G) Remove the Blade Shaft Cover Retaining Screws and the Blade Shaft Cover Shaft Wrench Cooling Hose (J) Install the Inner Blade Flange (I) Install the Blade Guard on the opposite side of the CX-3 Diamond Blade Direction of Installation Direction of Installation (K) Install the Cooling Transfer Hose from the Blade Guard (L) Install the Blade (See Blade Removal /Installation section) Shaft Cover Prote
MAINTENANCE AND TROUBLESHOOTING 14. Micro-V Belt, Adjustment and Replacement: In order to ensure the CX-3 operates at peak efficiency, the power transmission Micro-V belt should be inspected monthly and changed if any signs of damage and/or excessive wear is observed. NOTE: 1. When a new belt is installed, it should be inspected and re-tensioned after the first forty-eight (48) hours of operation.
MAINTENANCE AND TROUBLESHOOTING Blade Shaft Pulley Old Micro-V belt (J) Remove the old Micro-V belt from the Engine and Blade Shaft Pulleys Engine Pulley (K) Clean and verify the alignment of the Engine and Blade Shaft Pulleys New Micro-V belt (L) Obtain and install a new Micro-V belt onto the Engine Blade Shaft Pulleys Check Tension 1/2-way between pulleys Tension Arm Verify V-belt seated (M) Verify the Micro-V belt is seated in all grooves of the Engine and Cutting Drum Pulleys (N) Tighten the
EXPLODED VIEW AND PARTS LIST EXPLODED VIEW: MK CX-3 Revision 09/04, Effective Date September 17, 2004 Page 37
EXPLODED VIEW AND PARTS LIST PARTS LIST: Item A A1 A2 A3 A4 A5 A6 A7 A8 A9 A10 A11 A12 A13 A14 Description Assembly, Frame Casting, Frame, Right Casting, Frame, Left Support, Horizontal Frame Connector, Tube ∅1 3/8 x 5/16-18 Screw, 5/16-18 x 1 ½ Hex Hd. Cap Washer, 5/16 SAE Flat Washer, 5/16 Split Lock Wheel, Front, 4 X 1 ½ Shim, ¾ x 1 ¼ x .045 Axle, Front Bushing, Flange Wheel, Rear, 8 X 2 ¼ Pin, Cotter 1/8 x 1.
EXPLODED VIEW AND PARTS LIST F F1 F2 F3 F4 F5 F6 F7 F8 F9 F10 Assembly, Blade Guard Guard, DC Rear Blade Fitting, Brass, 1/8 MNPT X 3/8 BARB Screw, 3/8 X 2 ½ Socket Head Shoulder, w/ 5/16-18 Thread Washer, 3/8 SAE Flat Guard, DC Front Blade Screw, 5/16-18 x ¾ Hex Head Cap Washer, 5/16 Split Lock Label, Caution, Lift Guard, 1.5 X 3.0 Label, Warning, Blade Failure, 1.5 X 3.
EXPLODED VIEW AND PARTS LIST J J1 J2 J3 J5 J6 J7 J8 J9 J10 J11 J12 J13 J14 J15 Assembly, Depth Control Wheel, Depth Control Screw, 3/8-16 X 1/2 Socket Head Set Knob, Ball, 2”, 3/8-16 Insert Screw, 1/2 X 3/4 Socket Head Shoulder, w/ 3/8-16 X 5/8 Thread Tube, Depth Control ¾-10 Nut, 3/8-16 Nylock Hex Screw, 3/8-16 X 2 Hex Head Cap Bearing, Flange, FHSLF 204-12G Screw, 3/8-16 X 1 ½ Hex Head Cap Washer, 3/8 SAE Flat Nut, 3/8-16 Nylock Hex Screw, Depth Control Nut, 3/4-10 Hex Spring, Detent 1 1 1 1 1 1 1 1 1 2
EXPLODED VIEW AND PARTS LIST NA3 NA4 NA5 2 1 1 155407 155406 159495 Assembly, Wire Harness, CX3 Premium Harness, Wire, CX3 Premium Tachometer (redington) Screw, 6-32 x 3/8, Pan Head Self Tapping Switch, Engine On/Off 1 1 1 2 1 n/a 159480 159477 153466 157851 PA PA1 PA2 Assembly, Wire Harness, Standard Harness, Wire, Standard Switch, Engine On/Off 1 1 1 n/a 158232 157851 Q Q1 Q2 Q3 Q4 Assembly, Accessory Pack, Manual, Owner’s Card, Warranty Tube, Owner’s Manual Wrench, ¾, Open End 1 1 1 1 2 n/a
THEORY THEORY OF DIAMOND BLADES: Diamond blades do not really cut; they grind the material through friction. Diamond crystals, often visible at the leading edge and sides of the rim/segment, remove material by scratching out particles of hard, dense materials, or by knocking out larger particles of loosely bonded abrasive material. This process eventually cracks or fractures the diamond particle, breaking it down into smaller pieces.
ACCESSORIES, ORDERING and RETURN INFORMATION ACCESSORIES: ITEM 1. NUMBER DESCRIPTION 159615 MK – CX10 12 x .100 x 1.0 159616 MK – CX10 14 x .100 x 1.0 159617 MK – AX10 12 x .100 x 1.0 159618 MK – AX10 14 x .100 x 1.0 159619 MK – GX10 12 x .100 x 1.0 159620 MK – GX10 14 x .100 x 1.0 2. 3. 4. 5. 6.
ACCESSORIES, ORDERING and RETURN INFORMATION ORDERING INFORMATION: You may order MK Diamond products through your local MK Diamond distributor or, you may order direct from MK Diamond. NOTE: There is a $25.00 minimum order when ordering direct from MK Diamond. All purchases must be made using VISA or MasterCard.
MK CX-3 CONCRETE SAW OWNER’S MANUAL & OPERATING INSTRUCTIONS CALIFORNIA PROPOSITION 65 MESSAGE: Some dust created by power sanding, sawing, grinding, drilling, and other construction activities contain chemicals known [to the State of California] to cause cancer, birth defects or other reproductive harm.