MK DIAMOND PRODUCTS, INC 1315 STORM PARKWAY TORRANCE, CA 90509-2803 310-539-5158 www.mkdiamond.
SAFETY INSTRUCTIONS FOR THE PX-3 PAVER SAW Congratulations on your purchase of a PX-3 Paver Saw. We are certain that you will be pleased with your purchase. MK Diamond takes pride in producing the finest construction power tools and diamond blades in the industry. Operated correctly, your PX-3 should provide you with years of service. In order to help you, we have included this manual. This owners manual contains information necessary to operate and maintain your PX-3 safely and correctly.
TABLE OF CONTENTS SAFETY SAFETY MESSAGES _________________________________________________ 4 DAMAGE PREVENTION AND INFORMATION MESSAGES ___________________ 4 GENERAL SAFETY PRECAUTIONS AND HAZARD SYMBOLS ________________ 4 CALIFORNIA PROPOSITION 65 MESSAGE _______________________________ 6 ELECTRICAL REQUIREMENTS AND GROUNDING INSTRUCTIONS ___________ 8 SAFETY LABEL LOCATIONS __________________________________________ 10 PAVER SAW SPECIFIC WARNINGS ____________________________________ 10 PRODUCT SPECIFICAT
SAFETY Read and follow all safety, operating and maintenance instructions. Failure to read and follow these instructions could result in injury or death to you or others. Failure to read and follow these instructions could also result in damage and/or reduced equipment life. SAFETY MESSAGES: Safety messages inform the user about potential hazards that could lead to injury, death and/or equipment damage.
)) SAFETY (( on (( )) MAKE THE WORKSHOP KID PROOF on Make the workshops kid proof by using padlocks, master switches or by removing starter keys. (( )) DO NOT FORCE THE TOOL A power tool will do a job better and safer operating at the rate for which it was designed. on )) USE THE RIGHT TOOL (( Do not force a tool or an attachment, to do a job that it was not designed to do. on PROPER EXTENSION CORD USE THE (( on If using an extension cord make sure it is in good condition first.
on )) (( SAFETY on USE RECOMMENDED ACCESSORIES )) (( Consult the owner’s manual for recommended accessories. Using improper accessories may increase the risk of personal or by-stander injury. (( )) NEVER STAND ON THE TOOL Serious injury could occur if a power tool is tipped, or if a cutting tool is unintentionally contacted. CHECK FOR DAMAGED PARTS (( Before using a power tool, check for damaged parts.
SAFETY (( )) Hazard Symbols: Electrical Shock! )) Never touch electrical wires or components while the engine is running. They can be sources of electrical shock which could cause severe injury or burns. (( on Rotating Parts! (( )) clothing away from all moving parts to prevent injury. Never operate the Keep hands, feet, hair, and engine with covers, shrouds, or guards removed. Over Speed! (( )) Never tamper with the governor components or settings to increase the maximum speed.
SAFETY ELECTRICAL REQUIREMENTS AND GROUNDING INSTRUCTIONS: In order to prevent potential electrical shock and injury, the following electrical safety precautions and symbols should be followed at all times! ! WARNING In case of a malfunction or breakdown, grounding provides a path of least resistance for electric current to reduce the risk of electric shock. This tool is equipped with an electric cord having an equipmentgrounding conductor and a grounding plug.
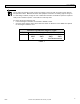
SAFETY ! WARNING Use of under size extension cords result in low voltage to the motor that can result in motor burnout and premature failure. MK Diamond warns that equipment returned to us showing signs of being run in a low voltage condition, through the use of undersized extension cords will be repaired or replaced totally at the customers expense. There will be no warranty claim. To choose the proper extension cord, • Locate the length of extension cord needed in TABLE 1 below.
SAFETY SAFETY LABEL LOCATIONS Safety labels are located according to TABLE 2 below. The labels contain important safety information. Please read the information contained on each safety label. These labels are considered a permanent part of your saw. If a label comes off or becomes hard to read, contact MK Diamond or your dealer for a replacement Item Description Part No.
SAFETY PRODUCT SPECIFICATIONS The PX-3 is a versatile lightweight, dry, masonry saw. Operated and used according to this manual, the PX-3 will provide years of dependable service. General Description The PX-3 Paver Xtreme is engineered as a 14” dry saw, consisting of a powerful 115v motor in a hard plastic case. The saw has a five (5) inch cutting depth. Motor Specifications Motor specifications for the PX-3 are listed in TABLE 3 below.
UNPACKING, TRANSPORT, STAND and ASSEMBLY UNPACKING Your PX-3 has been shipped from the factory thoroughly inspected. Only minimal assembly is required. If not already done, remove the PX-3 from the carton and place it on a flat surface. Remove strapping. Remove the accessories box from the main carton and place along side the PX-3. Note: The Owners Manual is in the accessories box.
UNPACKING, TRANSPORT, UNIVERSAL STAND and ASSEMBLY ASSEMBLY: Follow the assembly instructions to prepare your PX-3 for operation. 1. Diamond Blade Installation NOTE: When installing the Retaining Screw, do not "cross-thread" and DO NOT over tighten the screw. (A) Identify Blade Retaining Screw and Outer Flange. (B) Remove Blade Retaining Screw and Outer Flange. (C) Install and seat Blade –verify rotation. (D) Install Blade Retaining Screw and Outer Flange – tighten. 2.
SETUP, ADJUSTMENT & OPERATION SETUP: ! CAUTION • • • Before powering or starting, check for damage that could prevent this equipment from proper operation or performing its intended function. Check for binding and alignment of moving parts. Check for damaged, broken, or missing parts. Verify the trigger switch-locking button is in the RELEASE position.
SETUP, ADJUSTMENT & OPERATION ADJUSTMENT & OPERATION Chop Cutting: A chop cut is performed by cutting completely through an object in one pass. The following section describes the correct procedure for performing a chop cut. 1. Position the Back Stop for a cross cut or rip cut. 2. Position the work against back stop. 3. Depress the Trigger Switch to start. Lower the Cutting Head to begin cutting. 4. Continue lowering the Cutting Head until the cut is complete. 5.
SETUP, ADJUSTMENT & OPERATION Angle Cutting: Angle cuts are performed using the chop cut method. For angle cuts the Adjustable Back Stop is removed and repositioned. The following section describes the correct procedure for performing an angle cut. 1. Remove and position the Adjustable Back Stop. 2. Position the Back Stop for an angle cut. 3. Position the work below the Cutting Head. 4. Depress the Trigger Switch to start. Lower the Cutting Head to begin cutting. 5.
SETUP, ADJUSTMENT & OPERATION CLEANUP Clean the Air Filter and PX-3 surfaces after each use. The following section describes the correct procedure for cleaning your PX-3. 1. Unplug the PX-3 from its power source. 2. Remove the Motor Filter Cap. The Filter Cap pops on and off without removing the retaining screws. 3. Clean the Filter by removing it from the Filter Cap and tapping it on a hard surface, or use compressed air. ! CAUTION Always wear eye protection when using compressed air. 4.
MAINTENANCE AND TROUBLESHOOTING MAINTENANCE General Maintenance It is important to lubricate the Cutting Head Torsion Spring after each use. Use light oil such as WD-40 or 3-in-1 when lubricating parts. Lubricate Torsion Spring Monthly Maintenance: The following maintenance should be performed Monthly. Items should be inspected as described below.
MAINTENANCE AND TROUBLESHOOTING BLADE DRESSING Like most cutting instruments, a Diamond Blade performs best when it is dressed. Over time and use, diamonds on the outer edge will become smooth or “glazed” over. This will reduce grinding efficiency and may cause the blade to “wander” or bend, giving the illusion of an alignment problem. When this occurs, the blade will need to be dressed. The diamond blade can be dressed using the MK Dressing Stick (part number 152792) and by following the steps below. 1. 2.
MAINTENANCE AND TROUBLESHOOTING DIAMOND BLADE CHANGE OUT Change the Diamond Blade when it becomes worn, cracked, or damaged. The following section describes the correct procedure for changing out the Diamond Blade. ! WARNING Disconnect the tool before servicing and when changing accessories, such as blades, bits, cutters, and the like. (A) Unplug the PX-3 from its Power Source (B) Remove Retaining Nut and Outer Flange (D) Install the Diamond Blade onto Blade Shaft.
MAINTENANCE AND TROUBLESHOOTING MOTOR BRUSH CHANGE-OUT ! WARNING Disconnect the tool before servicing and when changing accessories, such as blades, bits, cutters, and the like. 1. Unplug the PX-3 from its power source and set it up for operation (See Setup, Adjustment and Operation) One on either side of motor (A) Locate and remove one Motor Cap Brush (B) Remove the Motor Brush.
MAINTENANCE AND TROUBLESHOOTING TROUBLESHOOTING ! WARNING Verify the Lockable Switch is unlocked and the saw is disconnected from the power source before performing any troubleshooting procedure. MOTOR STOPS TURNING If the PX-3 Motor should stop turning, perform the following troubleshooting steps: 1. Verify all power cords and plugs are fully connected. 2. Verify the circuit breaker is 20 AMP or greater. 3. Verify the circuit breaker is not tripped. Reset if necessary. 4.
EXPLODED VIEW AND PARTS LIST PX-3 EXPLODED VIEW PX-3 Revision 01/04, Effective Date January 23, 2004 23
PX-3 PARTS LIST PARTS LIST: 24 Item A A1 A2 A3 A4 A5 A6 A7 A8 A9 A10 A11 A12 A13 A14 A15 Description Assembly, Frame Casting, Frame, Right (comp) Casting, Frame, Left (comp) Support, Horizontal Frame Tube Connector, 1⁄4-20 Screw, 1⁄4-20 x 2” Hex Head Cap Washer, 1⁄4 SAE Flat Washer, 1⁄4 Split Lock Drive Stud, Round Head Grooved #16 (1⁄4) x 1⁄2 Bumper w/ Washer, �1.
PX-3 PARTS LIST (cont...) E E1 E2 E3 E4 E5 E6 E7 E8 E9 E10 E11 PX-3 Assembly, Table Table (comp) w/ Plastic Over Mold Screw, 5/16-18 x 3⁄4 Hex Head Cap Washer, 5/16 SAE Flat Washer, 5/16 Split Lock Backstop, Table Screw, 3/8 x 1⁄2 Socket Head Shoulder, 5/16-18 x 1.
THEORY THEORY OF DIAMOND BLADES Diamond blades do not really cut; they grind the material through friction. Diamond crystals, often visible at the leading edge and sides of the rim/segment, remove material by scratching out particles of hard, dense materials, or by knocking out larger particles of loosely bonded abrasive material. This process eventually cracks or fractures the diamond particle, breaking it down into smaller pieces.
ACCESSORIES ACCESSORIES PX-3 ITEM NUMBER DESCRIPTION 1. 157957 MK-PX10, Dry Cutting 14" Segmented Blade 2. 157944 MK-PX30, Dry Cutting 14" Segmented Block Blade 3. 157729 Motor Air Filter 4.
ORDERING & RETURN INSTRUCTIONS ORDERING INFORMATION You may order MK Diamond products through your local MK Diamond distributor.