MPS-1611P Powered Monitor Operation Manual Miller & Kreisel Professional • 9351 Deering Avenue • Chatsworth • CA • 91311 • USA tel: (818) 701-7010 • fax: (818) 701-0776 • www.mkprofessional.com ©2005 M&K Sound, Inc.
The exclamation point within an equilateral triangle is intended to alert the user of the presence of important operating and maintenance (servicing) instructions in the literature accompanying the appliance. 1. CAUTION: TO PREVENT THE RISK OF ELECTRIC SHOCK, DO NOT REMOVE COVER (OR BACK). NO USER-SERVICEABLE PARTS INSIDE. REFER SERVICING TO QUALIFIED SERVICE PERSONNEL.
TABLE OF CONTENTS 1. 2. 3. 4. 5. 6. 7. 8. 9. 10. 11. 12. 13. 14. 15. SAFETY INSTRUCTIONS............................................................................................... 2 INTRODUCTION.............................................................................................................. 4 M&K’S DESIGN PHILOSOPHY....................................................................................... 4 PRODUCT OVERVIEW......................................................................
2. INTRODUCTION Congratulations and thank you for purchasing the MPS-1611P. This Miller & Kreisel Professional powered monitor is designed to provide many years of accurate and problem free operation. We encourage you to read this owner's manual, as there is a great deal of information provided here to help you get the best possible performance from your new M&K Professional monitor.
into its correct acoustic impedance and prevents the backwave from reflecting off the tweeter’s back surface plate, significantly reducing high frequency smearing and phase/combing anomalies. The MPS-1611P’s 6.5" polypropylene woofer uses a new ultra-low distortion motor structure with a number of proprietary features.
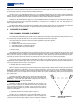
triangle between the two speakers (Y & Z) and your listening position (X) provides the best placement solution. This means that the distance between you and each speaker and the distance between the two speakers should be equal. Or, if the distance between you and one of the speakers is 6 feet, make the distance between the two speakers 6 feet and the distance between you and the other speaker 6 feet as well. See Figure 1. Angle the speakers towards you until you can see the green LED at its brightest.
reduce the resonance effects. The base monitoring width (also referred to as monitoring angle) is important for both music and film sound reproduction. Monitoring angles from 45 to 60 degrees are commonly used for proper translation and accurate stereo imaging. While the stereo base width will become greater in larger rooms or with greater monitoring distances, in rooms where picture is used as reference the size of the picture will dictate the available width. In general.
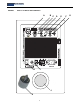
FIGURE 3 MPS-1611P INPUTS AND CONTROLS A B C I H J K 8 D E F G
(FIGURE 3) F) 7. Bass Response Switch – Normal (up) or Full Range (down) G) 80Hz High Pass Filter Switch – In (down) or Out (up). When the switch is in the IN position, a 12dB per octave 80Hz High-Pass Filter is placed on the input stage of the monitor. The OUT position bypasses this internal filter.
(see figure 3) A. “Full Range” Mode – (F) Switch position is down. (G) Switch is disabled in this mode. For extended bass response in a sealed alignment without the use of a subwoofer. 60Hz - 22kHz ±3dB. -6dB @ 50Hz. B. “Normal” Mode – (F & G) Switch position is up for both. For subwoofer use with an external bass management controller (LFE-4, LFE-5, BMC-Mini 80Hz). This is the standard M&K Satellite Low Frequency alignment. 80Hz - 22kHz ±3dB. -6dB @ 60Hz. C.
Bass management is equally suited to all formats from 2-channel stereo to 5.1 and beyond.
10. SPEAKER CALIBRATION 1. Your speakers should now be in their final positions. 2. Remove all EQ and signal processing from the monitor path. 3. Turn all volume controls in the signal chain to their “reference level” position. These volume controls include the console main monitor pot, submaster faders and power amplifier volume pots. The “reference level” position is your defined reference playback level, which is typically 85dB SPL for film, video and music.
12. SUBWOOFER CALIBRATION A. Set your SPL meter for C weighting and slow response. Set the scale to 80dB. Point the meter at the center speaker at ear height with the meter at a slightly up-turned angle. Play track two of the test CD through the selected speaker and read the SPL (Remember that the LFE-4 will re-route all frequencies below 80 Hz to the subwoofer.) Adjust the subwoofer level using a small screw driver to 85dB on the subwoofer trim pot on the LFE-4 or LFE-5. B.
15. SPEAKER MOUNTING OPTIONS The MPS-1611P, like all Miller & Kreisel Professional monitors, has many stand, wall and ceiling mounting options that make proper placement and installation easy and straightforward. M&K ST series wall brackets and stands (see Figures 3-5), are recommended because they are designed to facilitate proper installation. For more specific installation instructions, please consultant the manuals included with the stand and bracket hardware.