6000 series TAPB603/37 Register your product and get support at www.philips.
Contents 1 Important Help and support Safety Care for your product Care of the environment Caution FCC and IC statement for Users (USA and Canada only) Compliance 2 Your Soundbar Main unit Wireless subwoofer Remote control Connectors Prepare the Remote Control Placement 3 3 3 4 4 5 5 6 6 6 6 7 8 8 3 Connect 9 9 9 10 10 10 11 4 Use your Soundbar 12 12 12 12 12 12 12 13 13 13 14 14 Dolby Atmos® Connect to HDMI (ARC) Socket Connect to Optical Socket Connect to AUX Socket Connect to Power Pair up with
Read and understand all instructions before you use your product. If damage is caused by failure to follow instructions, the warranty does not apply. Help and support For extensive online support, visit www.philips.com/welcome to: • download the user manual and the quick start guide • watch video tutorials (available only for selected models) • find answers to frequently answered questions (FAQs) • email us a question • chat with our support representative.
Risk of overheating! • Never install this product in a confined space. Always leave a space of at least four inches around the product for ventilation. Ensure curtains or other objects never cover the ventilation slots on the product. Risk of contamination! • Do not mix batteries (old and new or carbon and alkaine, etc.). • CAUTION: Danger of explosion if batteries are incorrectly replaced. Replace only with the same or equivalent type.
This device contains licence-exempt transmitter(s)/receiver(s) that comply with Innovation, Science and Economic Development Canada’s licence-exempt RSS(s). Operation is subject to the following two conditions: 1. 2. FCC INFORMATION Warning: • This equipment should be installed and operated with minimum distance 20cm between the radiator & your body.
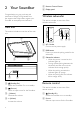
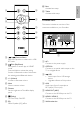
2 Your Soundbar Congratulations on your purchase, and welcome to Philips! To fully benefit from the support that Philips offers, register your Soundbar at www.philips.com/welcome. e Remote Control Sensor f Display panel Wireless subwoofer This section includes an overview of the Wireless subwoofer. Main unit This section includes an overview of the main unit. a b a b c a AC~ Socket Connect to the power supply. b PAIR button Press to to enter the pairing mode for the subwoofer.
b c e d f g h i English a j Bass Activate bass setup. k Treble Activate treble setup. Connectors This section includes an overview of the connectors available on your Soundbar. AC~ j k HDMI OUT (ARC) OPTICAL USB HDMI 1 HDMI 2 AUX a b cd e f AC~ HDMI OUT (ARC) OPTICAL c d / (Previous/Next) Skip to the previous or next track in USB/ BT mode. /Pair (Play/Pause) Start, pause or resume play in USB/BT mode.
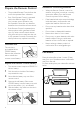
Prepare the Remote Control • The provided Remote Control allows the unit to be operated from a distance. • Even if the Remote Control is operated within the effective range 19.7 feet (6m), remote control operation may be impossible if there are any obstacles between the unit and the remote control. • If the Remote Control is operated near other products which generate infrared rays, or if other remote control devices using infra-red rays are used near the unit, it may operate incorrectly.
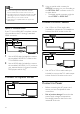
This section helps you connect your Soundbar to a TV and other devices, and then set it up. For information about the basic connections of your Soundbar and accessories, see the quick start guide. Note •• For identification and supply ratings, see the type plate at the back or bottom of the product. •• Before you make or change any connections, make sure that all devices are disconnected from the power outlet.
1 Note •• Your TV must support the HDMI-CEC and ARC function. HDMI-CEC and ARC must be set to On. •• The setting method of HDMI-CEC and ARC may differ depending on the TV. For details about ARC function, please refer to your TV owner’s manual. •• Only HDMI 1.4 compatible cables can support the ARC function. Option 2: Standard HDMI Using an optical cable, connect the OPTICAL connector on your Soundbar to the OPTICAL OUT connector on the TV or other device.
Connect the mains cable to the AC~ Socket of the unit and then into a mains socket • Connect the mains cable to the AC~ Socket of the subwoofer and then into a mains socket. * Power cord quantity and plug type vary by regions. Pair up with the subwoofer Automatic Pairing Plug the Soundbar and the subwoofer into the mains sockets and then press on the unit or remote control to switch the unit to On mode. The subwoofer and Soundbar will automatically pair.
4 Use your Soundbar Select Modes 1 This section helps you use the Soundbar to play audio from connected devices. Before you start • Make the necessary connections described in the quick start guide and the user manual. • Switch the Soundbar to the correct source for other devices. Turn ON and OFF • • • • When you first connect the unit to the main socket, the unit will be in STANDBY mode. The STANDBY indicator will light up white.
After about 5 seconds, the unit will exit from bass/treble setting. » The display will show the current selected mode. » You may now press the Vol+/Vol– button to adjust volume. 1 2 Dolby sound mode Experience an immersive audio experience with Dolby sound modes. 1 Press button on the remote control to turn Dolby mode on or off. • On: Create a Dolby listening experience. • Off: Two-channel stereo sound. Ideal for listening to music.
AUX / OPTICAL / HDMI Operation Ensure that the unit is connected to the TV or audio device. 1 2 3 Press the button repeatedly on the unit or press the Source button on the remote control to select the AUX, OPTICAL, HDMI ARC, HDMI 1, HDMI 2 mode. Operate your audio device directly for playback features. Press the VOL +/– buttons to adjust the volume to your desired level.
English 5 Wall mount Note •• Improper wall mounting may result in accident, injury or damage. If you have any query, contact Consumer Care in your country. •• Before wall mounting, make sure the wall can support the weight of your Soundbar. •• Before wall mount, you need not remove the four rubber feet at the bottom of the Soundbar, otherwise the rubber feet cannot be fixed back.
6 Product specifications Note •• Specifications and design are subject to change without notice. Bluetooth / Wireless • • • Bluetooth profiles: A2DP, AVRCP Bluetooth version: 4.2 + EDR Frequency band/Output power: 2402 MHz ~ 2480 MHz / 0 dBm(Max) • 5.8G wireless frequency range: 5730 MHz ~ 5845 MHz 5.
Warning •• Risk of electric shock. Never remove the casing of the product. To keep the warranty valid, never try to repair the product yourself. If you have problems using this product, check the following points before you request service. If you still have a problem, get support at www.philips.com/welcome. No power • • • Ensure that the AC cord is properly connected. Ensure that there is power at the AC outlet. Press standby button on the remote control or Soundbar to turn the Soundbar on.
产品中有害物质的名称及含量 Names and Contents of Hazardous Substances 有害物质 Hazardous Substance 部件名称 Name of the parts Housing 外壳 Subwoofer 超重低音箱 Loudspeakers 喇叭单元 PWBs 电路板组件 Accessories (Remote control & cables) 附件(遥控器, 电源线,连接线) Batteries in Remote Control (ZnC) (Pb) 铅 (Hg) 汞 (Cd) 镉 (Cr (VI)) 六价铬 多溴联苯 多溴二苯醚 O O O O O O X O O O O O O O O O O O X O O O O O X O O O O O X O O O O O (PBB) (PBDE) 遥控器电池 本表格依据 SJ/T 11364 的规定编制。 The table is formulated according to SJ/
The Bluetooth® word mark and logos are registered trademarks owned by Bluetooth SIG, Inc. The terms HDMI, HDMI High-Definition Multimedia Interface, and the HDMI Logo are trademarks or registered trademarks of HDMI Licensing Administrator, Inc. Manufactured under license from Dolby Laboratories. Dolby, Dolby Atmos, Dolby Audio and the double-D symbol are trademarks of Dolby Laboratories. Specifications are subject to change without notice.
Manufacturer information Manufacturer : MMD HONG KONG HOLDING LIMITED. Address: UNITS 1006-1007,10/F, C-BONS INTERNATIONAL CENTER 108 WAI YIP STREET, KWUN TONG KOWLOON HONG KONG Hereby, MMD HONG KONG HOLDING LIMITED, declares that this TAPB603/37 is in compliance with the essential requirements and other relevant provisions of Directive 2014/53/EU.