
Installation Guide


INSTALLATION INSTRUCTIONS – EXTERIOR DOORS
Tools Required: Supplies Required:
6’ Construction Level Wood Shims
Claw Hammer 3 Tubes of Elastomeric or Polyurethane Caulk
Power Screw Gun and Bits 12 #8 x 3” Exterior Grade Flathead Screws
Hand Screwdriver 12 #10 Galvanized Finish Nails
Caulk Gun Length of Aluminum Flashing (same width of door)
Framing Square
Tape Measure
Drill
Safety Glasses
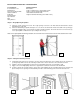
Step #1 – Rough Opening Preparation
a) Check the rough opening correct size. The rough opening needs to be 1/2” wider and 3/4” taller than the outside
jamb dimension of the unit.
b) Check the wall framing for plumb and square. Use a 6’ level to check both the inside and outside of the opening top
to bottom and right to left to ensure that the opening is plumb and square. Check the sub floor for level. Correct any
out of square/plumb conditions before proceeding to the next step.
Note: Out of square/plumb wall framing conditions are one of the most common reasons for door units that leak air or water.
Step #2 – Setting and Fastening the Unit
a) Temporarily fit the unit into the opening to check for proper fit. After fit has been verified remove the unit from the
opening and pre-drill a 1/8” hole at each hinge location on the exterior side of the unit centered in the frame.
b) Caulk the sub floor by applying three 3/8 beads of a high quality elastomeric or polyurethane caulk.
c) Apply a 1/2” bead of high quality elastomeric or polyurethane caulk to the back side of the brickmould.
d) Insert the unit into the opening from the exterior side of the building. Set the unit, bottom first into the opening and
tip the unit up into the opening. This method will prevent the caulk from being pushed out from under the unit.
1a 1b
2b 2c 2d2a