
Installation Guide

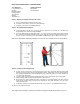

e) Center the unit into the opening to allow clearance for shimming. Install a #8 x 3” exterior grade flat head screw into
the pilot hole (see step 2a) at each hinge location. Do not fully set the screws at this time.
f) From the interior side of the unit, install shims at each hinge location between the frame and stud wall. Adjust the
shims to plumb and square the unit into the opening. After the unit is plumb and square in the opening, the screws
in the hinge side of the frame can be set. Units with sidelites will be fastened through the sidelight frame on the
hinge side of the unit in the same manner.
Note: Proper frame shimming and fastening are critical to the long term trouble free operation of your unit. Composite frame
components are not as rigid as wood and may require extra shimming and fasteners, especially on 8’ doors.
g) Remove the shipping plug and carefully open the door. Install the two #8 x 2 1/2” security screws (provided) into the
top hinge. Open and close the door to check for proper operation.
h) Pre-drill 1/8” pilot holes in the strike side of the frame across from each hinge. Install shims between the frame and
stud wall and adjust the shims to achieve a consistent margin around the entire perimeter of the door. Check for an
even contact between the door panel and weatherstrip. Secure the strike side of the frame with three #8 x 3”
exterior grade flathead screws through the pre-drilled pilot holes into the wall stud. Units with sidelites will be
fastened through the sidelight frame on the strike side of the unit in the same manner.
i) Shim sidelight units above each mull post and secure with a #8 x 3” exterior grade flat head screw through the
sidelight frame head.
j) Shim double door units at the frame head centerline of each door panel. Secure with two #8 x 3” exterior grade
flathead screws.
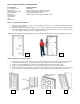
Doors with Sidlites Double Door
Shim above mull post or jambs separating doors and sidelites. Screw through the frame into the Header, adjacent to the
shims
2f
2i 2
j