
Installation Guide

INSTALLATION INSTRUCTIONS – INTERIOR DOORS
Tools Required: Supplies Required:
6’ Construction Level Wood Shims
Hammer #10 Finish Nails
Hand Screwdriver
Framing Square
Tape Measure
Nail Set
Safety Glasses
Step #1 – Remove Packaging and Inspect Door Unit
a) Remove all packaging materials from door unit.
b) Inspect the unit to ensure correct size, swing and style.
c) Inspect the door unit for any handling damage.
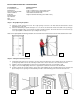
Step #2 – Rough Opening Preparation
a) Temporarily fit the unit into the opening to check for proper fit. The opening size should be 1/2”
larger than the door unit, both height and width.
b) Check the wall framing for plumb and square. Use a 6’ level to check both the inside and outside of
the opening top to bottom and right to left to ensure that the opening is plumb and square. Check
the floor for level. Correct any out of square/plumb conditions before proceeding to the next step.
Note: Out of square/plumb wall framing conditions are one of the most common reasons for door problems.
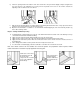
Step #3 – Setting and Fastening the Unit
a) Position the door unit into the opening and level the hinge side of the jamb. Shim the hinge jamb
behind each hinge location. Recheck for plumb and square. Temporarily secure the hinge jamb into
the opening using #10 finish nails. Nail through the stop, jamb and shims at each shim position. Do
not set the nails at this time.
b) Level the strike side of the jamb and temporarily fasten in the same manner as the hinge jamb.
c) Shim and temporarily fasten the jamb head in the same manner.
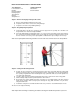
d) Recheck the door unit for plumb and square. Check for an even margin between the door slab and
jamb. Check operation. Nail securely in place through the stop, jamb and shims every 12 inches
using #10 finish nails.
e) Install door casing and secure with #10 finish nails every 12 inches. Set and fill all fastener holes.
The door is now ready for finishing.
Note: Proper frame shimming and fastening are critical to the long term trouble free operation of your unit.