Contents Credits Introduction Minimum Specification Installing ChooseIt! Maker 2 Running ChooseIt! Maker 2 Stopping ChooseIt! Maker 2 Playing an Activity Making a New Activity Adding a picture to choice boxes Adding text to choice boxes Adding sound to choice boxes Editing an Activity Adding more pages Changing what is on a page Sorting (re-ordering) the Pages of an Activity Deleting a Page from an Activity Options for Playing Activities Sorting Activities to be Played Rewards Prompt Colour (for changing ba
Credits Windows is a registered trademark of Microsoft Corporation. Macintosh is a trademark of Apple Computer, Inc. ChooseIt! Maker 2 was created using Macromedia Director. Director ® is © 1993 Macromedia, Inc. ChooseIt! Maker 2 is © 2005 Inclusive Technology Ltd. Sassoon Font is © 1993 Sassoon and Williams. Widgit Rebus symbols used with kind permission of Widgit Software.
Introduction It’s easy to create decision making activities and quizzes with ChooseIt! Maker 2. The new version is even easier to use and has a lot of new features. Use text, images and sounds to make choice making activities and quizzes that are automatically accessible using a mouse, whiteboard, touch monitor, keyboard or switches. It’s great for helping switch users to learn to make choices using scanning techniques, as you can create lots of motivating activities in finely graded steps of progression.
Minimum Specification Windows OS: Windows XP, Vista and Windows 7 (32-bit). Processor: 733MHz Pentium III. RAM: 128MB. Apple Macintosh OS: Mac OSX 10.4.11 or later. Processor: 733MHz PowerPC G4. RAM: 128Mb.
Installing ChooseIt! Maker 2 You will need to install ChooseIt! Maker 2 before you can run it. You only need to do this once. Windows Insert the CD. If your computer is set to Auto-run CDs, just follow the on-screen instructions. Otherwise, double-click on My Computer, then double-click on the CD icon. Double-click on Setup.exe to run the installer. Apple Macintosh Insert the CD. When the ChooseIt! Maker 2 CD icon appears, double-click on it.
Running ChooseIt! Maker 2 Windows If the ChooseIt! Maker 2 icon is on the computer screen (the desktop), double-click on it. Otherwise click on the Start button, then on Programs, then on Inclusive Technology, then on ChooseIt! Maker 2. Apple Macintosh If the ChooseIt! Maker 2 icon is on the computer screen (the desktop), double-click on it. Otherwise go to where you chose to install ChooseIt! Maker 2 to find the icon.
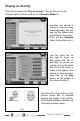
Playing an Activity From the title page click Play an activity. This will take you to the Teacher Options which is the hub of ChooseIt! Maker 2. Activities are stored in folders to help you keep them organised. You can see the five folders near the bottom of the screen. Click on the Samples folder to see what is in it. Use the scroll bar on the right to move up and down the list of activities. To choose an activity, click on the white box next to its name to make a tick appear.
Press the Esc key on the keyboard to go back to the Teacher Options. You can tick more than one activity to play at the same time. The activities will play one after another and then return to the first one again. Click on Sort Activities on the left side of the Teacher Options screen to control the order that the activities play in. See page 14 for more help. NB. Press the Esc key whilst playing an activity to return to the Options.
Making a New Activity To start making a new activity, either: • On the ChooseIt! Maker 2 title screen, click the Make a New Activity button. • In the Teacher Options, click the New Activity button at the bottom of the screen. The Editor will now start and ask you for a name for your new activity and also which of the five folders to store it in.
Add a picture to choice boxes First, select a choice box from those you can see in the preview screen. Then choose to add a picture, writing or sound by clicking the appropriate button at the bottom of the screen. ChooseIt! Maker 2 will load pictures and photos of many file types, including Windows meta files. (See page 25 for full list.) There is also a huge library of pictures on the ChooseIt! Maker 2 CD.
Adding text to choice boxes Text can be added to the page using the real computer keyboard or the on-screen keyboard, which is really designed for those using a large touch screen or an interactive whiteboard. (The on-screen keyboard doesn’t have all the keys; you will sometimes have to use the real keyboard instead.) Use the ‘t’ buttons on the left side to change the size of your text.
Adding sound to choice boxes Here you can add some music, a sound effect or record a voice-over directly using a microphone. Students without speech can still contribute using a BIGmack or other voice output device. Just put the microphone up to it! You can record for up to 60 seconds. When you have added a sound to a choice box, you can click on this button to hear your sound again. Click on it again to stop the sound. Click the Done button when you have finished with your choice boxes.
You have finished! When you have finished a page and clicked OK, the Editor will ask you what you want to do next. You can add a new page, make changes to the page you’ve just made or try out what you’ve got so far. We have found that students like to try their activity each time they add a page. To do this, click the Play Activity button. The activity will play through once and then return to the Editor. When you have finished making your new activity, click the X button at the top of the screen.
Editing an Activity In editing an activity you can: • Add more pages to the activity. • Change the content of a page of the activity. In the Teacher Options, click on the Edit button next to an activity. The Editor will open with these choices: Click Edit this Activity to continue to these choices: Add new page will add a new page to the end of your activity and ask you to choose its layout and content (see Making a New Activity on page 9).
Sorting (re-ordering) the Pages of an Activity In the Teacher Options, click on the Edit button next to an activity. Then click on the Sort Pages button. Use the scroll bar to see pages that are off the screen. To move a page, first click on it, then use the move forward and move back buttons to change its place in the activity. Deleting a Page from an Activity Pages can be deleted in the Sort Pages screen (see above). To delete a page, first click on it, then click on the Delete button.
Options for Playing Activities Sorting Activities to be Played ChooseIt! Maker 2 lets you select a number of activities that will be presented in sequence. The Sort Activities option lets you change the order they appear in. In the Teacher Options screen, first tick the activities you wish to play using the Activities screen. Next, click the Sort Activities button on the left-hand side. Select an activity by clicking on its name, then move it using the yellow Move buttons.
Rewards Here you can decide whether the on-screen reward will be accompanied by music and/or animation. You can also set how long the reward should last. Prompt Here you can create additional prompts to help the learner with the activity. The first option allows you to have the correct choice shown alongside the instructions for the activity.
You can use this to make picture matching or word matching activities. The second option will add a button to the activity screen which, when pressed, will replay the sound that accompanies the activity instruction. Colour Use this screen to set the colour of the text and background throughout your activities. You can also choose a colour for the mouse rollover box or scan box.
Switch Access Switch Access contains three options which control how an activity is played. Select the first option to access the program using a mouse, touch screen or interactive whiteboard. the switch should be pressed again. The second option is for single switch scanning. The user presses their switch, the spacebar on the keyboard or a mouse button to start the scanning.
Scan Speed This option is for single switch scanning. Here you can decide how quickly the scan box will move between the selectable options on the screen. Delay ChooseIt! Maker 2 has a ‘pre‑acceptance delay’ function. This is useful for students who make brief involuntary switch presses which you don’t want the program to recognise. For example, if you set the delay to 0.5 seconds, the program will only accept switch presses that last longer than 0.5 seconds.
Import Here you can choose to import activities created in ChooseIt! Maker 2 or the original ChooseIt! Maker. Simply click on the relevant button and you will then be asked where the activities are on your computer. Changing the Names of Activity Folders The activity folders appear in the Activities panel of the Teacher Options screen. These have default names, but you can change them to suit your needs. Hold down the Ctrl key on your keyboard and click on a folder.
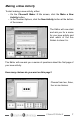
Managing an Activity Next to each activity listed in the Teacher Options is a Manage button. Clicking on this takes you to the Manager where you can do things that affect the activity as a whole: • • • • • Change its name (and folder). Duplicate it. Delete it. Print it. Export it (for storage or transfer to other computers). Renaming an Activity Not only can you rename an activity, but you can also change the folder it is stored in. This can help you organise your activities.
Printing an Activity This will print all the pages of your activity. To give a preview, the pages are shown on the screen. After the first page appears, click on the pages to go through them. You can also print what is on the screen at any time. Windows computers: hold down the Ctrl key and press the P key. Macintosh computers: hold down the Apple key and press the P key.
Sharing Activities with Other People (Free Player) Do you want to give your activities to someone who hasn’t got ChooseIt! Maker 2? First you need to export the activity. (See above). We have provided a free Player version of ChooseIt! Maker 2 on the CD that you can give to others along with your activities. These may be: • • • • Parents or carers of students. Practitioners in other schools or colleges. Partner schools in other countries.
Content File Types Supported by ChooseIt! Maker 2 ChooseIt! Maker 2 can load the following file types: Images (pictures and photos): jpg (jpeg) gif tif (tiff) emf bmp (bitmap) png wmf (windows meta file) Audio (sound, music and voice-over): wav mp3 aiff Where to Plug in your Microphone Microphone sockets on computers are often marked differently. Here are some tips on finding it: Windows computers: • Often pink in colour.
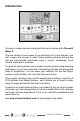
Setting up your Microphone If you find your microphone doesn’t work in ChooseIt! Maker 2, the microphone recording level on the computer may be turned down or even switched off. Windows XP 1. Windows comes with a program called Volume Control. To run this, click Start, then Programs, then Accessories, then Entertainment, then Volume Control. 2. Click the Options menu and choose Properties. 3. Click in the Recording radio button, as shown. 4. From the list below the radio buttons, tick the Microphone box.
You should now see something like this. You can use Windows Sound Recorder to test your microphone. To run this click Start, then Programs, then Accessories, then Entertainment, then Sound Recorder. You can also use this to help you refine the recording level in Volume Control (as seen above). If the recording is distorted, try lowering the microphone volume level by dragging the slider down.
Windows Vista and Windows 7 Recording devices and levels can be configured in the Sound program (located in the Control Panel): The graphic on the right hand side of the window should rise and fall as you speak into the microphone. To adjust input levels, click on the relevant recording device, click Properties then select the Levels tab (see below). If recorded messages sound distorted, you may need to lower the input level and Microphone Boost level.
Getting Music off Music CDs Activities that play your students’ favourite music are always going to be highly motivating, but you probably don’t want the whole song to play in response to a single switch press. However, getting a 10 second snippet off a CD is tricky. The easy method: use ChooseIt! Maker 2 and play the CD in an ordinary CD player. Record using a microphone put up to the CD player’s speaker. Method for Windows users who want quality You will need to use three Windows programs.
Connecting switches Switches come in all shapes and sizes. For example, the Smoothie Switch is a simple round plastic button that can be pushed down. It springs up again when you take your hand off. This means it is a ‘nonlatching’ or ‘momentary’ switch, like a doorbell. Most switches available for special needs use are of this type. To use a switch with ChooseIt! Maker 2, you will need to attach it to the computer using an interface box. There are a number of interface boxes available.
Summary of Access Options Mouse and Touch Screen I f the program is set for mouse access, any of the mouse buttons will operate as a single switch. The mouse can also work as two switches: if the Two Switches option is selected, the left and right mouse buttons will operate as two separate switches. Touch screens will work as a single switch. Just touch anywhere on the screen! In the touch screen control panel, set the touch mode to drawing or click on touch for the best drag and drop performance.
Switches Switches can be connected to the computer in a variety of ways. As a rule however, switches should act as if the Space bar or Enter keys are pressed. The descriptions below will cover many of the options: • Simple Switch Box - just plug your switches into the Space and Enter sockets. • Inclusive Multiswitch - plug your switches into sockets 1 and 2. If this does not automatically work with the program, make sure its software is set up so the switches act like the Space bar and Enter keys.
• Serial Switch Box - go to the Serial Switches menu screen and click on Setup Serial Switches. Select the COM port through which your switch box is connected. • Don Johnston Switch Interface Pro 6.0 - plug your switches into the left hand sockets. Then click the settings button until a blue light appears. • IntelliKeys - if you are connecting switches through an IntelliKeys keyboard, go to the menu screen and click on IntelliKeys.
The Inclusive Technology Troubleshooting Guide This is a simple guide to common problems when trying to install, remove or use any new software. If you need any further assistance, please contact us. Our online support website is available at www.inclusive.co.uk (click on support), e‑mail us on support@inclusive.co.uk or telephone Technical Support on 01457 819723. 1. I put my CD in and nothing happens. To install the software, do the following: • Click on ‘My Computer’.
4. I would like to remove the software but don’t know how. There are two ways to remove programs: a) Go to the Windows Start menu. Click Settings and then Control Panel. Double-click on ‘Add or Remove Programs’. This will bring up a window showing all software installed on your computer: Click on the Change/Remove button and follow the prompts to remove the software. b) Not all software appears in Add/Remove programs. If your software does not, follow these steps: • Open ‘My Computer’ (see Question 1).
(If it doesn’t look much like this, click on the word Shortcut at the top of the window.) c) Add “ /c” to the end of the text in the Target window. For example, if the text ends ChooseIt.exe” Change this to ChooseIt.exe” /c Remember to type a space before /c. Also make sure the / is not a \. d) Now click the OK button at the bottom of the window. Now try running the program again.