70062
Table of Contents Package Contents 1 Features 2 FCC Regulation 3 Monitor Features & Controls 4 Camera Features & Controls 5 Important Safety Instructions 6 Battery Installation & Set-Up 7 Camera Operation & Installation 8 Monitor Operation & Installation 9 Troubleshooting 12 Warranty 13
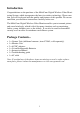
Introduction Congratulations on the purchase of the MobiCam® Digital Wireless Video Monitoring System, which incorporates the latest in wireless technology. We are sure that you will be pleased with the quality and features of this product. We recommend that you read these instructions carefully before use. The MobiCam® Digital Wireless Video Monitor enables you to transmit picture and sound wirelessly, which is ideal for many situations such as monitoring babies, young children, pets, or the elderly.
Features • DigiLock™ Wireless with (FHSS) technology for private and secure, noise-free performance • No installation needed, ready to use out of the box • Compact design for easy portability • Transmission range up to 900 ft. outdoors and 450 ft. indoors Note: Actual range can vary depending on the environment. • Automatic Night Vision mode with 30 ft.
FCC Regulation This equipment has been tested and found to comply with the requirements of the FCC. These requirements are designed to provide reasonable protection against harmful interference in a residential installation. This equipment generates, uses, and can radiate radio frequency energy, and if not installed and used in accordance with the instructions, may cause harmful interference to radio communications.
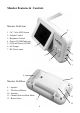
Monitor Features & Controls Monitor Unit Front 1 - 2.
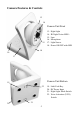
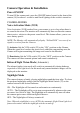
Camera Features & Controls 13 14 Camera Unit Front 15 13 - Night Light 14 - IR Night Vision LED’s 15 - Lens 16 - Microphone 17 - Light Sensor 18 - Power ON/OFF with LED 18 16 17 Camera Unit Bottom 19 22 20 21 5 19 - Link/Code Key 20 - DC Power Input 21 - Night Light Mode Switch 22 - Voice Activation (VOX) Switch
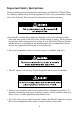
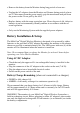
Important Safety Instructions Please read this instruction manual before using your MobiCam® Digital Wireless Monitor. When using electrical appliances, basic safety precautions should always be followed. Please keep this information for future reference. • Periodically examine this product for damage to the cord, housing or other parts that may result in the risk of fire, electric shock or injury. Do not operate any product with a damaged cord or plug.
• Remove the battery from the Monitor during long periods of non-use. • Unplug the AC adaptors from the Monitor and Camera during periods of non use. To disconnect from the power supply, grip the transformer and pull from the power socket. Never pull by the cord. • Replace battery with the same equivalent type. Please dispose of old, defective batteries in an environmentally friendly manner in accordance with the relevant legislation. • Only use the Monitoring System with the supplied power adaptors.
Camera Operation & Installation Power ON/OFF To turn ON the camera unit, press the ON/OFF button located at the front of the camera (18) for about 1 second or until back lighting of the switch is turned on. CAMERA MODES: Voice Activation Mode (VOX) Voice Activation (VOX) mode allows your camera to go to sleep when there is no sound in the room. The monitor will automatically turn on when the camera detects noise– subject to the preset sound level. This feature allows you to conserve battery power.
Monitor Operation & Installation NOTE: For best performance it is recommended to keep units at least 7-8 feet away from other wireless devices. Power ON/OFF To turn on the monitor unit, slide the LCD Power On/Off switch (5), located on the right side of the monitor, to the “ON” position. LCD Off When the LCD Power On/Off switch (5) is set to the center, LCD OFF position, the unit can be used as an audio-only monitor.
• Slide the channel selection switch (11) to select the desired Channel (A, B, C). • Press and hold the “+” brightness button marked B (3) and turn the monitor ON (5) simultaneously. • The monitor will display the word “PAIRED” • Turn off both the Camera and Monitor, then turn both units back on and the pairing process is completed. • Repeat the same process to pair a new camera. To Disconnect the Paired Camera • Turn the monitor OFF. • Select the Channel/Camera you want to de-link on the monitor (11).
Brightness Control & Volume Control The brightness control of the LCD can be adjusted by pressing the Brightness Control Button (“B”) located on the front of the Monitor (3). Press the “+” to increase and “–” to decrease the brightness of the LCD. The volume control of the LCD can be adjusted by pressing the Volume Control Button (“V”) located on the front of the Monitor (2). Press the “+” to increase and “–” to decrease the volume on your monitor.
Troubleshooting NORMAL SOLUTIONS PROBLEM Screen turns on and off • The “VOX” mode is selected on the camera, when there is no noise detected by the camera it stops transmitting to save power. To turn off select “OFF” under the “VOX” settings switch. No reception at Monitor • • • • • No picture display but can hear sound • Check if the LCD on/off switch.
Limited Warranty Mobi Technologies, Inc. warrants this product to be free from defects in material and workmanship for a period of ninety (90) days from the date of purchase. Should this product prove to be defective at any time during the warranty period, Mobi Technologies, Inc. will, at its option, either replace or repair it without charge. After the warranty period, a service charge will be applied for replacement of parts or labor for repair.
Expand Your Monitoring Possibilities... The available MobiCam® Digital Additional Camera (#70063, sold separately) can be added to your system (for a total of 2 or 3) so you can switch between them, either automatically, or at the touch of a button.