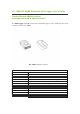
GT-120B/GT-600 600B Bluetooth GPS Logger User’’s Guide Product roduct Brand: Mobile Action Package contents & specifications The GPS Logger package comes with 1 GPS data logger logger, and 1 color jelly case, case and 1 fastening strap (GT-600B) 600B). GT-120B package contents GT-120B Dimension 44.5 x 2 28 x 13.5mm Weight 2 21.
GT-600B package contents GT-600B Dimension 46 x 4 42 x 14 mm Weight 3 34g Antenna Built Built-in GPS patch antenna Memory 64M bit Flash Memory to store 260,000 waypoints Battery Built Built-in 750mAh Lithium-ion battery LED indicators 2 LEDs for On/Off/Charge/Logging status indication Cold start < 35 seconds Wireless Interface Bluetooth 5. 5.2 Connection interface USB 2.
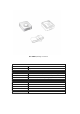
USB Cable USB 2.0 Cable works both as GT-600B / GT-120B built-in battery charger and data transfer medium for GT-600B / GT-120B. i-gotU GPS Software i-gotU GPS is an easy to use software tool to manage and visualize the GPS waypoints recorded on your device . Follow the on-screen instructions to complete the installation. GPS Logger jelly case Besides especially designed for broader appliances, both GT-120B & GT-600B also comes with a jelly case for easier wear or any other kind of attachment.
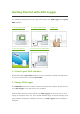
Getting Started with GPS Logger The following demonstrates how to get started with your GPS Logger and i-gotU GPS software: 1. Installi-gotU GPS 4. Get first GPS fix 2. Charge GPS Logger 3. Power on 5. Connect PC to import data 1. Install i-gotU GPS software Please download i-gotU GPS software from the company’s website and follow the on-screen instructions to install i-gotU GPS. 2. Charge GPS Logger The USB Cable serves as a charger as well as data transfer medium.
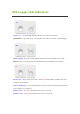
Tip: You can also use any market available standard USB car charger or USB travel charger to charge up the battery power for your GPS Logger. 3. Power on/off your GPS Logger Long press the button to power on/off your GPS Logger. The blue LED indicator blinks once upon power-on, and the red LED indicator blinks upon power-off. Tip: Go to GPS Logger LED indicators to familiarize yourself with the LED indicators. 4.
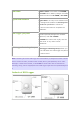
GPS Logger LED Indicators Power On : The blue LED indicator blinks once every 4 seconds. Operation: Long press (over 1.5 seconds) the button to power on GPS Logger. Data Logged : Both the red and blue indicators blink simultaneously twice. Status: Device is powered on and GPS data has been logged successfully. Power Off : Short press the button, and the red LED blinks indicates the GPS Logger is powered off.
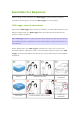
Essentials For Beginners Before hitting on the road with your GPS Logger, please read the following information thoroughly to ensure the GPS Logger to work properly. GPS Logger wear & attachment When taking GPS Logger from indoors to outdoors, it usually takes longer to get a GPS fix. Please place your GPS Logger face-up toward the sky and press the button to acquire a GPS fix.
GPS Logger setup Click Device Settings button on the main menu bar of i-gotU GPS software to configure your GPS Logger. GPS Logger is water-resistant, designed for a broader use. Multiple tracking modes with different data logging intervals work for both short & long journey.
GPS Classroom What is GPS: Global Position System (GPS) is developed and operated by the Department of Defense (DOD) of the United States, on which the accuracy and maintenance of this system fully depends. Any change made by the authorities might influence the accuracy and performance of the GPS equipments. How GPS works: GPS provides satellite signals which are specially coded for the computation in a GPS receiver to produce the position, velocity and time.
Any changes or modifications not expressly approved by the party responsible for compliance could void your authority to operate the equipment. Note: This equipment has been tested and found to comply with the limits for a Class B digital device, pursuant to part 15 of the FCC Rules. These limits are designed to provide reasonable protection against harmful interference in a residential installation.