CONTENTS CX FLEX™ PRODUCT MANUAL Product Manual for CX FLEX™ Single-Power+ WORKS WITH Contents 1. Materials in Box 2 2. Installation 2 3. Key Whitelist 3 4. Merchandising 3 5. Managing Alarms 4 6. Cable Removal 4 7. Remerchandising 4 8. Adding New User Keys 5 9. Deleting Whitelist 5 10. LED Status Indicators 6 11. Dimensions 8 12. FCC and ISED Statement 9 DO NOT REMOVE FROM STORE For additional support, please reach out to our Contact Center at 800-426-6844 www.
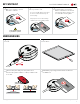
MATERIALS IN BOX CX FLEX™ PRODUCT MANUAL CX FLEX™ Single-Power+ USB-C Female End Optional Power Supply (400-00118) USB-C Male End INSTALLATION 1 Clean the desired surface with an alcohol pad allow it to 2 Feed power cable through hole in fixture (if needed), 3a Use the individual power supply and plug it into 3b Alternately, use the Power Supply provided with completely dry. Peel the red film from the VHB adhesive. the nearest outlet.
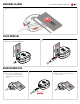
KEY WHITELIST CX FLEX™ PRODUCT MANUAL 1 Place Authorization Card over the RFID icon to register to system. LED will be solid blue. 2 Place the User Key over the RFID icon you want to add. If successful unit beeps 2 times If unsuccessful unit beeps 4 times (retry) 3 To close the whitelist mode, place the Authorization Card over the RFID icon. Whitelist mode will end automatically after 3 minutes of no use. LED will be flashing white.
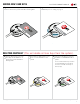
MANAGING ALARMS CX FLEX™ PRODUCT MANUAL 1 To silence an alarm, hold the user card over the RFID icon. To disarm after silencing an alarm, hold the user card over the RFID icon for 5 seconds. CABLE REMOVAL 1 Insert a corner of the RFID card into the slot and press down until the cable ddetaches. 2 Remove the cable. REMERCHANDISING 1 From an armed state, place the user key over the RFID icon to disarm the system. LED will be flashing white. Then remove the cable. 2 Insert new cable until it clicks.
ADDING NEW USER KEYS CX FLEX™ PRODUCT MANUAL 1 From an armed state, place the user key over the RFID icon to disarm the system. LED will be flashing white. 2 Place Authorization Card over the RFID icon. Follow Key Whitelist process starting on page 3. DELETING WHITELIST (This will delete all User Keys from the system.) 1 From an Armed state, place the User Key over the RFID icon to disarm the system. LED will be flashing white. www.mtigs.com | T:800.426.
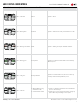
LED STATUS INDICATORS Visual Reference CX FLEX™ PRODUCT MANUAL System Status Condition Solution LED is solid white. Armed System is armed. LED is flashing white. Disarmed System is disarmed and is ready to merchandise or re-arm. LED is flashing red and white. Alarm System is alarming and requires immediate attention. LED is flashing green. Factory Reset System has no whitelist or Authorization Card. Follow key whitelist process. LED is solid green.
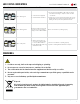
LED STATUS INDICATORS Visual Reference System Status LED is flashing blue. LED is flashing yellow. LED is solid yellow. CX FLEX™ PRODUCT MANUAL Condition 1. Connect Provisioning Mode 2. Overcurrent when disarmed Ready to be Armed, provisioned for Connect, but not communicating to Connect Mesh Network 1. Armed, provisioned for Connect, but not communicating to Connect Mesh Network 2. Delete Whitelist Mode (If using Authorization Card) Solution 1.
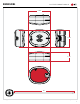
DIMENSIONS CX FLEX™ PRODUCT MANUAL 2.36” 1.09” 1.87” 18” www.mtigs.com | T:800.426.
FCC AND ISED STATEMENT CX FLEX™ PRODUCT MANUAL FCC ID: 2AA2X-15000204 Model: CX Flex Single-Power+ FCC Statement This device complies with Part 15 of the FCC Rules. Caution: If any changes or modifications not expressly approved by the party responsible for compliance could void the user’s authority to operate the equipment.