
User manual


2.5 Mounting the Camera
2.5.1 D22-IT/Secure
Before mounting the MOBOTIX D22-IT/Secure, you need to prepare the network
connection and drill the holes for the fixtures:
• Network connection: The network cabling is supplied through the ceiling di-
rectly above the camera. The cabling is perfectly protected and cannot be
seen or damaged. When preparing the installation, you should make sure
that the cable runs at least 15cm (6in) within the camera housing (excluding
the connector itself). This will ensure that you can turn the lens unit freely later
on.
Note: When using a wall outlet (either flush-mounted or on-wall), the D22-IT/
Secure will have to be mounted using either the On-Wall set or the Outdoor
Wall Mount. The D22-IT/Secure models cannot be mounted directly on top of
wall outlets.
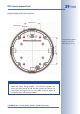
• Drilling the holes: Prepare the holes in the ceiling. Make sure that you have
the supplied dowels ready for this purpose. Use the supplied drilling tem-
plate for the mounting ring of the D22-IT/Secure (fold-out at the end of this
manual) to mark the position for drilling the dowel holes and the holes
through which the cables will be led later on.
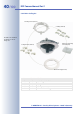
Procedure
• Use the delivered screws to affix the cam-
era's mounting ring to the ceiling. The outer
shell will be used later in the mounting proc-
ess.
• Continue with section 2.5.3,
Finishing the Mounting Process
.
© MOBOTIX AG • Security-Vision-Systems • Made in Germany
www.mobotix.com • sales@mobotix.com
48/100
D22 Camera Manual Part 1
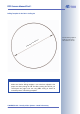
Find the folded drilling
template for the mounting
ring of the D22-IT/Secu-
re models at the end of
the manual!
Maximum torque for all
screws is 1 to 1.2Nm
(0.74lbf ft)
Caution
Only use the factory pre-installed network cable of the MOBOTIX
camera. It is very important that the rubber plug of the network
cable reliably protects the housing from moisture entering the ca-
mera. All openings of the camera housing need to be closed off
properly. This will ensure that the camera remains weatherproof.