
User manual


2.5.2 D22-Basic
Before mounting the MOBOTIX D22-Basic, you need to prepare the network con-
nection and drill the holes for the fixtures:
• Network connection: The network cabling is supplied through the ceiling di-
rectly above the camera. The cabling is perfectly protected and cannot be
seen or damaged. When preparing the installation, you should make sure
that the cable runs at least 15cm (6in) within the camera housing (excluding
the connector itself). This will ensure that you can turn the lens unit freely later
on.
Note: As an alternative, you can also connect the camera above a wall outlet
(either flush-mounted or on-wall types). Note, that the cabling remains visible
in this case. The D22-Basic model cannot be mounted directly on top of wall
outlets.
• Drilling the holes: Prepare the holes in the ceiling. Make sure that you have
the supplied dowels ready for this purpose. Use the supplied drilling tem-
plate for the D22-Basic (fold-out at the end of this manual) to mark the posi-
tion for drilling the dowel holes and the holes through which the cables will
be led later on.
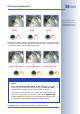
Procedure
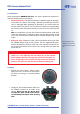
• Remove the camera dome. Take the deliv-
ered plastic foil or a cotton cloth and remove
the dome by turning it in counter-clockwise
direction.
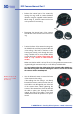
• Unplug the pre-installed network cable from
the network connector at the inside of the
camera. Make sure that you do not touch
any electronic parts insinde! Static electric-
ity could destroy these parts when touching
them.
© MOBOTIX AG • Security-Vision-Systems • Made in Germany
www.mobotix.com • sales@mobotix.com
49/100
D22 Camera Manual Part 1
Find the folded drilling
template of the D22-Ba-
sic at the end of the man-
ual!
Caution
Only use the factory pre-installed network cable of the MOBOTIX
camera. It is very important that the rubber plug of the network
cable reliably protects the housing from moisture entering the ca-
mera. All openings of the camera housing need to be closed off
properly. This will ensure that the camera remains weatherproof.