
User manual
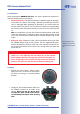


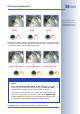


• Release the internal part of the camera by
turning the ring inside in counter-clockwise
direction using the supplied toothed wrench.
While doing so, hold the camera at the lens
unit to prevent it from turning.
• Disengage the internal part of the camera
with the lens unit from the base of the hous-
ing.
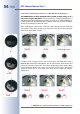
• Position the base of the camera housing over
the drilled holes and the prepared cable exit
in the ceiling. If the holes in the base of the
housing are closed, push through the holes
using a suitable tool or use a suitable drill bit
to open the holes. Caution: These holes will
need to stay closed on D22-IT/Secure
models.
Make sure that the cable is at least 15cm (6in) long within the camera hous-
ing (excluding the connector itself), as in the factory-installed cable.
It is very important that the rubber plug of the network cable reliably pro-
tects the housing from moisture entering the camera. This will ensure that
the camera remains weatherproof.
• Use the delivered screws to mount the base
of the camera to the ceiling.
If the cabling from the ceiling is not directly
beneath the camera, make sure that the net-
work cable is not damaged by one of the feet
of the camera base. When tightening the
screws of the camera base, the base will lock
the cable in place, thus securing the cable
against the ceiling. The cable is now firmly
installed and cannot be pulled out or reposi-
tioned.
© MOBOTIX AG • Security-Vision-Systems • Made in Germany
www.mobotix.com • sales@mobotix.com
50/100
D22 Camera Manual Part 1
Maximum torque for all
screws is 1 to 1.2Nm
(0.74lbf ft)