
Specifications

69/148
First Installation Steps
© MOBOTIX AG • Security-Vision-Systems • Made in Germany
www.mobotix.com • sales@mobotix.com
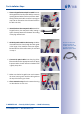
3.
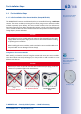
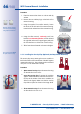
Remove hinged ferrite and pull out cable
: Remove
the hinged ferrite from the patch cable by cautiously
opening the two latches with a small screw driver.
Gently pull the patch cable out of the housing (you
may have to remove the foot of the wall mount to
be able to do this).
4.
Attach ferrite at the new patch cable
: Attach the
hinged ferrite at the new patch cable, leaving a
space of exactly 70mm/2.8in between the sealing
of the plug and the ferrite.
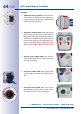
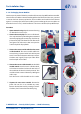
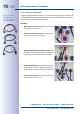
5.
Guide the patch cable into the housing
: Guide the
new cable from the front through the cable guide
in the hinge of the VarioFlex mount (see figure).
Reinstall the foot of the wall mount if you removed
it in step3.
6.
Connect the patch cable
: Insert the plug of the
Ethernet cable into the appropriate connector. Apply
bayonet catch as shown and turn it clockwise until
it gently snaps shut.
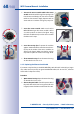
7. Make sure that the hinged ferrite rests between
the inner housing cover and the cable guide at
the top of the housing as shown.
8.
Close camera housing:
Close the camera housing
as described in
Section 2.2.8
.
70mm/2.8in
In order to ensure the
weatherproofness of
the M15, make sure that
you only use genuine
MOBOTIX patch cables!