
Specifications


78/136
M25M Camera Manual: Installation
© MOBOTIX AG • Security-Vision-Systems • Made in Germany
www.mobotix.com • sales@mobotix.com
2.6 Replacing the MicroSD Card
The camera must be taken down to remove, insert or replace a MicroSD card. To avoid
data loss, be sure to deactivate MicroSD card recording in the camera software and reboot
the MOBOTIX camera before removing the card.
Caution
A MicroSD card may only be removed from the camera after you have deactivated
Recording to SD Card and rebooted the camera. Failing to do so may lead to loss of
data! Make sure that the card is not write-protected!
2.6.1 Removing the MicroSD Card
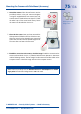
1. Deactivate recording: Recording to MicroSD card must
be deactivated (Admin Menu > Storage on External
File Server/ Flash Device). If MicroSD card recording is
still active, deactivate recording and reboot the camera.
Section 3.4, «MicroSD Card Recording»
, contains more
information on this topic.
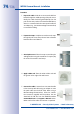
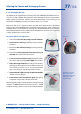
2. Remove camera from the weatherproof housing:
Remove the two lock screws from the weatherproof
housing and then remove the camera from the hous
-
ing. In doing so, do not pull too hard on the lens cover. If
required, use the long side of the 5mm Allen wrench to
carefully push the camera out of the housing from behind
through the screw holes.
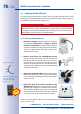
3. Remove the connection cables: The connected cables
(patch cable, MiniUSB) must be removed from the camera
first by rotating and opening the bayonet catch (MxBus
see
Section 2.7.6
).
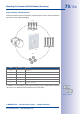
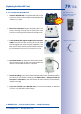
4. Remove the back of the camera and take out the
MicroSD card: Remove the four screws from the back
plate using the supplied 2.5 mm Allen wrench and care
-
fully lift o the back plate. Gently push on the MicroSD
card in the card slot of the camera. The card is released
from the slot and can be removed from the camera.
To use the camera without a MicroSD card, continue by mounting the back plate (see
step2 in
Section 2.6.2
).
Bayonet catch open
Push-push operation: only
remove the MicroSD
card after rst gently
pushing it in
Click!