
Instructions / Assembly
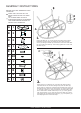

Table Of Contents

TABLE ASSEMBLY INSTRUCTIONS
ASSEMBLY INSTRUCTIONS
BEFORE YOU START ASSEMBLING YOUR
FURNITURE:
CHECK THAT YOU HAVE ALL THE
PIECES LISTED ON THE LEFT HAND
SIDE.
LAY A CLEAN SHEET ON A FLAT
SURFACE BIG ENOUGH TO ASSEMBLE
YOUR FURNITURE ON IN ORDER TO
PROTECT YOUR FURNITURE.
A
1
B
2
C
2
D
1
E
4
F
20
G
1
H
1
I
8
J
8
L
1
1.
Laying the table top, (A) on the ground, top facing down, attach
both table legs(B) so they are parallel to each other and insert
screws (E) through a washer (F) and into the screw hole of the table
leg (E) and into the table top. Then loosely tighten the screws with
the allen key(G).
J
2.
Adjoin parts (C) to table legs (B), (ensuring the rattan is facing
outwards and the curved end is facing away from the table top).
Secure parts (C) in place by connecting the bolt tabs of (B) and (C) in
all eight places as shown in the above image. Do this by putting bolt
(J), through a washer (F), then through the connecting tabs. Then
secure with another washer followed by a nut (I). Loosely tighten
each of the bolts as you go. Once all screws and bolts are in place,
fully tighten the nuts bolts using the allen key, (G), and spanner, (H).
Then fully tighten the screws from step 1.
B
E
F
A
B
F
I
C