
User guide

Set up a Virtual Private Network (VPN) 129
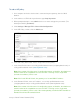
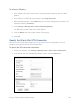
3. To enable the tunnel, select the Tunnel Enabled check box.
4. In the Site Name field, enter a unique name for VPN.
Note: If the remote gateway is behind a NAT firewall then the name of the tunnel must
be anonymous.
5. If you want to use only responder mode, select the Responder Mode check box.
By default, this check box is not selected so that the VPN connection can work as the
initiator or responder. In responder mode, the connection has to be initiated by other
end.
Note: If the remote gateway is behind a NAT firewall, enable the responder mode. The
tunnel must be initiated from the remote gateway.
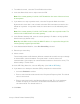
6. In the Remote Gateway field, enter the remote gateway's IP address or fully qualified
domain name (my.domain.com).
Note: Dynamic DNS can be useful if the WAN IP address is expected to change if the
remote gateway supports Dynamic DNS.
7. In the Authentication Mode list, leave Pre-Shared Key selected.
8. Enter the pre-shared key.
9. Select a mode.
Tunnel mode protects traffic between different networks when traffic must pass through
an intermediate, untrusted network. Transport mode is used for end-to-end
communications (for example, for communications between a client and a server). The
default setting is Tunnel mode.
10. In the IKE Policy Name list, select an IKE policy. (See Add an IKE Policy.)
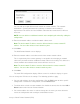
11. If you want to use dead peer detection (DPD), complete the relevant fields:
Select the Enabled check box.
Enter a value from 10 to 30 seconds in the Requested Frequency field. The default
value is 30 seconds.
Enter a value from 3 to 5 in the Maximum Requests field. This is the maximum
number of requests to send at the selected time interval before the tunnel is
considered dead. The default value is 5.
12. Click Next.