
User guide
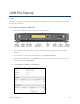

USB File Sharing 56
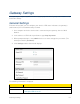
6. To allow file sharing, select Enable in the File Server field.
When this feature is enabled, all of the files on the USB drive are available as Windows
Shared Files to other devices on the local area network (LAN). Shared files are not
available to clients on the Internet outside of the local network.
7. In the Domain Name field, specify the network name.
This feature allows a computer on the LAN to access the shared files with a name rather
than the IP address. The host name displays in the Windows Network on local network
computers. Files can be accessed with the router’s IP address (for example,
\\192.168.15.1), the host name (for example, \\dslrouter), or the link in the network
neighborhood.
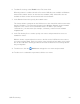
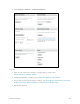
8. In the File Sharing Users section, specify user names and passwords for access to
network file shares.
With this feature, anyone who tries to access the files on the USB device must enter a
user name and password. Each user can be set to read only or have write access to the
files on the USB drive. Existing passwords cannot be viewed. You must change them if
they are forgotten.
9. To add a user, click the Add button and type the user name and password.
10. To edit a user’s credentials or password, click the user name.