MRC Prodigy Advance User’s Manual
TABLE OF CONTENTS 1 Getting Started Introduction ............................................................................................................ 1-1 DCC Basic Background ........................................................................................ 1-1 Specifications and Features ................................................................................. 1-2 System Menu Summary Chart .............................................................................
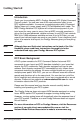
1 Introduction Thank you for purchasing MRC’s Prodigy Advance DCC (Digital Command Control) system. You now own one of the most advanced, easy to use DCC systems available. It comes as a complete system with a Command Station (base unit), power supply and LCD Cab/Handheld with cable. The MRC Prodigy Advance DCC system will enhance the enjoyment of your train layout for many years to come. Here at MRC, we pride ourselves in giving you the most advanced, reliable and easy to use DCC train controls.
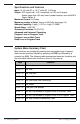
Specifications and Features Input: 15-16 volts AC or 16-17 volts DC, 3.5 Amps Output: DCC signal with 14.5 V amplitude, for HO and N scales Scales larger than HO may need a power booster, such as MRC’s Power Station 8 Maximum Current: 3.
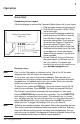
2 Operation Quick Start Connecting to Your Layout Follow the diagram to connect the Command Station (base unit) to your layout. Prodigy Command Station (base unit) Power To Main Track To Program Track Running a Loco Note First, turn the Cab switch on the base unit to “Cab #1 to #8” for faster response time. We will explain the reason later. To run a loco, you have to first know its address. Most decoders you purchase have the factory default address #3.
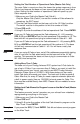
Controlling Accessory Functions To control accessory functions F1 - F9, press 1 - 9. To control F10 - F19, press SHIFT, then 0 - 9. When F1-F12 are on, F1 - F12 will be displayed on the LCD. F13 - F19 will not be displayed. F1 Loco REV왔 Speed F11 The left LCD display shows that the current loco is 3802 running in reverse at a speed of 102. Its accessory functions F1 and F11 are on. Recalling Locos To call up previous locos stored in the memory, press RECALL. You can recall up to 25 locos.
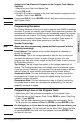
speed until 0. Continuing turning counterclockwise will reverse the loco’s direction. Continuing turning counterclockwise will increase the loco’s speed in the reverse. Turning clockwise will decrease its speed in the reverse until 0. Continuing turning clockwise will reverse the loco’s direction and set it forward. Fast Clock AM Loco FWD왖 Time Speed To view the fast clock, press TIME. The time will replace the address display on the LCD. You can still run the current loco while the time is displayed.
Setting the Total Number of Operational Cabs (Master Cab Only) The more Cabs in use at one time, the slower the system response is from Cab to loco because the base unit can communicate with only one Cab at a time. Setting the total number of operational Cabs will speed up your Cab’s response time. 1. Make sure your Cab is the Master Cab (Cab #1). Only the Master Cab (Cab #1) can set the number of Cabs allowed to operate on the DCC layout. 2.
Setting Last Cab Allowed to Program on the Program Track (Master Cab Only) 1. Make sure your Cab is the Master Cab. 2. Press SYS and 8. 3. Using 0 - 9, enter the number of the last Cab allowed to program on the Program Track. Press ENTER. Example If you press SYS, 8, 2, and ENTER, Cab #3 and above cannot program on the Program Track. Programming Decoders Decoder Terminology Note Before you start programming, please familiarize yourself with the following terminology.
4. Next, “SV” will flash, prompting you to program the Start Voltage. Input data and then press ENTER. 5. Next, “Acc” will flash, prompting you to program the acceleration rate. Input data and then press ENTER. 6. Next, “dEc” will flash, prompting you to program the deceleration rate. Input data and then press ENTER. 7. Next, “TV” will flash, prompting you to program the Top Voltage. Input data then press ENTER. 8. Finally, “CV#” will flash, prompting you to program a CV (Configuration Variable).
3. First, “Adr” will flash, prompting you to read the loco address. Press ENTER to read or press SHIFT to skip to the next item. It may take several seconds to retrieve the address. If the decoder does not support read back feature, you will receive an “Err” (Error message). 4. Next, “SV” will flash, prompting you to read the Start Voltage. Press ENTER to read or SHIFT to skip. 5. Next, “Acc” will flash, prompting you to read the acceleration rate. Press ENTER to read or SHIFT to skip. 6.
A Word About CV #29 CV29 is the most important CV of the decoder. Improperly programming the CV29 may cause decoder malfunction. We do not recommend you program CV29 yourself because the unit will take care of it for you in most cases. When you program your decoder’s address with Prodigy Advance, it will automatically program CV29. If you want to reverse the loco’s polarity or set 14 speed steps, you have to reprogram CV29 after programming the loco’s address.
4. “Add Loco” will display again, prompting you to add another loco into the consist group. You can add as many locos into the consist as you would like. To end programming, press ENTER. Running Advanced Consists Running Advanced Consist is just like running a single loco. After setting up your consist group, use the consist number to run the consist. 1. Press the LOCO key. Make sure “Loco” appears on the LCD. If not, press the LOCO key again. Enter the consist number and press ENTER. 2.
2. “LEAd Loc” will flash, prompting you to enter the address of the lead loco. Enter the lead loco’s address. Press DIRECTION if you want the loco’s direction reversed (forward is default setting) and press ENTER. 4. “Add Loco” will flash, prompting you to add another loco into the consist group. Enter a loco address. Press DIRECTION if you want the loco’s direction reversed (forward is default setting) and press ENTER. 5. “Add Loco” will flash again, prompting you to add another loco into the consist.
Setting Time (Master Cab only): 1. Make sure your Cab is the Master Cab. 2. Press SYS and 1. The current time will be momentarily displayed. 3. Enter the new time. Press ENTER. Setting Time Rate (ratio) (Master Cab only): The time rate is how many real seconds are in one fast clock minute. Example Rate 1 means that one real second equals one fast clock minute, or 60 times as fast as real time. Rate 30 means 30 real seconds equal one fast clock minute, or twice as fast as real time.
Most accessory decoders have their own unique address (CV #513) and some have multiple outputs (groups of 4). Accessory decoder’s and loco decoder’s addresses are different, so they can be operated independently of each other (even if the address values are the same). Exception The MRC #AD360 Dispatch Decoder uses a short (1-127) mobile decoder address. You can treat the MRC #AD360 as a loco decoder and use accessory functions F1 and F2 to operate it. It is very easy to use and program.
3 Trouble Shooting General Trouble Shooting It takes the Command Station, the decoders and your layout to make the DCC system work. This Trouble Shooting Section has been arranged in a manner easiest for you to find the cause of your problem. Please go through this section in the exact order it appears because each following set of instructions assumes that the preceding set has been tested and that component of the DCC system found not defective. 1. Turn on the power of the base unit.
9. The base unit may have a Universal Consist controlling your decoder. Clear the old consist by pressing CONSIST until “Cons oLd cLr” flashes in the display. Then press ENTER. 10. The current loco speed command may not match the decoder’s speed steps. Reprogram your decoder’s address. When you program the decoder with Prodigy Advance it will automatically set the decoder’s speed steps to 28/128. Select 28 or 128 speed steps on the base unit and then try to run the loco. 11.
Your loco doesn’t work while other locos work The decoder may have lost its memory. Reprogram loco address. Your Cab doesn’t work while other Cabs work Unplug the Cab, wait 3 seconds and plug the Cab in again. If the Cab does not display anything, please check the cable connection as mentioned above. Make sure each Cab address is unique. Make sure your Cab address is an operational address. If the Cab still does not work, it may be a defective Cab.
© 2004 Model Rectifier Corporation 80 Newfield Avenue Edison, NJ 08837 www.modelrectifier.