
Instruction manual

4. Installing the Keel/Stem & Sternpost
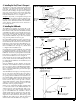
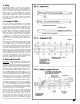
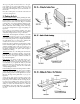
The ship has no real point of change between the keel
and stem, so we will call it a keel/stem. The laser-cut
keel/stem, and sternpost can now be added. Taper
the keel/stem according to the plans before gluing in
place or do it later. Dowels can be used to help align
and hold the pieces. Remove any glue squeeze-out
from the rabbet before it sets (see figure 3).
An Option:
If you like, you can glue the sternpost and
keel/stem onto the center keel before cutting the rab
-
bet. This makes cutting the rabbet a little more diffi-
cult, but on the other hand, it makes the installation
of the sternpost and keel/stem easier since there is
more gluing surface.
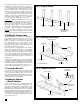
5. Installing the Bulkheads
The bulkheads are labeled “A” through “M”. Com-
pare the laser-cut bulkheads with the plans to deter-
mine which is which, and label each bulkhead. Check
each bulkhead to make sure it will slide into the cen-
ter keel slots. Machine tolerances during laser cutting
may provide a too tight fit. Sand the slots, if neces-
sary, until the bulkheads slip on. The fit should be
snug, allowing a little tolerance for glue.
On each bulkhead, mark the location of the WL ref-
erence lines in pencil. This mark should line up with
the WL mark on the center keel. It will assure that the
hull form is accurate and that each bulkhead is cor-
rectly related to the others. There are two WL marks.
One is for Bulkhead “A” through “L”, and the other
is a higher mark for Bulkhead “M”.
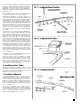
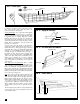
Next, mark the bevels on the bulkheads. Use a tick strip
to transfer the bevel line as shown on the plans, or cut
the bulkhead patterns from the plan and glue onto the
bulkheads. You can also lay the pattern over the bulk-
head and use a pin prick to locate the bevel. Cut the
bevels with a #11 blade as shown (see figure 4).
Some of the bevels are very slight, especially the deck
bevels and the side bevels near amidships. These can
be sanded after the bulkheads are installed instead of
pre-cutting them.
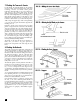
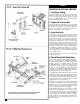
Glue the bulkheads in place, making sure that the
WL marks on the bulkheads and the center keel line
up. Use a square to make each bulkhead perpendicu-
lar to the center keel, then tack a temporary strip to
the top to hold the bulkhead in place while the glue
dries (see figure 5).
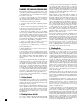
After all bulkheads are in place, tack a temporary bat-
ten on each side of the hull just below the deck as
shown. (see figure 6). This is a critical step. Measure
the spacing between bulkheads and retack the bat-
tens until the hull is aligned. Even though the center
keel was assembled flat, it could warp out of line. The
result could be that you end up with a banana-
shaped hull. Check the spacing between bulkheads,
and the port against starboard spacing. Look at the
the hull to see if it is properly aligned.
When you are satisfied that the hull is aligned, check
to see that the bottom of each bulkhead feathers out
and lies precisely on the bearding line. Trim as nec-
essary to line up. Also, check to make sure that the
top of each bulkhead at the centerline is flush or
slightly higher than the center keel. Since all align-
ment is based on the WL marks, there could be some
slight errors. If the center keel is below the top of the
bulkheads, that’s OK. If above, trim the center keel
until it is flush with the bulkheads (see Figure 7).
FIG. 5 – Squaring the Bulkheads
FIG. 6 – Applying Battens
FIG. 7 – Aligning the Bulkheads
11
Tack temporary
strip until glue dries
Reference
lines must
line up
Glue
Bulkheads
REF.
REF.
Check 90°
with square
Check alignment
visually in all
directions
Tack temporary
batten on hull
Check spacings
Check straightness of center
keel with straight edge
Sand flush with top of
bulkheads if necessary
Bearding line
Trim if neccessary to line
up on the bearding line
Smooth flow
into rabbit
REF.
Line up with reference
line on center keel