
Instruction manual
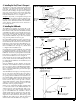
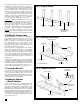
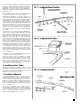
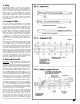
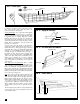
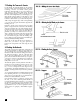
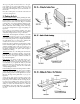
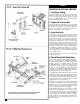

FIG. 18 – Sloping the Plank Edges
FIG. 19 – First Strake Below the Planksheer
FIG. 21 – Stealers in Belt D
lose them. You could now remove the temporary bat-
tens or leave them in place until they need to be
removed in order to add a plank.
Sloping Plank Edges
: As you proceed with the plank-
ing, you may need to slope the edges of a particular
plank so it butts flush against the adjacent plank. This
is especially true for a plank adjacent to another
member intersecting at an angle. For example, the
first plank below the planksheer at the bow butts
against the planksheer at an angle. The edges of these
planks must be trimmed so they fit against the
planksheer (see figure 18).
To begin with, all of the planks on the hull have
square edges. When butted against each other on a
round hull form, a small gap will appear between
each plank. Most of the gaps eventually will be filled
with glue, or you can fill them with wood filler. On a
real ship, the gaps are caulked. In fact, the edges of
the planks are often sloped to increase gapping. This
measure assures that the inside of the planks butt
against each other, while on the outside there are suf-
ficient gaps for caulking. If you want a perfectly
smooth hull without the gapping, you must trim the
edge of each plank as you fit it. It’s a lot of work, but
your decision.
First strake below the planksheer
: This is a single
strake that is 1/16” thick by 3/32” wide from bow to
stern. You will not taper it. Edge-cut the plank so it fits
flush to the underside of the planksheer. Note that at
the bow, the wale rides up to the planksheer. Run the
plank forward, then when doing the wale, just add a
doubler over the plank so that it will be the same thick-
ness as the wale (see figure 19).
Wale
: The wale is made up of three planks that are
3/32” thick. The planks will need to taper toward the
stern since the overall wale should taper. Make each
plank equal in width. On the real ship the wale is
thicker than the hull planking, but not quite as much
as you will get using a 1/16” hull plank and a 3/32”
wale plank (a 2” difference on the real ship). If you
desire, sand the wale down a little so it is not so thick.
At this model scale, however, it is probably not nec-
essary.
The aft end of the wale and the counter planks inter-
sect in a miter joint. See the expanded counter view
on P-O-B plan sheet 2.
16
Bottom wale
Planksheer
Main rail
Battens
“A”
“B”
“C”
“D”
Planksheer
Edge must be
sloped and fitted
Doubler at bow to
match wale thickness
First plank strake
Wale planks
Stealers
Sternpost
Look for smooth flow
of battens
FIG. 17 – Batten Layout
(Bow area)