
Instruction manual


17
Laying the Planks in Belt A: Each belt of planking
should be done separately. Consequently, you can
start with any belt. For discussion, let’s start at the
top and work down.
Belt A has six 1/16”–thick plank
strakes below the wale. The maximum plank width is
at
Bulkhead G and is roughly a 9” real ship width (a
little over 1/8” model scale). The planks should taper
both forward and aft to about 3/32”. On the real ship,
the planks taper to no less than 5-1/2”. Use the 1/16”
x 3/16” strips for the planking in this belt.
Use a tick strip and lift the plank widths from the
Hull Planking Layout on Sheet 2. If you have
changed the locations of the battens, simply divide
the space into six equal plank widths at each bulk-
head. A set of proportional dividers would help.
Mark these lines on the bulkheads with a pencil. You
will then have a completely marked area for
Belt A.
The next step is to cut planks to fit between the
marks.
Belt A will not require spiling, so a straight
tapered plank can be made. Start at
Bulkhead G. Use
four planks, one from
Bulkhead G to Bulkhead K,
another from
K to the transom, Bulkhead G to Bulk-
head C
, and Bulkhead C to the stem. First, lay a piece
of planking material over the bulkheads and mark
the length. Mark the plank in pencil at each of the
bulkheads. Next, use a set of dividers or a tick strip
and lift the plank widths from the marks on the bulk
-
heads and transfer to the plank. Draw a line through
the points and cut the plank. You now have a tapered
plank. Trace this plank to obtain another one for the
other side of the hull.
Install the planks on the hull, butting them up against
the wale. Then, do the same process for the next
strake below. Stagger the butts for this strake. Install a
plank from
Bulkhead F to B, B to the stem, F to J, and
J to the transom. You should have four planks making
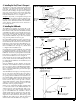
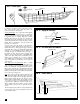
up each strake from bow to stern (see figure 20).
At the stern, some planks will need to be twisted into
place. You may need to steam bend the twist if it is
severe.
Now move down to the next planking strake and
work it the same way as you did the previous one.
Stagger the plank butts, starting at
Bulkhead E. Con-
tinue until this strake is finished, then complete the
strakes in
Belt A.
For now, let the aft ends of the planks that rest on the
counter extend just beyond the counter. When you
plank the counter, the counter and hull planks should
meet in a miter like the wale noted previously.
Laying the Planks in Belt B
: This belt is very similar to
Belt A. It has six plank strakes about the same width
as those in
Belt A. If you have not removed the tem-
porary batten, do it now. Then you may start the
process for
Belt B. Remember to stagger the butts.
Laying the Planks in Belt C
: This belt is also similar to
Belt A except that the planks do not get tapered as
abruptly at the stern. Also, there are seven, rather
than six, strakes. As mentioned when you were check-
ing the fairness of the bulkheads, the area near the
sternpost takes a severe bend. Steam-bending this
area is essential, otherwise the planks may break or
knuckle as you lay them over
Bulkhead L. You can
also use the filler block as an option.
Laying the Planks in Belt D
: This belt will contain the
garboard strake (next to the keel) and two other
strakes. It will also contain three stealers in order to
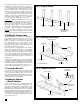
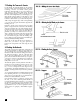
reduce the width aft as shown (see figure 21). All the
planks in this belt will be very wide (about 13” full-
ship size) and must be spiled. You will need to use the
wide planking strips provided in the kit. There will
also be some severe twist to the forward part of the
planks. The twist should be steam-bent.
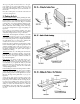
Toward the bow, the planks will feather out at the
rabbet rather sharply. This is fine for the model, but
on the real
Pride of Baltimore II, four of the lower
planks have nibs in them as shown (see figure 22).
You may do this if you desire.
P-O-B plan sheet 2 has a complete planking profile as
shown. Use this drawing to determine the plank
widths in
Belt D. The sections, Hull Planking Layout
drawing , cannot show all the planks aft so the profile
view is necessary.
Plank Variations within a Belt
: Suppose you are work-
ing within a belt, and have five planks the same
width, and then find that the last plank in the belt
needs to be made slightly wider to complete the
belt...should you worry? Certainly not. No planking
job, even on real ships, is that precise. You are dealing
with hand-cut planks. The important thing is to keep
the flow of planks smooth. A variation in widths is of
no great concern. Even though this kit tries to dupli-
cate the planking on the real
Pride of Baltimore II, you
must be realistic. There are going to be some slight
variances as you proceed.