
Instruction manual


18
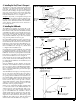
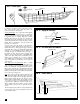
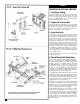
7. Planking the Transom & Counter
For the model, the side hull planks can be extended
past the counter (bottom curved portion of the stern
overhang), and the 1/16”-thick counter planks
butted into the hull planks or vice versa. On the real
ship, however, the counter plank meets the hull
plank in a miter joint. If you elect to do this, first cut
the ends of the hull plank that you left hanging over,
then add the counter planks. Cut the miter on each
plank, then glue them in place (see figure 23). You
could also cut the miter as you add each side plank.
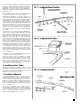
Add a strip to the upper edge of the counter planking
so it covers the end grain. Round this edge like the
molding above it.
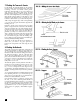
Plank the outside of the transom with 1/32”-thick
planks (see figure 24). The section below the molding
strip can be made from 1/32”-wide material. On the
real ship, the upper part is mahogany and the planks
can be seen. The lower section should either be
planked or you may use a wide sheet (It was not pos-
sible to decipher this detail from photographs taken
of the transom). Over top of the 1/32” planks, add
the 1/32”-thick fancy piece and the molding strip.
Leave a little gap in the upper horizontal molding for
inserting the Maryland flag emblem.
The inside of the transom will not be planked, so
make sure you remove any glue squeeze-out
between the outer plank seams and along the stern
knees.
8. Planking the Bulwarks
The planks between the planksheer and main rail
will be in two thicknesses. There are five planks that
are 1/32”-thick, and a 3/64”-thick plank at the top.
Check the width of the inboard stringer, the head of
the bulwark stanchions, and the outboard thick
strake. The total width must be correct since these
pieces must fit under the main rail. If any one part is
oversize it won’t fit. You should not have to make the
rail wider to cover a mistake. The rail would look
bulky and be out of scale.
The bulwark planks are fairly uniform and will not
require any severe tapering forward or aft. If you do
not want to use the five planks, you may use only
two, or even a solid piece. The real ship, however,
was planked as described. Simplification is up to you
and it is certainly justified if you intend to paint the
model.
As you plank the bulwarks, remember that there will
be no planking inboard so you should clean up any
glue squeeze-out on the inside as you plank. If left to
harden, it would be difficult to remove.
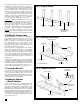
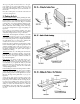
Note that there will be a continuous scupper along
the side, so the lowest bulwark plank should not
touch the planksheer from gunport 2 to 5 (see figure
25). There is a real ship gap of 1” at the deck. For the
model, you could cheat a little and use about a 1/32”
gap rather than 1/64” so it shows up better. Forward
and aft of the two gunports, small drilled scuppers
are used.