
Specifications


29
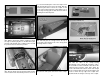
6-minute epoxy. Note the distance from the leading
edge of the wing to the end of each gun barrel.
The “belly pan” under the wing conceals the air
ducting for the supercharger. One duct carries
air from the intake in the front of the cowl back
to the supercharger (driven by the turbine) and
two smaller ducts carry exhaust gasses from the
engine to the turbine.
APPLY THE DECALS
❏
1. Use scissors or a sharp hobby knife to cut the
decals from the sheet. Where possible, round the
corners so they won’t catch and lift while cleaning
and handling the model.
❏
2. Be certain the model is clean and free from oily
fi ngerprints and dust. Prepare a dishpan or small
bucket with a mixture of liquid dish soap and warm
water—about 1/2 teaspoon [2.5cc] of soap per gallon
of water. Submerse one of the decals in the solution
and peel off the paper backing. Note: Even though
the decals have a “sticky-back” and are not the water
transfer type, submersing them in soap & water
allows accurate positioning and reduces air bubbles
underneath.
❏
3. Position decal on the model where desired.
Holding the decal down, use a paper towel to wipe
most of the water away.
❏
4. Use a piece of soft balsa or something similar
to squeegee remaining water from under the decal.
Apply the rest of the decals the same way.
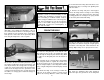
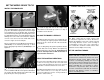
Please use the following pictures as
a guide for decal placement.
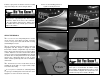
One problem that occurred with the removal of the
razor spine to accommodate the bubble canopy
was tail fl utter. Beginning with the D-40, a dorsal
fi n was added to rectify this. The dorsal fi n was also
retrofi tted to all previous variants still fl ying.