
User's Manual


7
OPERATING INSTRUCTIONS
P
P
OWER CONNECTION
This product operates on 120V~ 60Hz power supply. Plug the AC Adaptor
into a household outlet AC source.
CONNECTING THE AC ADAPTER
1. Insert the DC plug of the AC adapter (included) into the DC Jack of the
unit.
2. Fully insert the blades of the AC adapter (included) into the slots of a
working wall socket as shown.
3. The LCD DISPLAY of the unit will show a flashing time of “12:00”
prompting you that the time is not valid and needs to be adjusted to the
right time as soon as possible.
4. After correctly setting up the time (as described in the next section),
your unit is now in standby mode.
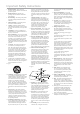
BATTERY BACKUP
This unit is equipped with a battery
back-up system, requiring two DC 1.5V
UM-3 type batteries (not included).
Insert the battery in the BATTERY
COMPARTMENT, making certain that
the positive and negative (+ and -)
sides are properly aligned. If power
failure occurs, the clock automatically
switches to the battery power supply,
the clock continue running internally
and the radio presets are preserved.
When power returns, the unit switches
back to AC adaptor again.
NOTE: The display will not exhibit time during power failure but the clock
will keep correct time internally.