Traditional Pergola Installation Guide
Tools List • Drill(s) • Phillips bit for Drill • Composite shims • Miter or Circular Saw with carbide blade (cut slowly) • Level • Sawhorses • Hammer • Quick Clamp(s) • 5/8" Drill Bit • Tape Measure • 5/16" Magnetic Driver(s) • String Line • Step Drill Bit (Vari –Bit®) – For reaming holes in aluminum • 3 /8" Magnetic Driver(s) • 6" Drill Extension(s) • Hammer Drill if necessary for concrete or footing mounts • 12" Drill Extension (2x8 option only) • Wrench for Anchors on post • PVC P
Traditional Pergola Installation Guide Step 1 – Layout A Note on Pergola Sizes Sizes are defined by the total width and depth of the roof. For example, a 12' x 16' pergola will have a roof area of 12' x 16' and a post spacing of 10' x 14'. All Pergola Kits Can Be Cut To Size. The beams and rafters supplied in the kit are NOT pre-drilled. This is to allow the width and depth to be customizable for each kit. Our standard sizes are designed around a 1' overhang on each end.
Step 2 – Install Post Mounts Figure 2a 5x5 Post or Column Sleeve b) Inset mount as necessary to ensure post skirt does not overhang edge of decking • Minimum 6.25" inset from edge to center of mount for a 10" round column • Minimum 5.25" inset from edge to center of mount for a 7" square or 7" round column • Minimum 3.
Traditional Pergola Installation Guide b) Mount To Slab Or Landscape Column Top a) Inset mount as necessary to ensure post skirt does not overhang edge of slab or column top • Minimum 6.25" inset from edge to center of mount for a 10" round column • Minimum 5.25" inset from edge to center of mount for a 7" square or 7" round column • Minimum 3.25" inset from edge to center of mount for 5x5 post b) Mount Fasteners - 3/8" hot dipped galvanized wedge or screw type anchors, minimum 2 1/2" embedment.
c) Mount To Footing – 10" Round, 7" Round, Or 7" Square Column a) The main goal in this method is to isolate the pergola posts from the patio area without looking like it. This allows the patio to move up and down over the seasons while the pergola posts stay rock solid. To do this properly you need to make sure you know the finished grade of the patio. • If there is an existing patio, you can simply remove blocks as necessary to form and pour footings to the height of the existing patio surface.
Traditional Pergola Installation Guide d) Mount In Footing (5X5 Post) a) The 5x5 post comes with a movable post skirt and (optional) trim ring. These can slide up or down the post and allow you to finish your patio height at any level and simply slide the skirt down to meet the finished surface. Because the trim will move up and own with ease, you can set your posts and build your patio around them.
Step 3 – Install Columns Over Post Mount Cut Post Mount To Height Figure 3.2 Wood Post Plug a) Mark the desired top of beam height on each post mount. • Ensure the top of beam will be level. The simplest way (short of using a laser level) is to quick clamp your beams to your post mounts and adjust until level. b) Measure the distance from the ground to this mark on each post.
Traditional Pergola Installation Guide a) Install 5" X 5" Post Over Post Mount a) Cut each 5x5 vinyl post sleeve to proper height. • Cut post ½" shorter than recorded measurements. b) Install Column Over Post Mount (7" Square/ 7" Round/10" Round Column) a) Cut each vinyl column sleeve to proper height: b) Install skirts and optional trim rings on to your vinyl post sleeve, these fit tight. • Kits with a 6" beam: Cut column 8" shorter than recorded measurements.
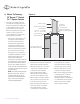
Step 4 – Attach Ledger To Structure (Attached Pergolas Only) Figure 4 Framing of Structure (studs, headers, wall plates, or similar) Heavy Bead Silicone Caulk Attach Rafter to Rafter Hanger with (4) 5 ⁄16"x1" Hex Screws Optional: ½" LedgerLOK® or equivalent 16" OC (not provided) 3 ⁄ 8"x1" Rafter and Aluminum Insert PVC Ledger Plate 1"x10" or 1"x12" Required: Rafter Hanger attached with (6) Heavy Shank Screws (not provided) 5 ⁄ 8" plugs Sheathing Hex Screw Skirt with Locking Tabs (tabs MUST point do
Traditional Pergola Installation Guide Step 5 – Install Beams Figure 5 5 ⁄ 8" White Panhead Screw into each Purlin Plugs 3 ⁄ 8"x1" Hex Screw Cap (2) 3 ⁄ 8"x1" Hex Screw (8) 3 ⁄ 8"x2" Hex Screw 2"x6" or 2"x8" Beam with Reinforcement 5 ⁄ 8" Plugs PRO TIPS: If flat caps are desired on ends of a beam, cut aluminum insert short by ½" per end to allow for insert of cap.
Step 6 – Rafter Attachment a) Attach Rafters To Beam a) Set rafter on top of beam with desired overhang. Trim rafters if necessary. Mark hole locations directly above each beam. b) Drill through TOP ONLY of rafter with step bit, directly over center of both beams – This is safest to do on sawhorses at ground level. Attach rafter to each beam with 3/8" x 1" hex screws. b) Attach Rafters To Ledger [Attached Pergolas Only] a. Install rafter hangers to ledger plate per desired layout. b.
Traditional Pergola Installation Guide Step 7 – Attach Purlin Holders Step 8 – Install Purlins Step 9 – Caps And Finishing a) For maximum shade, determine primary direction of sun and install purlin holders to angle purlins accordingly. a) If necessary, measure and cut purlins to desired length. a) Glue on beam and rafter end caps. b) PRO-TIP: Purlin overhang from holder should not exceed 24". c) Wipe off any construction marks. b) Determine desired length of purlin holders.