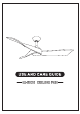
01 1. To reduce the risk of electric shock, ensure the electricity has been turned off at the circuit breaker or fuse box before you begin. WARNING: To reduce the risk of personal injury, do not bend the blade brackets (also referred to as flanges) during assembly or after installation. Do not insert objects in the path of the blades. 2. All wiring must be in accordance with the National Electrical Code ANSI/NFPA 70-1999 and local electrical codes.
02 The supplier warrants the fan motor to be free from defects in workmanship and material present at time of shipment from the factory for a lifetime after the date of purchase by the original purchaser. The supplier also warrants that all other fan parts, excluding any glass or acrylic blades, to be free from defects in workmanship and material at the time. of shipment from the factory for a period of two years after the date of purchase by the original purchaser.
+ -
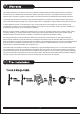
05 Installation of the hanging brackert(suspension part) WOODEN CEILING 1) Use the Mounting Bracket(A) as aguide, mark the spots where the 4 Self Tapping Screws (B) will be drilled. 2) Remove the Mounting Bracket(A), drill 4 holes for 3MM diameter, install the mounting bracket onto wooden ceiling with 4 Self Tapping Screws (B) & Washers (C). NOTE: SCREWS MUST BE TIGHTENED TILL SUNG 1) Use the Mounting Bracket (A) as a guide, mark the spots where the 4 Expansion Bolts (B) will be drilled.
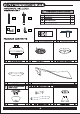
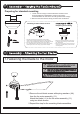
07 Preparing for standard mounting 1. Loosen the two canopy screws located in the bottom of the mounting bracket(L shaped slots), and turn the canopy counterclockwise to remove the mounting bracket from canopy. 2. Remove and save the two canopy screws in the round holes. Installing remote control receiver Preparing for mounting 1.
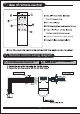
09 R RED 7
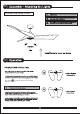
09 3.Install the lamp cover 10 The switch controls the direction of the blades: forward or reverse.
11 + - Light up / Light on/off / Lights dimmed 12 Remote control wiring diagram Red 9
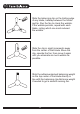
13 Slide the balancing clip on the trailing edge of any blade, halfway between the holder and tip. Run the fan to check the wobble. If the wobble persists, repeat with each blade, noting which one most reduced the wobble. Slide the clip in small increments away from the center of that blade. Move the clip, operate the fan, then move it again until you eliminate as much wobble as possible. Stick the adhesive-backed balancing weight on the top center of the blade directly in line with the balancing clip.
14 □ Because of the fan’s natural movement, some connections may become loose. Check the support connections, brackets, and blade attachments twice a year. Make sure they are secure. It is not necessary to remove the fan from the ceiling. □ Clean your fan periodically to help maintain its new appearance over the years. Do not use water when cleaning, as this could damage the motor, or the wood, or possibly cause an electrical shock. Use only a soft brush or lint-free cloth to avoid scratching the finish.