
Owner Manual

Pre Sizing and Cutting Top and Bottom Rails
(prior to assembly)
There are two methods used when cutting the top and bottom rails to size. It is
important to cut appropriate amounts from each end of the rails so the picket
spacing from the post/wall appears symmetrical.
1. Measure the distance between your posts from the inside edge of the post
to the inside edge of the other post. Measure at the top and then at the
bottom, if the measurements are different, your posts may not be level and
may need to be shimmed.
2. Divide the distance between posts by two (÷2) to find the
center of the railing.
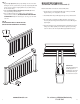
Option A – Measure from the “center gap:
A) Find the center “gap” (space between picket holes) of the top snap
(B),Make a pencil mark exactly in the middle of this gap (2-3/8"from
either pair of holes). Measure from the pencil mark the distance from
#2 above. Make another pencil mark 1/8" short of that (allows railing
to fit between posts when installing the completed section), repeat
at the other end.
Option B - Measure from “center baluster”
B) Choose one of the two sets of holes on either side of your pencil mark
and do the same as in Option A except starting from the center hole
instead of center of the gap.
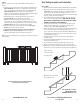
Option C - Lay in front of installed post
Visually center rail between posts
3. Place your marked piece between the two posts and make sure there is not
more than a ¼" gap (1/8" for either side). When satisfied, make your cuts.
4. Place top snap (B) on bottom channel (D) with flat portions together. Drop
a screw through a hole to line up pieces. Cut bottom channel (D) to equal
length using the top snap (B) as a template.
MAKE SURE THE HOLES ARE ALIGNED!!
5. Cut Top Cap (A) to same length as top snap and bottom channel.
7
www.maddenmetals.com
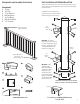
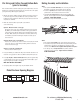
Picket Fastener Spacing Diagram
Cut same
amount from
each end
Cut same
amount from
each end
2 3/8" (midpoint)
Hole dimension:
3/16"
4 3/4"
4 3/4"
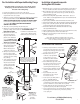
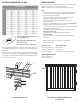
Railing Assembly and Installation
STEP 1:
1. Place predrilled bottom channel (D) on its side using non-abrasive
work surface. Protect the painted surface from scratching.
2. Position one picket (C) above bottom channel aligning the
predrilled holes. Place baluster on flat side of channel.
3. Start both 1 ½" fasteners (G) thru bottom channel halfway into
baluster, and then tighten fasteners down fully. Tighten fasteners
until flush – DO NOT OVER TIGHTEN.
4. Repeat these steps until all balusters are secured.
STEP 2:
1. Place predrilled top snap (B) on the opposing flat side of balusters.
2. Loosely fasten top snap to the first and the last picket making sure the
predrilled holes are aligned correctly. Next, loosely fasten a picket
near the center. Make sure not to tighten until all pickets are in place.
3. Once the top snap is loosely fastened to all pickets, stand the
upright and secure all pickets – Tighten fasteners until flush –
DO NOT OVER TIGHTEN.
8
For assistance call Madden Manufacturing
573-365-7085
G
B
D
C
G
C
D