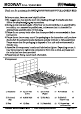
MIDWAY rill/ QUEEN BED 1 midway Thank you for purchasing the FULL/QUEEN BED. Before you start, here are some helpful advice: 1.We suggest you that spend a short time reading through this leaflet and then follow the simple step-by-step instructions. winging to the size and weight of the bed, we recommend that it is assembled by two adults, on a carpeted or padded area, in the room that it is intended for Approximate assembly time: 45 minutes. 3.
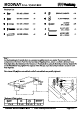
MIDWAY rill/ QUEEN BED 1 midway Hardware list: A Bolt M8 x 20MM x8 F 0 SPRING WASHER ~~ x14 B (mm Bolt M6 x 25MM x8 G FLAT WASHER x14 C Bolt M6 x 50MM x10 H §mm M4 SR x24 D (um mm Bolt M6 x 70MM x2 I ALLEN have x1 E WOOD DOWEL x2 J SULLENNESS xl Step 1: Put the Headboard (1) upside down on a carpeted or padded area by two adults. Then remove all the Component and Hardware Pack from the back side of Headboard (1). Attach Low Post Left (2) and Low Post Right (3) to the Headboard (1).
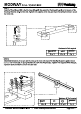
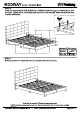
MIDWAY rill/ QUEEN BED Step 2: 1 midway Insert 1x Wood Dowel (E) to the Foot board Leg (5) then attach the Foot board Leg (5) to the bottom of the Foot board (4) by using 1x Bolt (D). Tighten with supplied Allen Key (J), repeat the same procedure to secure the other side. Hardware & Tool required Emm Dx2 Ex?2 Tx1 STEP 3 Attach Side Rails each other by lining up the holes with those of the Side Rail Support Legs (8). Secure each one with 4x Bolts (B), 4x Spring Washers (F) and 4x Flat Washers (G).
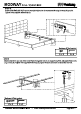
MIDWAY rill/ QUEEN BED 1 midway STEP 4: Attach Side Rails Low Post (2) & (3) and to the Foot board (4) using 2x Bolts (A) per side. Tighten with supplied Allen Key (I). Hardware & Tool required © rr Ax8 Ix1 STEP 5 Attach 2x Slat (9) to each side of the Center Rail (11) together with the 2x Support Leg With Adjustable Feet (12) by using 2x Bolt (C). Tighten with supplied Allen Key (J), repeat the same procedure to secure the other set. Hardware & Tool required (mia Customer Service 908-368-1025 | www.
MIDWAY rill/ QUEEN BED 1 midway STEP 6: Attach the assembled Slat (9) & 4x Slat (10) to Side Rail (6) & (7) using 12x Screws (H) per cache set of slat. Tighten screws with Phillips head screwdriver (not included). Repeat the same procedure to secure the other set. Hardware & Tool required Gomez |_s Hx24 | Bries, STEP 7: Assembly is complete. The bed is ready to use now! NOTE: Hardware may loosen over time. Periodically check that all connections are tight. Customer Service 908-368-1025 | www.