
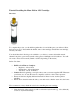
Installation Manual


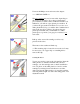


To get access to the cartridge, unscrew and remove the
faucet escutcheon. Remove the washer and the limit stop
from the cartridge and use pliers to remove the retaining
clip.
Cartridge Removal
You are now ready to remove the old cartridge. Insert the
white plastic tool, which is included with your new
cartridge, onto the cartridge stem so that it straddles the
ears. Use pliers on the white plastic tool and loosen the
cartridge by twisting ¼ turn each direction one time.
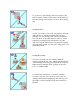
After removing the white plastic tool, grasp the cartridge
stem and pull it straight out of the valve using pliers or an
adjustable wrench.
Cartridge Reassembly
You can now install your new cartridge. Push the
cartridge straight into the valve, making sure that the ears
of the cartridge are lined up precisely with the clear tabs
filling the front and back center openings of the valve
body, or 12:00 and 6:00.
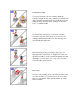
To reinstall the cartridge into your faucet assembly,
reverse the steps that you followed to remove the old
cartridge. Reinstall the retaining clip, the limit stop and
the washer onto the cartridge. Fasten the escutcheon to
the wall.