
Installation Sheet

To Install
MB074D
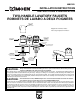
CARTRIDGE
STEM
TIGE DE
CARTOUCHE
CARTRIDGE
CARTOUCHE
BODY
BATI
HANDLE
SCREW
VIS DE POIGNEE
HANDLE
KNOB KIT
TROUSSE DE
BOUTON DE
POIGNEE
HANDLE KNOB
INSERT KIT
TROUSSE DE
COUVERCLE DE
POIGNEE
HANDLE
SCREW
VIS DE POIGNEE
HANDLE KNOB
BOUTON DE
POIGNEE
HANDLE
KNOB KIT
TROUSSE DE
BOUTON DE
POIGNEE
CARTRIDGE
NUT
ECROU DE
CARTOUCHE
REPLACEMENT
CARTRIDGE
CARTOUCHE DE
REMPLACEMENT
ESCUTCHEON
PLUG
BUTTON
BOUTON DE
BOUCHON
DE ROSACE
ESCUTCHEON
ROSACE
ESCUTCHEON
GASKET
JOINT
DE ROSACE
FLOW-RATOR
AERATOR
GASEIFICATEUR
"FLOW-RATOR"
MOUNTING
NUT/WASHER
ECROU/RONDELLE
DE MONTAGE
TAILPIECE
NUT
ECROU DE
RACCORD
HANDLE KNOB
INSERT KIT
TROUSSE DE
COUVERCLE DE
POIGNEE
ACRYLIC KNOB
HANDLE
POIGNEE EN
ACRYLIQUE
TRANSPARENT
INSERT
AND RING
CAPUCHON ET
ANNEAU EN "O"
HANDLE
SCREW
VIS DE
POIGNEE
SHORT
LEVER HANDLE
LEVIER DE
POIGNEE COURT
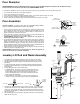
1. Be sure basin is clean and dry. Place faucet supplies down through basin holes.
Position faucet.
2. To fasten faucet on basin: Adjust the position of the faucet on the basin to best accom-
modate bowl size. From under the sink, place the mounting nut/washers on the faucet
supplies, large side up. Thread on mounting nut/washers by hand. Check faucet posi-
tion. Align and match escutcheon and escutcheon gasket together. Make final tighten-
ing of the mounting nut/washers by hand.
Pour Installer
1. Assurez-vous que la surface du lavabo est séche et propre. Passez les alimentations
du robinet à traverse les trous du lavabo. Mettez le robinet en place.
2. Afin de fixer le robinet sur le lavabo: régiez la position du robinet sur le lavabo, afin de
mieux accomoder la grandeur de la cuvette. Par le dessous du lavabo, placez
l'écrou/les rondelles de montage sur les alimentations due robinet, le bord le plus large
vers le haut. Vissez l'écrou/les rondelles de montage àla main. Vérifiez l'emplacement
du robinet. Alignez la rosace et le joint de rosace ensembles. Faites le serrage défini-
tif de l'écrou/les rondelles à la main.
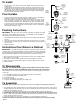
To Assemble
CAUTION: Failure to follow these instructions can cause the cartridge to be damaged beyond repair.
1. Turn cartridge stem LEFT (counterclockwise) to ON, (internal hole in piston lined up with hole in shell). Push the
cartridge straight down into the body. Fit the key on the cartridge into the notch in the body. This will position the
handle stop on the cartridge to the side.
2. Screw down the cartridge nut. Start by hand and DO NOT CROSS THREAD. Tighten firmly with wrench.
3. CAUTION: Make sure that the other cartridge on the opposite side is completely assembled into the faucet.
4. Now the handle knob can be installed. Match the flats in the handle knob with the flats on the cartridge stem and
drop the handle knob down on the stem.
5. Screw in the handle screw, snug. Do not overtighten. Press the handle knob insert into place.
CAUTION: Shut OFF the faucet handles before opening the water supplies to prevent accidental flooding.
To Disassemble
CAUTION: Turn OFF BOTH water supplies and open BOTH faucet handles to allevi-
ate water pressure to insure that COMPLETE water shut-off has been accomplished.
These instructions are the same for both the hot and cold sides. Parts and procedures are the same
for each side.
1. Use a flat bladed instrument to pry off the handle knob insert (on knob handles).
2. Use a screwdriver and remove the handle screw.
3. Pull handle up and off.
4. Unscrew the cartridge nut. Use a wrench.
5. Using pliers, pull cartridge straight up by the cartridge stem.
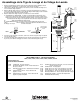
Flushing Instructions
IMPORTANT: Pipe chips, sand, stones, and other solid objects can damage the sealing
surface of the faucet cartridge and cause a leak. To avoid damage, DO NOT OPERATE
VALVE until you have followed these instructions:
1. After installing and connecting your new faucet, turn on both supply valves and look for
any leaks.
2. At the valve turn on both hot and cold water and allow the water to run for 15 seconds.
3. Turn off the water, unscrew the aerator from the end of spout and clean any debris from
the cone screen.
4. Replace the aerator.
Instructions Pour Rincer Le Robinet
IMPORTANT: Des débris de tuyauterie, du sable, de la pierraille et autres solides que
l'on retrouve dans le système de plomberie de nouvelles constructions peuvent endommager
la surface éntanche de la cartouche du robinet et causer des fuites. Pour éviter de tels dégats,
NE PAS FAIRE FONCTIONNER LA VALVE avant de suivre les instructions suivantes.
1. Aprés avoir installé et raccordé votre nouveau robinet, ouvrir les deux soupapes d'alimen-
tation et vérifier s'il y a des fuites.
2. À la soupape, ouvrir l'eau chaude et groide et laisser couler pendant 15 secondes.
3. Couper l'eau, dévisser l'aérateur du bout du bec et enlever les débris du tamis conique.
4. Replacer l'aérateur.