
Installation Guide


English
E6
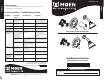
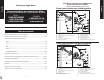
78” (1981mm)
45-48”
(1143-1219mm)
Shower Only
The center of the valve should be 45 inches to 48 inches
above the shower stall floor. The shower arm should be
placed 78 inches above the floor of the shower stall floor
(recommended installation of the shower arm is with a
flanged elbow fitting – not included
– and attached to a
wood brace).
Use 1/2” Copper or
IPS Pipe Only
78” (1981mm)
32” (813mm)
6” (152mm) Min.
9” (229mm) Max.
Tub/Shower
Position the valve body 32 inches from the floor of the
tub basin. The shower arm should be placed 78 inches
above the floor of the tub basin (recommended installa-
tion of the shower arm is with a flanged elbow fitting –
not included – and attached to a wood brace). The tub
spout is to be no less than 6 inches and no greater than
11 inches below the valve. If installing a threaded tub
spout, connect to the valve with 1/2 inch pipe or 1/2 inch
copper tubing with a threaded adapter. If installing a
slip-fit tub spout, connect to the valve with only copper
tubing – no threaded adapter is needed.
See step 4.3 for tub spout tube length.
2. Installation Schematics –
Measuring for Ideal Tub/Shower Performance
Installation of this product at non-recommended measurements may
lead to issues such as water discharge from the showerhead during
tub fill mode.
English
E7
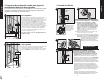
2-1/4" min.
(57mm)
3-1/2" max.
(89mm)
less than 1/4"
(6mm)
3/4"
(19mm)
E
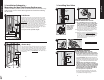
Thin Wall Installation
For Walls Thinner Than
1
/4 inch
3.1 The “Thin Wall” method is used when the
tub/shower wall is less than 1/4 inches thick
(such as fiberglass tub surround) and will
be the main source of support for the valve.
The plaster ground (E) remains attached to
the valve. A 2-1/4 inches to 3-1/2 inches diam-
eter hole is cut thru the wall for this method.
3.2 Break away the black plastic protective cover
using pliers and rotating clockwise.
3.3
Remove the escutcheon screws (G), place product
identification label (P) on back of escutcheon
, make
sure wall is clean, place the escutcheon (F) over the
stop tube (B), then reinstall the screws (G). A gasket
on the back of the escutcheon provides a seal
against the finished wall.
G
B
F
3
2
Secure
escutcheon
to wall.
(Wall)
F
P
1
E E
E
4-1/2"
(114mm)
more than 1/4"
(6mm)
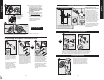
3. Installing Your Valve
3.1
3.2
3.3
3.4
2.1
2.2
Go To Step 4.1
Ensure cartridge
retainer clip is
installed prior
to escutcheon
installation.
Thick Wall Installation
For Walls Thicker Than
1
/4 inch
3.4 The “Thick Wall” installation method is used when
the tub/shower wall is greater than 1/4 inches thick.
“Thick Walls” are usually built up with materials such as
cement board, drywall, tile, etc. The valve is secured by
straps (not included) holding the water inlet lines to
the framing members (2X4’s) as shown in steps 2.1 and
2.2. The valve also features mounting holes to screw the
valve to a cross member attached behind the valve if
desired.
Attach the plaster ground (E) to the valve body
using the 2-3/16 inches escutcheon screws (G). Keep
the plaster ground (E) attached to the valve until the
valve has been positioned and secured. The plaster
ground (E) is positioned so that it is flush with the
finished wall. This ensures that the valve will be at
the correct position to accept the trim.
The hole in the wall should be the same size (4-1/2
inches) as the plaster ground (E). This hole will allow
access for future servicing if necessary.