
Use and Care Guide


INS288
3
Moen Incorporated • 25300 Al Moen Drive • North Olmsted, OH 44070-8022 U.S.A.
In Canada Moen Inc. • 2816 Bristol Circle • Oakville, Ontario L6H5s7
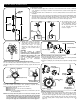
Attach The Handle
1. Place the Handle onto the valve stem as shown above. Test
the Handle rotation so that it comes to a stop at all three stop
locations on the Escutcheon. If this is not the case, remove the
handle, rotate it 180°, and replace the Handle onto the valve
stem.
2. Fasten the Handle to the valve stem using the supplied torx
screw.
3. Push the Plug Button into the Handle hole until it snaps into
place.
Faucets made of leaded brass alloys may contribute small amounts of lead to
water that is allowed to stand in contact with the brass. The amount of lead
contributed by any faucet is highest when the faucet is new. The following steps
may reduce potential exposure to lead from faucets and other parts of the
plumbing system:
• Always run the water for a few seconds prior to use for drinking or cooking
• Use only cold water for drinking or cooking
• If you wish to flush the entire plumbing system of water that has been standing
in the pipes or other fittings, run the cold water until the temperature of the
water drops, indicating water coming from the outside main
• If you are concerned about lead in your water, have your water tested by a
certified laboratory in your area
Moen products have been manufactured under the highest standards of quality and
workmanship. Moen warrants to the original consumer purchaser for as long as the original
consumer purchaser owns their home (the “Warranty Period” for homeowners), that this
faucet will be leak and drip-free during normal use and all parts and finishes of this faucet will
be free from defects in material and manufacturing workmanship. All other purchasers
(including purchasers for industrial, commercial and business use) are warranted for a period
of 5 years from the original date of purchase (the “Warranty Period” for non-homeowners).
If this faucet should ever develop a leak or drip during the Warranty Period, Moen will FREE
OF CHARGE provide the parts necessary to put the faucet back in good working condition and
will replace FREE OF CHARGE, any part or finish that proves defective in material and
manufacturing workmanship, under normal installation, use and service. Replacement parts
may be obtained by calling 1-800-289-6636 (Canada 1-800-465-6130), or by writing to the
address shown. Proof of purchase (original sales receipt) from the original consumer
purchaser must accompany all warranty claims. Defects or damage caused by the use of other
than genuine Moen parts are not covered by this warranty. This warranty is applicable only to
faucets purchased after December 1995 and shall be effective from the date of purchase as
shown on purchaser’s receipt.
This warranty is extensive in that it covers replacement of all defective parts and finishes.
However, damage due to installation error, product abuse, product misuse, or use of cleaners
containing abrasives, alcohol or other organic solvents, whether performed by a contractor,
service company, or yourself, are excluded from this warranty. Moen will not be responsible
for labor charges and/or damage incurred in installation, repair or replacement, nor for any
indirect, incidental or consequential damages, losses, injury or costs of any nature relating to
this faucet. Except as provided by law, this warranty is in lieu of and excludes all other
warranties, conditions and guarantees, whether expressed or implied, statutory or otherwise,
including without restriction those of merchantability or of fitness for use.
Some states, provinces and nations do not allow the exclusion or limitation of incidental or
consequential damages, so the above limitations or exclusions may not apply to you. This
warranty gives you specific legal rights and you may also have other rights which vary from
state to state, province to province, nation to nation. Moen will advise you of the procedure to
follow in making warranty claims. Simply write to Moen Incorporated using the address below.
Explain the defect and include proof of purchase and your name, address, area code and
telephone number.
MOEN LIFETIME LIMITED WARRANTY CONSUMER INFORMATION
HELPLINE:
1 (800) BUY-MOEN
[289-6636]
In the U.S. call our toll free Helpline number, for answers
to any product installation, or warranty questions.
In Canada:
Toronto: 905-829-3400;
Rest of Canada: 1-800-465-6130
In Mexico:
(84) 88-08-26, 88-08-27,
o 91-800-84-345
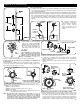
1. Prior to Escutcheon installation, verify that the plaster ground has been removed from
the valve so that the trim will fit properly.
2. Screw on the Mounting Sleeve passing through the Escutcheon such that the outer rim
of the sleeve presses up firmly against the Escutcheon, holding it in place against the
wall.
Note:
• The orientation of the Mounting Sleeve is dependent upon whether the valve was
installed closer or further from the finished wall.
Optional
An optional decal sheet was included with the packaging.
These decals on this sheet can be used in place of the
numbers on the Escutcheon according to the valve position
function.
2. Re-assemble the top plate to the transfer valve body by turning it clockwise until handtight (take caution when handling
the top plate threads) and then turn an additional 1/2 turn with a wrench.
Note:
• The proper torque of the top plate into the transfer valve body is 25 in-lbs. (2.8 N-m).
3. If the trim is to be installed at a later time, re-install the plaster ground to protect the valve.
Handle Stem Position for Handle Adapter/Handle Assembly
For correct handle position/outlet flow designation, make sure that the handle stem flats locating mark is facing upwards
and away (opposite direction) from the inlet.
Top Plate
Remove
Plaster Ground
Escutcheon
Mounting Sleeve
(Reversible — see
illustration above)
Mounting Sleeve
(Reversed)