INS10083B - 6/16 Please Contact Moen First For Installation Help, Missing or Replacement Parts (USA) 1-800-BUY-MOEN (1-800-289-6636) Mon - Fri 8:00 AM to 7:00 PM, Eastern Sat. 9:00 AM to 3:00 PM Eastern WWW.MOEN.COM Installation Guide Guía de Instalación Guide d’installation (Canada) 1-800-465-6130 Mon - Fri 7:30 AM to 7:00 PM, Eastern WWW.MOEN.
INS10550 - 4/16 Please Contact Moen First For Installation Help, Missing or Replacement Parts (USA) 1-800-BUY-MOEN (1-800-289-6636) Mon - Fri 8:00 AM to 7:00 PM, Eastern Sat. 9:00 AM to 3:00 PM Eastern WWW.MOEN.COM Installation Guide Guía de Instalación Guide d’installation (Canada) 1-800-465-6130 Mon - Fri 7:30 AM to 8:00 PM, Eastern WWW.MOEN.
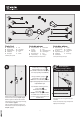
x4 A x4 B F x2 C G x2 H x2 D I E Parts List A. B. C. D. E. Dry Wall Anchor (x4) Wood Screw (x4) Mounting Plate (x2) Ink Plate (x2) Pivoting Post J F. G. H. I. J. Lista de piezas Post Set Screw (x2) Hex Wrench Level Red Pin Confirm all parts are present 6 A. Ancla para paneles de E. F. G. H. I. J. yeso (x4) B. Tornillo para madera (x4) C. Placa de montaje (x2) D.
2 1 I E 3 F 2 E F D x2 E 1 90˚ 1. 2. 1. 2. 1. 2. Remove film backing from adhesive on included Level (I). Center level (I), adhesive side down, on top of the bar of Pivoting Post (E). Press evenly to adhere. Retire la película protectora del adhesivo en el nivel incluido (I). Centre el nivel (I) con el adhesivo hacia abajo sobre la barra del poste pivotante (E). Presione en forma pareja para adherir. Détacher la pellicule de l’endos de la partie adhésive sur le niveau (I) (compris).
INS10550 - 4/16 4 2 5 Important / Importante / Importante 90˚ E F 1 1 1. 2. 1. 2. 1. 2. C 2 C 2 Choose location for installation. Gently place the assembled product against the wall, ensuring bar is level. Before you compress the Ink Stamps, ensure the set screw holes are facing downward. Important: Ensure Pivoting Post (E) and Post (F) are at a 90° angle. Elija el lugar para la instalación. Coloque el producto armado suavemente contra la pared, asegurándose de que la barra esté a nivel.
INS10550 - 4/16 Hollow wall option 11B Opción para pared hueca Hollow wall option 12B Opción para pared hueca Option pour mur creux Option pour mur creux J Hollow wall option 13B Opción para pared hueca Option pour mur creux x2 C 1 x4 B 2 J To actuate Dry Wall Anchors (A) Lightly tap Red Pin (J) with hammer until lower portion of Pin is engaged with the Dry Wall Anchors (A) leaving upper portion exposed.
Re-marking Instructions / Instrucciones para volver a marcar / Directives pour effectuer de nouveaux marquages A1 A2 Rubbing alcohol (isopropyl alcohol) Alcohol fino (alcohol isopropílico) Alcool à friction (alcool isopropylique) A3 0 45 30 15 Sec. Apply one drop of rubbing alcohol (isopropyl alcohol) to each Ink Stamp reservoir. Apply cap, let stand for 30 sec. Ink Stamp is re-charged and ready to press and mark Using a damp cloth, gently wash away unintended ink stamp indications from wall.
INS10549 - 4/16 Please Contact Moen First For Installation Help, Missing or Replacement Parts (USA) 1-800-BUY-MOEN (1-800-289-6636) Mon - Fri 8:00 AM to 7:00 PM, Eastern Sat. 9:00 AM to 3:00 PM Eastern WWW.MOEN.COM Installation Guide Guía de Instalación Guide d’installation (Canada) 1-800-465-6130 Mon - Fri 7:30 AM to 8:00 PM, Eastern WWW.MOEN.
1 x2 A x2 B F C D F G E H Parts List A. B. C. D. Dry Wall Anchor (x2) Wood Screw (x2) Mounting Plate Post E. F. G. H. Set Screw Ink Stamp Hex Wrench Red Pin Liste des pièces A. Dispositif d’ancrage sur cloison sèche (x2) B. Vis à bois (x2) C. Plaque de montage D. Support 4B E. F. G. H. Lista de piezas A. Ancla para paneles de yeso (x2) B. Tornillo para madera (x2) C. Placa de montaje D. E. F. G. H. Remove cover from Ink Stamp (F).
2 3 2 For Wood stud, proceed to Step 4A . For Hollow wall, proceed to Step 4B . Para viga de madera, vaya al paso 4A . Para pared hueca, vaya al paso 4B . D 1 1. 2. 1. 2. 1. 2. Ensure the set screw hole is facing downward. Push on Post (D) against the wall to compress the Ink Stamp (F). Set product aside. Asegúrese de que el tornillo de fijación esté mirando hacia abajo. Empuje el poste (D) contra la pared para comprimir el sello de tinta (F). Deje a un lado el producto armado.
INS10549 - 4/16 4A OpciónWoodparastudvigaoption de madera Installation sur montant en bois 6A OpciónWoodparastudvigaoption de madera stud option 5A OpciónWood para viga de madera Installation sur montant en bois Installation sur montant en bois 1/16" 1.6 mm C 1 x2 B 2 1/16" bit / Broca de 1/16" / Mèche de 1,6 mm (1/16 po) Drill 1/16" holes at the ink marked stamp locations. Perfore agujeros de 1/16" en los lugares marcados por el sello de tinta.
INS10549 - 4/16 Re-marking Instructions / Instrucciones para volver a marcar / Directives pour effectuer de nouveaux marquages A1 A2 A3 Rubbing alcohol (isopropyl alcohol) Alcohol fino (alcohol isopropílico) Alcool à friction (alcool isopropylique) 0 45 30 15 Sec. Apply one drop of rubbing alcohol (isopropyl alcohol) to each Ink Stamp reservoir. Apply cap, let stand for 30 sec.
Moen Incorporated 25300 Al Moen Drive North Olmsted, Ohio 44070-8022 U.S.A. INS10549 - 4/16 ©2016 Moen Incorporated Moen de Mexico, S.A. de C.V. Carretera Saltillo-Monterrey KM 14.7 Ramos Arizpe, Coahuila Mexico 25900 Moen Inc.
INS10551 - 4/16 Please Contact Moen First For Installation Help, Missing or Replacement Parts (USA) 1-800-BUY-MOEN (1-800-289-6636) Mon - Fri 8:00 AM to 7:00 PM, Eastern Sat. 9:00 AM to 3:00 PM Eastern WWW.MOEN.COM Installation Guide Guía de Instalación Guide d’installation (Canada) 1-800-465-6130 Mon - Fri 7:30 AM to 8:00 PM, Eastern WWW.MOEN.
E x2 x4 A x4 B F x2 G x2 C H I x2 D Parts List A. B. C. D. E. Dry Wall Anchor (x4) Wood Screw (x4) Ink Stamp (x2) Set Screw (x2) Mounting Plate (x2) J F. G. H. I. J. Lista de piezas Post (x2) Bar Level Red Pin Hex Wrench Confirm all parts are present 6 A. Ancla para paneles de E. F. G. H. I. J. yeso (x4) B. Tornillo para madera (x4) C. Sello de tinta (x2) D.
1 3 2 H F 2 C x2 G F 1 1. 2. 1. 2. 1. 2. Remove film backing from adhesive on included Level (H). Center level (H), adhesive side down, on top of the Bar (G). Press evenly to adhere. Retire la película protectora del adhesivo en el nivel incluido (H). Centre el nivel (H),con el lado adhesivo hacia abajo, sobre el barral (G). Presione en forma pareja para adherir. Détacher la pellicule de l’endos de la partie adhésive sur le niveau (H) (compris).
INS10551 - 4/16 4 2 F 5 Important / Importante / Importante G 90˚ 90˚ F 1 2 1 C C 2 1. 2. 1. 2. 1. 2. Choose location for installation. Gently place the assembled product against the wall, ensuring bar is level. Before you compress the Ink Stamps, ensure the set screw holes are facing downward. Important: Ensure Bar (G) and both Posts (F) are at a 90° angle. Elija el lugar de instalación. Coloque el producto armado suavemente contra la pared, asegurándose de que el barral esté a nivel.
INS10551 - 4/16 Hollow wall option 11B Opción para pared hueca Hollow wall option 12B Opción para pared hueca Option pour mur creux 13 Option pour mur creux I Hollow wall option Opción para pared hueca Option pour mur creux x2 E x4 1 B 2 I To actuate Dry Wall Anchors (A) Lightly tap Red Pin (I) with hammer until lower portion of Pin is engaged with the Dry Wall Anchors (A) leaving upper portion exposed.
Re-marking Instructions / Instrucciones para volver a marcar / Directives pour effectuer de nouveaux marquages A1 A2 Rubbing alcohol (isopropyl alcohol) Alcohol fino (alcohol isopropílico) Alcool à friction (alcool isopropylique) A3 0 45 30 15 Sec. Apply one drop of rubbing alcohol (isopropyl alcohol) to each Ink Stamp reservoir. Apply cap, let stand for 30 sec.
A J B K F L G M C CAUTION — TIPS FOR REMOVAL OF OLD FAUCET: Always turn water supply OFF before removing existing faucet or disassembling the valve. Open faucet handle to relieve water pressure and ensure that complete water shut-off has been accomplished. PRECAUCIÓN — CONSEJOS PARA CAMBIAR LA LLAVE MEZCLADORA: Siempre CIERRE la toma de agua antes de quitar la llave existente o desmontar la válvula. Abra la llave para liberar la presión, y asegúrese de que esté bien cerrada el agua.
INS10083B - 6/16 1A 1 F C or o ou F * option opcion option A B * option opcion option C For single hole installations, place deck gasket (C) on the underside of the faucet body (F). Insert faucet into sink opening. For 3 Hole Applications: Insert foam gasket (B) into underside of the deck plate (A) onto sink and insert faucet body (F) into opening. Para instalaciones de un solo agujero, coloque el empaque de cubierta (C) en la parte de abajo del cuerpo de la mezcladora (F).
5 4 H I Sealant Sellador Mastic E L Place the small end of the mounting tool (E) onto the mounting nut (I) and tighten to secure the mounting bracket (H). Insert a screwdriver into the hole and turn clockwise as shown. Clean drain opening in the bottom of sink. Apply a generous amount of sealant to the underside of the waste seat (L). Coloque el extremo pequeño de la herramienta de montaje (E) sobre la tuerca de montaje (I) y apriete para fijar la ménsula de montaje (H).
INS10083B - 6/16 9 8 K N M NO NO NON YES SÍ OUI Rotate pivot rod opening on side of drain body (N) to face towards wall as illustrated. Install lift rod (K) into opening on the top of the faucet. Slide the lift rod strap (M) onto lift rod and tighten the bolt finger tight. Final tightening will be completed during Step 13. Haga girar la abertura del pivote en el costado del cuerpo del desagüe (N) para que mire hacia la pared como se ilustra.
11 12 M 2 1 Q 3 11A Q S R 11B J 1 J 2 1 The pivot rod (Q) can be installed in two ways. Illustration (11A) shows the pivot rod (Q) next to hole in plug (J). This allows the plug (J) to be pulled out for cleaning. Illustration (11B) shows the pivot rod (Q) inserted into the hole in the plug (J). This prevents the plug (J) from being easily removed after installation. Once the pivot rod is installed (11A or 11B), tighten the pivot rod nut (R). Push pivot rod (Q) down.
INS10083B - 6/16 14 15 Optional/Optionnel/Opcional D 3/8" (9.5mm) Hot / Caliente / Chaud Attach the hot supply on the left side to the hot water shut off valve and tighten with a wrench. Do not use thread seal tape. Repeat these steps for the cold side. If the supply lines are too long, looping is acceptable. Turn on the water supply line valves on and check for leaks. Attach the Product Identification Label (D) in a conspicuous location such as on an inlet supply line.
Cleaning Instructions Instrucciones para la limpieza Directives de nettoyage Spot Resist™ Stainless and Spot Resist™ Brushed Nickel Finishes: Moen recommends cleaning the Spot Resist finish with a mild soap, rinsing thoroughly with warm water and drying with a clean, soft cloth. Never use cleaners containing abrasives (including abrasive sponges or steel wool), ammonia, bleach or sodium hypochlorite, organic solvents (e.g. alcohols) or other harsh chemicals (e.g.