
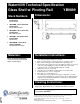
Dimensions Guide

Glass Shelf with Pivoting Rail is
constructed of zinc posts and rail.
Shelf is tempered glass.
YB9899CH – Glass Shelf with
Pivoting Rail
Chrome Finish
YB9899BN – Glass Shelf with
Pivoting Rail
Brushed Nickel Finish
YB9899WR – Glass Shelf with
Pivoting Rail
Wrought Iron Finish
YB9899NL – Glass Shelf with
Pivoting Rail
Nickel Finish
YB9899ORB – Glass Shelf
with Pivoting Rail
Oil Rubbed Bronze Finish
Cleaning Instructions:
25300 AL MOEN DR I VE N OR TH OLMSTED , OH 44070
C OR POR ATE H EAD QU AR TER S: (800) 321 -8809 F AX: (800) 848-6636
I N TER N ATI ON AL: (440) 962 -2000 F AX: (440) 962-2726
C U STOMER SER VI C E (U SA): 800 -882-0116 F AX: (888) 379 -2720
W W W . MOEN . C OM
Copyright Creative Specialties International Literature #BA1190
1. Position the mounting template on the wall in the desired location. Using a
level, align the template and tape it to the wall.
2. Remove each mounting post from the body by loosening the setscrew.
3. Place each mounting post on the template with notch facing down.
4. One at a time, place each anchor screw through the mounting post, centered
in the hole. Using a Phillips screwdriver, turn the anchor screw while
applying pressure. Screw will self drill and tap into drywall.
5. Only insert screw ½ to ¾ into wall.
6. After all screws are installed, tear the template away from the wall.
7. Tighten all 4 screws. Do not over tighten.
8. Place skirt over each mounting post.
9. Assemble glass to each post by removing the pivoting rail. Loosen both
setscrews below rail with the provided hex wrench. Re-assemble with glass
shelf between both washers and finish by screwing the pivoting rail back
on, by tightening the setscrews.
10. Place each post over the mounting plate with setscrew down. Tighten both
setscrews.
Stock Number:___________Glass Shelf w/ Pivoting Rail
By Creative Specialties
Materials:
Installation Instructions:
Stock Numbers:
Dimensions:
Glass Shelf w/ Pivoting Rail
YB9899
Waterhill® Technical Specification
To preserve the fine finish of this product, clean only with a soft
damp cloth. Dry well. Do not use commercial or abrasive cleaners.