Bottom Freezer Refrigerators moffatappliances.ca Safety Instructions . . . . . . . . . . .2, 3 Operating Instructions Care and Cleaning . . . . . . . . . . . . . . . .7, 8 Controls . . . . . . . . . . . . . . . . . . . . . . . . . . . .4 Crispers and Pans . . . . . . . . . . . . . . . . . . .5 Freezer Compartment . . . . . . . . . . . . . . .6 Replacing the Light Bulbs . . . . . . . . . . . .8 Shelves and Bins . . . . . . . . . . . . . . . . . . . .
Safety Instructions IMPORTANT SAFETY INFORMATION. READ ALL INSTRUCTIONS BEFORE USING. WARNING! Use this appliance only for its intended purpose as described in this Owner’s Manual. SAFETY PRECAUTIONS Operating Instructions When using electrical appliances, basic safety precautions should be followed, including the following: ■ This refrigerator must be properly installed and located in accordance with the Installation Instructions before it is used.
WARNING! HOW TO CONNECT ELECTRICITY Do not, under any circumstances, cut or remove the third (ground) prong from the power cord. For personal safety, this appliance must be properly grounded. Have the wall outlet and circuit checked by a qualified electrician to make sure the outlet is properly grounded. Where a standard 2-prong wall outlet is encountered, it is your personal responsibility and obligation to have it replaced with a properly grounded 3-prong wall outlet.
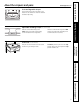
Safety Instructions Operating Instructions About the controls. Initially, set the refrigerator control at 5 and the freezer control at 5. Allow 24 hours for the temperature to stabilize. Several adjustments may be required. Adjust the controls one increment at a time, and allow 24 hours after each adjustment for the refrigerator to reach the temperature you have set.
moffatappliances.ca Fruit and Vegetable Crisper Excess water that may accumulate in the bottom of the drawers or under the drawers should be wiped dry. Operating Instructions Adjustable Humidity Crisper (on some models) Slide the control all the way to the HIGH setting to provide high humidity recommended for most vegetables. Safety Instructions About the crispers and pans. Slide the control all the way to the LOW setting to provide lower humidity levels recommended for most fruits.
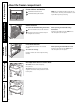
Freezer Shelves and Baskets A full-width fixed wire shelf A full-width sliding wire basket Operating Instructions Safety Instructions About the freezer compartment. NOTE: Do not fill baskets higher than the rim of the basket. This may cause baskets to stick or jam when opening or closing. Basket Removal To remove the full-width sliding wire basket: Open the basket out to its full extension. Lift up the front of the basket and pull straight out to remove.
moffatappliances.ca Cleaning the Outside The door handles and trim. Clean with a cloth dampened with soapy water. Dry with a soft cloth. Do not use wax on the door handles and trim. Cleaning the Inside To help prevent odors, leave an open box of baking soda in the refrigerator and freezer compartments. Unplug the refrigerator before cleaning. If this is not practical, wring excess moisture out of sponge or cloth when cleaning around switches, lights or controls.
Preparing for Vacation For long vacations or absences, remove food and unplug the refrigerator. Clean the interior with a baking soda solution of one tablespoon (15 ml) of baking soda to one quart (1 liter) of water. Leave the doors open. Installation Instructions Operating Instructions Safety Instructions Care and cleaning of the refrigerator.
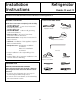
Installation Instructions Refrigerator Models 20 and 22 Questions? Call 1.800.561.3344 or Visit our Website at: moffatappliances.ca BEFORE YOU BEGIN TOOLS YOU MAY NEED Read these instructions completely and carefully. • IMPORTANT — Save these instructions for local inspector’s use. • • • • • • • Adjustable Wrench IMPORTANT — Observe all governing codes and ordinances. Note to Installer – Be sure to leave these instructions with the Consumer.
Installation Instructions INSTALLING THE REFRIGERATOR REFRIGERATOR LOCATION 4 REMOVE THE FRESH FOOD DOOR HANDLE • Do not install the refrigerator where the temperature will go below 60°F (16°C) because it will not run often enough to maintain proper temperatures. • Do not install the refrigerator where the temperature will go above 100°F (37°C) because it will not perform properly. • Install it on a floor strong enough to support it fully loaded.
Installation Instructions 5 REMOVE THE FREEZER DOOR HANDLE 6 ATTACH THE FRESH FOOD DOOR HANDLE (cont.) Stainless steel and plastic handles: A Loosen the set screws located on the underside of the handle with the 1/8″ Allen wrench and remove the handle. NOTE: If the handle mounting fasteners need to be tightened or removed, use a 3/16″ Allen wrench. Plastic handle: A Attach the handle to the handle mounting fasteners by aligning the slots with the handle mounting fasteners.
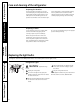
Installation Instructions INSTALLING THE REFRIGERATOR (cont.) 8 LEVEL THE REFRIGERATOR 9 SET THE CONTROLS The leveling legs have 2 purposes: 1) Leveling legs adjust so the refrigerator is firmly positioned on the floor and does not wobble. 2) Leveling legs serve as a stabilizing brake to hold the refrigerator securely in position during operation and cleaning. The leveling legs also prevent the refrigerator from tipping. Set the controls to the recommended setting.
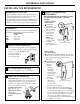
Installation Instructions REVERSING THE DOOR SWING 1 REMOVE THE IMPORTANT NOTES REFRIGERATOR DOOR When reversing the door swing: NOTE: Door swing is not reversible on stainless steel models. • Read the instructions all the way through before starting. • Parts are included in the door hinge kit. • Handle parts carefully to avoid scratching paint. • Set screws down by their related parts to avoid using them in the wrong places. • Provide a non-scratching work surface for the doors.
Installation Instructions REVERSING THE DOOR SWING (cont.) 2 REMOVE FREEZER DOOR 3 TRANSFER CENTER HINGE BRACKET (cont.) A Tape the door shut with masking tape. B Transfer the plug button and screw hole cover in the hinge holes on the left side to the right side. B Remove the hinge pin from the hinge bracket. This will be used again with the new hinge bracket for the other side. C Remove the tape and tilt the door away from the cabinet. Lift the door off the bottom hinge pin.
Installation Instructions 5 INSTALL BOTTOM HINGE AND 6 TRANSFER REFRIGERATOR AND LEVELING LEG A FREEZER DOOR STOPS Using a 1/2″ socket ratchet/driver, install the hinge pin and nut in the opposite hole on the hinge bracket with leveling leg. A B C B Using a 5/16″ socket ratchet/driver, install the hinge bracket with leveling leg on the left side of the refrigerator. The pin will be toward the outside of the refrigerator.
Installation Instructions REVERSING THE DOOR SWING (cont.) 9 REHANG REFRIGERATOR DOOR A Lower the refrigerator door onto the center hinge pin. Ensure that the plastic hinge pin thimble is on the center hinge pin or inside door hinge pin hole located in the bottom of the door. B Insert the door thimble into the hinge hole on top of the refrigerator door and then insert the top hinge pin. Make sure the door is aligned with the cabinet. Attach the hinge to the top of the cabinet loosely with the bolts.
moffatappliances.ca Newer refrigerators sound different from older refrigerators. Modern refrigerators have more features and use newer technology. Do you hear what I hear? These sounds are normal. HUMMM... WHOOSH... and longer than your old refrigerator and you may hear a high-pitched hum or pulsating sound while it is operating. ■ You may hear a whooshing sound when the doors close. This is due to pressure equalizing within the refrigerator. ■ You may hear the fans spinning at high speeds.
Safety Instructions Operating Instructions Installation Instructions Troubleshooting Tips Consumer Support Before you call for service… Troubleshooting Tips Problem Possible Causes What To Do Motor operates for long periods or cycles on and off frequently. (Modern refrigerators with more storage space and a larger freezer require more operating time. They start and stop often to maintain even temperatures.) Normal when refrigerator is first plugged in.
Refrigerator compartment light does not work No power at outlet. • Replace fuse or reset the breaker. Light bulb burned out or loose. • See Replacing the light bulbs. Door does not close by itself Leveling legs need adjusting. • See Installing the Refrigerator. Freezer door pops open when refrigerator door is closed This is normal if, after popping open, the freezer door closed on its own. • This indicates that there is a good seal on the freezer door.
Consumer Support Troubleshooting Tips Installation Instructions Operating Instructions Safety Instructions Notes.
Please place in envelope and mail to: Veuillez mettre dans une enveloppe et envoyez à : OWNERSHIP REGISTRATION P.O.
CUSTOMER WARRANTY (for customers in Canada) Your refrigerator is warranted to be free of defects in material and workmanship.
Consumer Support. GE Appliances Website moffatappliances.ca Have a question or need assistance with your appliance? Try the GE Appliances Website any day of the year! For greater convenience and faster service, you can now download Owner’s Manuals or order parts on-line. Schedule Service 1.800.561.3344 Expert GE repair service is only one step away from your door. To schedule your service at your convenience 24 hours any day, call 1.800.561.3344 during normal business hours.
Congélateur inférieur Réfrigérateurs electromenagersmoffat.ca Mesures de sécurité . . . . . . . . . .2, 3 Fonctionnement Clayettes et bacs . . . . . . . . . . . . . . . . . . . .4 Compartiment congélateur . . . . . . . . . .6 Entretien et nettoyage . . . . . . . . . . . . .7, 8 Les bacs à rangement et bacs à légume . . . . . . . . . . . . . . . . . . . .5 Les commandes . . . . . . . . . . . . . . . . . . . . .4 Remplacement des ampoules . . . . . . . . .
AVERTISSEMENT! N’utilisez cet électroménager que pour l’usage auquel il est destiné, comme expliqué dans le présent manuel. MESURES DE SÉCURITÉ Lorsque vous utilisez un appareil électrique, observez toujours les mesures de sécurité de base, y compris les suivantes. ■ Installez le réfrigérateur conformément aux directives d’installation avant de l’utiliser. Fonctionnement Mesures de sécurité MESURES DE SÉCURITÉ IMPORTANTES. LISEZ D’ABORD TOUTES LES DIRECTIVES.
AVERTISSEMENT! RACCORDEMENT ÉLECTRIQUE Ne coupez ni retirez en aucun cas la troisième broche (mise à la terre) de la fiche du cordon d’alimentation. Pour votre sécurité, cet appareil doit être correctement mis à la terre. Faites examiner la prise de courant et le circuit par un électricien qualifié pour vous assurer que la prise est correctement mise à la terre.
Mesures de sécurité Fonctionnement Les commandes avec réglages de température. Initialement, réglez le réglage de votre compartiment réfrigération en position 5 et celui de votre compartiment congélation en position 5. Attendez 24 heures que la température se stabilise. Plusieurs ajustements peuvent être requis. Ajustez le réglage une unité à la fois, et attendez 24 heures après chaque ajustement que le réfrigérateur atteigne la température que vous avez réglée.
electromenagersmoffat.ca Bacs à fruits et légumes Vous devez bien essuyer toute eau en excès qui peut s’accumuler au fond des bacs ou en dessous des bacs. Fonctionnement Bac à légume à humidité réglable (sur certains modèles) Faites glisser le réglage en position HIGH (élevée) pour obtenir l’humidité maximum qui est recommandée pour la plupart des légumes. Mesures de sécurité Bacs à rangement et bacs à légume.
Clayettes et paniers du compartiment congélation Une clayette fixe pleine largeur Un panier coulissant pleine largeur NOTE : Ne remplissez pas les paniers au-delà du bord du panier. Cela pourrait provoquer un bourrage ou coincer le panier, lors de l’ouverture ou de la fermeture. Enlèvement du panier Fonctionnement Mesures de sécurité Compartiment congélation. Pour retirer le panier coulissant pleine largeur : Tirez le panier à sa pleine extension.
electromenagersmoffat.ca Nettoyage de l’extérieur Les poignées de porte et les garnitures. Nettoyez avec un linge trempé dans de l’eau savonneuse. Séchez avec un linge doux. N’appliquez pas de cire sur les poignées et les garnitures de porte. Nettoyage de l’intérieur Après avoir nettoyé les joints de porte, appliquez une fine couche de vaseline sur les joints du côté des charnières pour empêcher les joints de coller et de se déformer. Débranchez votre réfrigérateur avant de le nettoyer.
Départ en vacances Lorsque vous vous absentez pendant une période prolongée, videz et débranchez le réfrigérateur. Nettoyez l’intérieur avec une solution d’eau et de bicarbonate de soude, à raison 15 ml (d’une cuillère à soupe) de bicarbonate par litre (1 pinte) d’eau. Laissez les portes ouvertes. Fonctionnement Mesures de sécurité Entretien et nettoyage de votre réfrigérateur.
Instructions d’installation Réfrigérateur Modèles 20 et 22 Questions? Appelez le 1.800.561.3344 ou Visitez notre site Web à l’adresse : electromenagersmoffat.ca OUTILS DONT VOUS POUVEZ AVOIR BESOIN AVANT DE COMMENCER Veuillez lire toutes les directives attentivement. • IMPORTANT — Conservez ces instructions Tournevis à cliquet de 3/8 po et de 5/16 po pour l’inspecteur local. • • • • • • • IMPORTANT — Respectez toutes Clé réglable les ordonnances et les codes locaux.
Instructions d’installation INSTALLATION DU RÉFRIGÉRATEUR EMPLACEMENT DU RÉFRIGÉRATEUR 4 ENLEVEZ LA POIGNÉE DE PORTE • N’installez jamais votre réfrigérateur dans un emplacement où la température ambiante sera inférieure à 16° C (60° F). Il ne se mettra pas en marche suffisamment souvent pour maintenir des températures convenables. • N’installez jamais votre réfrigérateur dans un emplacement où la température ambiante sera supérieure à 37° C (100° F). Il ne fonctionnera pas bien.
Instructions d’installation 5 ENLEVEZ LA POIGNÉE DE LA PORTE 6 FIXEZ LA POIGNÉE DE LA PORTE DU COMPARTIMENT CONGÉLATION DU COMPARTIMENT ALIMENTS FRAIS (suite) Poignées en acier inoxydable et en matière plastique : A Desserrez les vis de l’ensemble situées en bas de la poignée à l’aide de la clé Allen de 1/8 po et enlevez la poignée. NOTE : Si vous devez resserrer ou enlever les fixations de montage de la poignée, utilisez la clé Allen de 3/16 po.
Instructions d’installation INSTALLATION DU RÉFRIGÉRATEUR (suite) 8 METTEZ LE RÉFRIGÉRATEUR 9 RÉGLEZ LES COMMANDES DE NIVEAU Réglez les commandes selon les recommandations. Les pieds de nivellement jouent deux rôles : 1) Elles peuvent être réglées de manière à permettre à l’appareil de reposer solidement sur le sol. 2) Les pieds de nivellement servent de frein de stabilisation, pour tenir le réfrigérateur bien en place pendant son fonctionnement et son nettoyage.
Instructions d’installation CHANGEMENT DU SENS D’OUVERTURE DES PORTES 1 ENLÈVEMENT DE LA PORTE NOTES IMPORTANTES DU COMPARTIMENT RÉFRIGÉRATION Pour changer le sens d’ouverture des portes : NOTE : Vous ne pouvez pas changer le sens d’ouverture des portes sur les modèles en acier inoxydable. • Lisez les instructions jusqu’à la fin avant de commencer. • Les pièces sont comprises dans l’ensemble de charnière de porte. • Manipulez les pièces avec soin pour éviter de rayer la peinture.
Instructions d’installation CHANGEMENT DU SENS D’OUVERTURE DES PORTES (suite) 2 ENLEVEZ LA PORTE DU CONGÉLATEUR 3 FAITES PASSER LE SUPPORT DE LA CHARNIÈRE CENTRALE (suite) A Maintenez la porte fermée à l’aide de ruban-cache. B Faites passer le bouton et le couvercle des trous de charnière du côté gauche au côté droit. B Enlevez l’axe du support de charnière. Il sera réutilisé avec le nouveau support de charnière de l’autre côté. C Enlevez le ruban et éloignez la porte de l’armoire.
Instructions d’installation 5 INSTALLEZ LA CHARNIÈRE INFÉRIEURE 6 TRANSFERT DES ARRÊTS DE LA PORTE ET LA PATTE DE NIVELLEMENT A DU COMPARTIMENT RÉFRIGÉRATION ET DU COMPARTIMENT CONGÉLATION À l’aide d’une clé à douille 1/2 po, installez l’axe et l’écrou de charnière dans le trou opposé sur le support de charnière à patte de nivellement. A B C B Enlevez l’arrêt de la porte situé en bas à droite de la porte du compartiment réfrigération en enlevant les deux vis.
Instructions d’installation CHANGEMENT DU SENS D’OUVERTURE DES PORTES (suite) 8 REMISE EN PLACE DE LA PORTE A 9 RE-SUSPENSION DE LA PORTE DU COMPARTIMENT CONGÉLATION DU COMPARTIMENT RÉFRIGÉRATION (suite) Abaissez la porte du compartiment congélation sur l’axe de charnière inférieure. Veillez à ce que la bague en plastique soit placée sur l’axe de charnière ou à l’intérieur du trou de l’axe de charnière situé au bas de la porte.
electromenagersmoffat.ca Les réfrigérateurs plus récents font des bruits différents de ceux des anciens. Les réfrigérateurs modernes présentent plus de fonctions et sont plus avancés sur le plan technologique. Entendez-vous ce que j’entends ? Ces bruits sont normaux. OUIR ! HUMMM... OUUCH.... Mesures de sécurité Bruits de fonctionnement normaux. ■ Le nouveau compresseur à rendement élevé peut fonctionner plus ■ Vous pouvez entendre les ventilateurs tourner à hautes vitesses.
Mesures de sécurité Fonctionnement Installation Avant d’appeler un réparateur… Problème Causes possibles Le moteur fonctionne pendant de longues périodes ou démarre et et s’arrête fréquemment. s’arrête fréquemment. (Les (Les réfrigérateurs réfrigérateurs congélateurs étant plus modernes et leurs grands, leur moteur doit congélateurs étant plus grands, leur moteur doit fonctionner fonctionner plus plus longtemps. longtemps.
Problème Causes possibles La lumière de compartiment Pas d’électricité à la prise. réfrigération ne s’allume pas Correctifs • Remplacez le fusible ou remettez en marche le disjoncteur. La porte ne ferme pas seul Vous devez ajuster les pieds de nivellement. • Consultez Installation du réfrigérateur. La porte du compartiment congélation s’ouvre quand la porte du réfrigérateur est fermée C’est normal si, après s’être ouverte, la porte du compartiment congélation se referme tout seul.
Soutien au consommateur Conseils de dépannage Installation Fonctionnement Mesures de sécurité Notes.
Please place in envelope and mail to: Veuillez mettre dans une enveloppe et envoyez à : OWNERSHIP REGISTRATION P.O.
22
GARANTIE DU CLIENT (pour la clientèle au Canada) Votre réfrigérateur est garanti contre tout défaut de matériau et de fabrication.
Soutien au consommateur. Site Web appareils électroménagers GE electromenagersmoffat.ca Vous avez une question ou vous avez besoin d’aide pour votre appareil électroménager? Contactez-nous par Internet au site electromenagersmoffat.ca 24 heures par jour, tous les jours de l’année. Service de réparations 1.800.561.3344 Service de réparations GE est tout près de vous. Pour faire réparer votre électroménager GE, il suffit de nous téléphoner.