
Installation & Assembly


Installation Instructions
For Laminate oors that require a oating installation
©2019 | 0740ES | 07/2019 | Page 1/5MOHAWK TECHNICAL SERVICES DEPARTMENT | 508 EAS T MORRIS S TREET, DALTON, GA. 30721 | 888.387.9881
LAMINATE FLOOR
General
Uniclic
®
is a revolutionary system for installing laminate floors without using glue. The panels can be clicked together simply, thanks to the ingenious shape of
the tongue and groove. Uniclic
®
is unique because you can install the planks in two different ways:
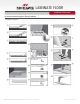
Method A: Angle-In Installation. RECOMMENDED FOR MOST AREAS
Position the plank to be installed at an angle of 20° to 30° to the plank already installed. Move the plank gently up and down while applying forward
pressure. The plank will automatically click into place. You can either insert the tongue into the groove or the groove onto the tongue.
See Diagrams 1A-1B-1C.
Method B: Flat Installation. USE WHEN METHOD A CANNOT BE USED
With Uniclic
®
you can also tap the planks into each other without lifting using a Uniclic
®
tapping block (sold separately). To avoid damaging the planks, tap
them together gradually with the tapping block flat on the floor. See Diagrams 2A-2B. Use this method only in cases where you are unable to use the
Angle-In method (see above). The rest of your floor should be installed using the Angle-In method.
Tools for Installing the Floor
For best results, follow the installation instructions above. In addition to the regular tools for installing laminate floors (i.e. hammer, saw, pencil, tape
measure, level), you will also need the following accessories:
• Installation kit (pull bar, spacers and Uniclic
®
-adapted tapping block)
• UniFix
®
tool (optional)
• Saw: Cut pattern side-down when using a jigsaw, sabre saw or circular saw. Cut pattern side-up when using a laminate cutter, handsaw, table saw or crosscut saw.
• Underlayment system
• Finishing moldings
• 100% silicone sealant
10 Focus Points
1. Thanks to the Uniclic
®
system, the oor oats and is installed without glue. You can walk on the oor during and immediately after installation.
2. With the Uniclic
®
system, you can choose where you want to begin. Consider the easiest way to install the oor. For example, installation for right-handed
people is optimal from left to right.
3. Make sure the planks are mixed sufciently so that you do not end up with too many identical light or dark planks next to each other.
4. Check all planks in daylight before and during installation. Do not use any defective planks.
5. The oor should be installed parallel to the light entering the room. The required conditions are 60°-85°F at a relative humidity of 35-65%.
6. Acclimation: All 7mm products must acclimate for 48 hours in its sealed packaging in the middle of the room where it is to be installed. Under normal
conditions, all other ooring requires no acclimation period. Outside of the normal conditions, let the planks acclimate for 48 hours in the unopened
packaging at the normal room temperature in the middle of the room where the oor is to be installed. Normal conditions means a difference of no
more than 25°F and 20% relative humidity between the stocking/ transportation environment of the ooring and the nal installation environment
of the ooring.
7. Room humidity varies according to season, so it is vital that the oor is able to expand and contract. Be sure to leave a 3/8-inch minimum expansion
joint on all sides of the oor, around pipes, thresholds, under doors and around any xed objects (oor vents, kitchen islands, etc.).
8. Large rooms must have expansion joints every 40 feet width-wise to the planks and every 40 feet length-wise. An expansion joint is recommended
between different rooms (e.g. under the door). Expansion joints can be nished by means of a molding that is attached to the suboor.
9. Ensure that the end joints of the planks in two successive rows are never in line. Always ensure that the joints are staggered by at least 6 inches.
10. We recommend you purchase extra cartons in case you have some damaged pieces, miscalculate the room size, cut any pieces incorrectly or need
replacement planks for future repairs.