
Installation & Assembly


TYPICAL TROWEL AND APPROXIMATE COVERAGE*
3/16” x 1/4” x ½” V-notch trowel: 50 to 65 square ft. per gallon.
*Coverage is based on application to a clean, smooth concrete substrate; therefore,
application rate may vary depending on substrate conditions
NOTE: Do not apply over self-stick tile, sheet vinyl, old adhesives, metal, linoleum,
laminate, particleboard or strip wood sub-floors without first covering with an
approved wood or wood composite underlayment. Air temperature must be between
50 F and 100 F for applying ProTack M908/WUA2 Urethane Adhesive.
• Product must be used in its entirety when opened. Lid cannot be re-sealed.
• Temperature and humidity will affect the curing time. The higher the temperature
and humidity, the faster the cure.
APPLICATION
1. Regulate temperature and humidity 72 hours before, during and after installation.
2. Spread adhesive using recommended trowel, ensuring 95 – 100%
adhesive contact.
Wet-lay method: Press flooring firmly into adhesive immediately after troweling.
Walk-on method: Press flooring firmly into adhesive after it has developed
its initial grab (typically, after 15 to 20 minutes).
3. Remove any adhesive smudges or drops immediately as adhesive is very difficult
to remove once allowed to dry. Clean tools while adhesive is fresh using a
urethane adhesive remover or mineral spirits.
4. Avoid light/regular foot traffic for at least 12 hours. Avoid heavy foot traffic for at
least 24 hours.
Use clean white terry cloth towels with mineral spirits to clean as you go. It is easy
and convenient to use. Adhesive that has cured on the surface of the flooring can be
difficult to remove.
Getting Started Direct Glue:
There are two ways to install when using a moisture cured urethane wood flooring
adhesive (wet lay meaning to lay directly into wet adhesive and dry-lay method
meaning to allow the adhesive to flash or to tack up.)
Caution: Whether you choose to install using the dry or wet method, follow all
guidelines set by the adhesive manufacturer as well as the flooring manufacturer. By
not adhering to the guidelines you can void your flooring warranties.
General Information for Glue-Down Installations
1. Use cement-based patch, skim coat leveling products to correct substrate
imperfections.
2. Regulate temperature and humidity 72 hours before, during and after installation.
3. At least 48 hours before installation, place cartons of wood flooring in the
installation area.
4. Install and secure starter row.
5. Spread adhesive using recommended trowel, ensuring 95 to 100% adhesive
contact. Wet Lay method: press flooring firmly into adhesive immediately after
troweling. After the flooring is place, roll the entire installation with a 75 lb.
smooth roller.
6. Inspect the installation and remove any adhesive smudges or drops immediately
using mineral spirits. NOTE: Urethane adhesive is very difficult to remove once
dry and cured. Make every effort to prevent adhesive from getting on the flooring
surface. For best results, keep a urethane adhesive cleaner or mineral spirits
nearby to remove any adhesive smudges or drops during installation.
7. Clean tools while adhesive is fresh using a urethane adhesive cleaner or mineral
spirits.
8. Avoid light/regular traffic for at least 12 hours. Avoid heavy traffic for at least 24
hours.
9. See adhesive manufacture guidelines for OPEN TIME on the adhesive
container.
10. Proper ventilation within the room must be provided. An electric fan is helpful.
Step 1 (Wet Lay Method)
Select a starter wall. It is recommended to start the installation along an exterior wall.
It’s more likely to be straight and square with the room. Measure out from the wall the
width of two planks plus 3/8” expansion and mark each end of the room and snap your
chalk line.
Step 2
Spread adhesive from the chalk line to the starter wall using the recommended trowel
size. It is important to use the correct trowel at a 45° to get the proper spread of
adhesive applied to the sub-floor, which will produce a proper and permanent bond.
Improper bonding can cause loose or hollow spots.
Note: Change the trowel every 2000 to 3000 square feet (or sooner as needed) due to
wear down of the dimples. This assures you always get the proper spread of adhesive.
Step 3
Install the first row of starter planks with the tongue facing the starter wall and secure
into position. Alignment is critical and can be achieved by securing a straight edge
along the chalk line (2x4’s work well), or by top nailing the first row with finishing nails
(wood sub-floor), or adjustable spacers (concrete sub-floor). This prevents slippage of
the planks that can cause misalignment.
Note: The planks along the wall may have to be scribed and cut to fit in order to
maintain a consistent expansion space since most walls are not straight .Try to
maintain at least 2” on the scribed plank.
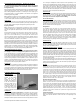
Step 4
Once the starter rows are
secure spread 2 ½ to 3 feet of
adhesive the length of the
room. (Never lay more
adhesive than can be covered
in approximately 1 hr.) Place
tongue into groove of plank or
strips and press firmly into
adhesive. Never slide planks
or strips through adhesive.
Use Uniclic Tapping Block if necessary to fit planks snug together at side and butt
ends. Clean any adhesive off the surface before it cures using clean terry cloth towels
and mineral spirits.
Note: Never work on top of the flooring when installing. If you must work on top of the
newly laid flooring use a kneeling board.
Secure your starter rows with a straight edge (2x4’s). Once the remainder of the floor
has been installed, go back to the beginning and remove the straight edges and
spread adhesive on the remainder of the open sub-floor. Remember planks closest to
the wall may have to be scribed and cut to fit due to irregularities along the wall. When
using Mohawk’s Pro-Tack M908/WUA2 adhesive it is not necessary to roll the
floor.
Clean Up
Use clean white terry cloth towels to clean as you go along with mineral spirits.
It is easy and convenient to use. Adhesive that has cured on the surface of the flooring
can be difficult to remove.
Light foot traffic is allowed after 12 hours but wait 24 hours after installation to remove
the Low Adhesion Delicate Surface Painters Tape. Once the tape is removed clean
any adhesive residue left from the tape using mineral spirits on a clean white terry
towel.
Final Touches
Trim excess underlayment (floating installation only) and install or re-install any
transition pieces, reducer strips, T-moldings, thresholds, bases and/or quarter round
moldings. Trims and moldings should be nailed into the wall, or subfloor, not the floor.
Install the proper trim molding at the doorways to achieve the transition and along the
walls to cover the edges of any gaps along the wall due to irregularity.
Complete the job by using the wood filler that coordinates with the installed engineered
flooring for minor corrections or areas where brad nails were used in the trim or the
flooring. Clean the finished floor with Performance Accessories Cleaner.
To prevent surface damage, avoid rolling heavy furniture and appliances on the floor.
Use plywood or appliance lifts if necessary. Use protective castors/castor cups or felt
pads on the legs of furniture to prevent damage to the flooring.
Clean Up
Use clean white terry cloth towels to clean as you go along with mineral spirits. It is easy
and convenient to use. Adhesive that has cured on the surface of the flooring can be
difficult to remove. Measures should be taken to protect floors from other trade work.
If the floor is to be covered, the floor should be thoroughly cleaned prior to
covering to prevent grit damage to the finish. Do not cover with plastic, red
rosin, felt or wax paper or previously used cardboard. Instead use a breathable
material such as clean, dry, plain uncoated cardboard or Kraft paper. Inks from
printed cardboard could damage the hardwood floor.
A common reinforced builder’s paper is a good choice. Any covering should be taped,
using a low-adhesion tape, to base or shoe moldings. Avoid taping to finished flooring.
When taping paper or sheets together, tape them to each other, not to the floor. The
floor must be completely covered to eliminate uneven ambering from exposure to UV
light.
Page 4
Generic Multi-Layered T&G Installation Instructions 071315