
Installation Guide


2
Residential Installation Guide — LVT Click
Start of Installation
It is the installer’s responsibility to inspect the ooring prior to installation to ensure that there are no visual defects. Donot
installooringwithvisibledefects.Ifvisibledefectsarepresent,contactyourretailerimmediately.
• Floor must be clean, smooth, at and dry before installation.
• Check the tongue and groove to assure it is free of debris or damage.
• To achieve maximum appearance, mix planks from two to three cartons from the same production.
The advantage of Mohawk LVT Click product is that it allows you to choose your own starting position, direction and can
work one plank/tile at a time.
Walls are not always straight. Snap a chalk line for your rst row to follow.
Maintain a ¼" (½ cm) expansion space around all walls. Quarter round or baseboard molding will cover this expansion
space. IMPORTANT: Maintain the 1/4 inch space around cabinets, pipes, toilet anges and any obstacle in the oor.
• For plank installation, we recommend staggering the end joints a minimum of 6 inches.
• For tile installation, we recommend staggering the end joints a minimum of 3 inches.
NOTE: Do not install four corners together, as this will not provide a stable installation.
Clicking Planks/Tiles Together
To click the end joint of the plank/tile together, click the short side of the plank/tile vertically into the previous one by
pressing it by hand and rolling it with a hand roller or seam roller to ensure a fully compressed tight t.
To click the length joint of the plank/tile together, place long joint together, lifting slightly to engage lock. Rotate
downward, clicking together for a tight t. Use a small hand roller or seam roller to press/lock the compression t end joint.
To tap along the entire length of plank or tile to properly seal the joint, use a small scrap piece of plank/tile with the lock
on the edge. Lock groove-to-tongue or tongue-to-groove for this application. Lock the scrap piece to the area requiring
tapping, and lightly tap the edge of the material. This will bring the tile edges tight together. Do not use a tapping block.
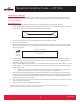
Cut the plank/tile by scoring through the top wear layer with a utility knife then snap the plank/tile across the score.
Install adjoining rows as you did the rst; one piece at a time. Holding the plank/tile at a slight angle, place it against the
prole in the rst row. Rotate the plank/tile down to secure the length joint ensuring there are no gaps along the joint.
The adjoining planks/tiles are aligned by sliding the long joint into position, shifting it to properly match the end joint
against the previous plank/tile. Repeat until you reach the nal row of material.
To install the nal row of planks/tiles, you will usually need to cut them. We recommend the following: lay a panel on top of
the last row installed. Lay another plank/tile against the edge of the wall. Mark the plank/tile underneath. Cut the plank/tile
through the wear layer and snap along the score. Install the last row leaving ample expansion space.
Additional Notes
Molding and Transitions Installation
• All molding and transition strips need to provide a ¼ inch expansion space to allow expansion and contraction of
the suboor. Ensure moldings and transition strips will not pinch the ooring.
• Never allow nails or screws to enter into the LVT ooring or the expansion zone around the ooring perimeter, as
it will prevent proper expansion of the structure and ooring.