Carpet Tile & Plank I N S TA L L AT I O N EcoFlex® EcoFlex® EcoFlex® EcoFlex® NXT AIR Matrix ONE 160 South Industrial Blvd. Calhoun, GA. 30701 MohawkGroup.com Technical Services Department 196 S. Industrial Blvd. Calhoun, GA 30701 800.833.6954 product_tech@mohawkind.com ©2022 mohawkgroup.com | 800.833.
This information, offered as a customer service, is based on Mohawk Group’s engineering test and field experience. It is intended for installers with professional experience to be used at their discretion and risk. Mohawk Group does not guarantee results and assumes no liability in connection with these instructions SITE CONDITIONS Concrete slabs must be tested for moisture by the current version of ASTM F2170. (Consult CRI 104 part 6.
Hydrostatic Pressure If the concrete slab is visibly wet, or experiencing hydrostatic pressure, the cause of the moisture should be properly addressed prior to installation of floor covering. Consult Mohawk Group Technical Services at 800.833.6954 TEMPERATURE The floor and room temperature must be acclimated by maintaining the temperature between 65°F and 85°F, and the humidity between 30% and 65%, for at least 48 hours before and during installation.
FLOOR PRIMING • Concrete: Prime if floor is extremely porous or has excessive dust. Note: Any existing sealer or primer must be tested for compatibility with Mohawk Group’s adhesive. Terrazzo, Marble, Vinyl Tile (VAT or VCT), Linoleum and other smooth nonporous surfaces do not require priming. Damp mop only. If patching is required on these surfaces, prime the patched areas if required by patch manufacturer.
Carpet Tile & Plank Direct Glue Down | I N S T A L L A T I O N Site Layout Site Layout 1. The starting point in a carpet tile installation must be as near to the center of the room 1. The point in a carpet to tileutilize installation must beperimeter as near to the of the room as as possible andstarting must be positioned the largest cutcenter module size. 10’ possible and must be positioned to utilize the largest perimeter cut module size. 2.
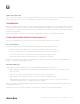
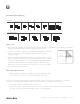
Tab Installation Methods 1. Start from the intersection point in the center of the floor with the 1st tile. Place a tab under each edge of the tile at the corners, leaving ¾ of the tab exposed 2. Carefully insert the second tile in place then firmly press the tile into the tab. 3. Continue with the third tile, creating a stair step or pyramid pattern, starting at the center point. Check to ensure tiles are properly aligned at edges during the installation. (See figure to right.
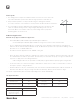
Product Product SpreadSpread Method Method EcoFlex AIR Cushion EcoFlex AIR Tiles Cushion Tiles 1/16”x1/32”x1/32” U-notched trowel trowel 1/16”x1/32”x1/32” U-notched SpreadSpread Rate Ra 25-30 square peryards gallo 25-30yards square Plank Glue Down Direct Glue | I N SDown T A L L|AI TNI SOTNA L L A T I O N EcoFlex ICT Tiles ICT Tiles EcoFlex EcoFlex Matrix EcoFlex Matrix 3/8” Roller 3/8” Roller Approximately 35-40 square Approximately 35-4 yards peryards gallonper gal 1/16”x1/32”x1/32” U-notched tr
Multi-Directional Format (Follow No Order) Tiles are to be placed without being concern for the arrow direction (random). Mixing tiles from various boxes during installation will further blend color and design elements. This process is essential for achieving optimal aesthetics.
Cutting Border Tiles • Cuts are made from the back. Install border tiles by placing the tile face down exactly on top of the last row of field tiles, keeping the arrows pointed in the same directions. This will be your cut tile. Using another tile, butt it against the wall, allowing it to lie on top of the tile that is to be cut. Using this tile as a reference tile, score a line on the back of the tile that is to be cut.