
Installation Guide


©2022 mohawkgroup.com | 800.833.6954 1286_Feb/2022 Page 5/9
Site Layout
1. The starting point in a carpet tile installation must be as near to the center of the room
as possible and must be positioned to utilize the largest perimeter cut module size.
2. Snap a chalk line parallel to one major wall bisecting, the starting point. It will be
necessary to offset the center chalk line to assure perimeter modules will be at least half size.
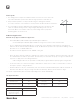
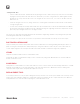
3. A second chalk line must be snapped from the starting point at 90° to the first line. This
can be accomplished using a 6-8-10 or larger triangle, depending on the room size.
(See below). Meters or feet will be used to lay out the triangle in these proportions.
A framing square can also be used.
Adhesive Application
Mohawk Group Approved Adhesive Application
• EcoFlex NXT, Matrix, AIR and ONE require Mohawk approved adhesive.
• EcoFlex AIR requires Mohawk approved adhesive using a 1/16” x 1/32” x 1/32” U-Notch Trowel.
• The use of Mohawk Group branded adhesives is required to ensure optimum results and are the only approved
adhesives that are authorized by the Mohawk Group. The Mohawk Group will not be responsible for damage caused
by a failure to use our branded adhesives.
• The adhesive must be applied in a FULL SPREAD – NOT grid.
• Ensure the proper amount of adhesive is applied to the sub-floor. Prior to installation, mark off a small area of the sub-
floor and determine the adhesive spread rate. This will allow you to determine the proper coverage level and amount
of pressure to apply to the roller during installation.
• When rolling the adhesive, the spread rate is 35-40 yards per gallon and 25-30 yards per gallon using a trowel.
• On smooth surfaces, be careful not to apply too little adhesive. Just because a surface is smooth and / or sealed, it
still requires a proper coating of adhesive.
• Allow the adhesive to dry to a clear and tacky state. Tiles must be installed immediately after adhesive has dried. To
determine if the adhesive is dry, press finger into adhesive. When dry, adhesive will not transfer to finger.
Set-up time is approximately 45 to 90 minutes depending on the climate and humidity.
Tab Application Rate
24” x 24” Tiles
Coverage (Sq. Yds./Box)
12” x 36” Tiles
Coverage (Sq. Yds./Box)
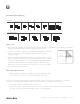
Monolithic, Quarter Turn,
Multidirectional
150
Monolithic
110
Horizontal and Vertical Ashlar
100
Ashlar, Basketweave,
Herringbone
80
Tiles & Planks
Coverage
(Sq. Yds./Box)
Monolithic, Stepping,
Half-Lap, Brick Ashlar,
Random, Herringbone
100
© 2018 Mohawk Group | mohawkgroup.com
Page 5 / 9
Carpet Tile & Plank Direct Glue Down | INSTALLATION
Site Layout
1. The starting point in a carpet tile installation must be as near to the center of the room as
possible and must be positioned to utilize the largest perimeter cut module size.
2. Snap a chalk line parallel to one major wall bisecting, the starting point. It will be necessary to
offset the center chalk line to assure perimeter modules will be at least half size.
$VHFRQGFKDONOLQHPXVWEHVQDSSHGIURPWKHVWDUWLQJSRLQWDWqWRWKHôUVWOLQH7KLVFDQ
be accomplished using a
6-8-10 or larger triangle, depending on the room size. (See below). Meters or feet will be used
to lay out the triangle in these proportions. A framing square can also be used.
Pallet and Box Sequencing
It is very important to install carpet tiles in the order they were manufactured. This is easily accomplished by selecting
pallets in sequential order.
Adhesive Application
EnPress Adhesive Application
• EcoFlex ICT, NXT, Matrix and AIR require EnPress Adhesive.
• Other adhesives may not be compatible and will void product warranties.
• For EcoFlex ICT, EcoFlex NXT and EcoFlex Matrix carpet tiles, apply the adhesive with a heavy-duty frame paint roller with
a 3/8” nap. A trowel can also be used (1/16” x 1/32” x 1/32” U-Notch minimum). For EcoFlex AIR tiles, the adhesive must
be applied with a 1/16” x 1/32” x 1/32” U-Notch trowel.
• The adhesive must be applied in a FULL SPREAD – NOT grid.
• (QVXUHWKHSURSHUDPRXQWRIDGKHVLYHLVDSSOLHGWRWKHVXEõRRU3ULRUWRLQVWDOODWLRQPDUNRIIDVPDOODUHDRIWKHVXE
õRRUDQGGHWHUPLQHWKHDGKHVLYHVSUHDGUDWH7KLVZLOODOORZ\RXWRGHWHUPLQHWKHSURSHUFRYHUDJHOHYHODQGDPRXQWRI
pressure to apply to the roller during installation.
• On smooth surfaces, be careful not to apply too little adhesive. Just because a surface is smooth and / or sealed, it still
requires a proper coating of adhesive.
• Allow the adhesive to dry to a clear and tacky state. Tiles must be installed immediately after adhesive has dried. To
GHWHUPLQHLIWKHDGKHVLYHLVGU\SUHVVôQJHULQWRDGKHVLYH:KHQGU\DGKHVLYHZLOOQRWWUDQVIHUWRôQJHU
Set-up time is approximately 45 to 90 minutes depending on the climate and humidity.
6’
8’
10’