
Installation Guide


©2022 mohawkgroup.com | 800.833.6954 1286_Feb/2022 Page 6/9
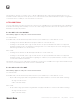
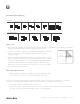
Tab Installation Methods
1. Start from the intersection point in the center of the floor with the
1st tile. Place a tab under each edge of the tile at the corners, leaving
¾ of the tab exposed
2. Carefully insert the second tile in place then firmly press the tile
into the tab.
3. Continue with the third tile, creating a stair step or pyramid pattern,
starting at the center point. Check to ensure tiles are properly
aligned
at edges during the installation. (See figure to right.)
4. Place tabs under the edges of the second and third tile.
5. Continue with the stair step method until the entire area
is completed.
6. All carpet tiles must be rolled with a 75 lb. or 100 lb. roller.
NOTE: Before pressing tile into the adhesive tab, fit the tiles
together, being careful not to trap face yarns between or under
the edges of the tile and/or crease the tab under the tile.
Step 1 Step 2 Step 3 Step 4
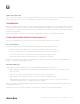
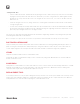
Tab Placement
Tabs must be placed on every corner of the tile or the plank. A tab is also required at any seam next to the wall or transition.
24x48 planks require an additional tab in the middle along the 48” side. See Below.
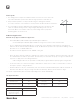
Starting Point
Chalk line 1
Chalk line 2
MONOLITHIC, QUARTER-TURN &
MULTIDIRECTIONAL (24” X 24” TILES)
BRICK & VERTICAL ASHLAR
(24” X 24” TILES)
24” X 48” PLANKS12” X 36” PLANKS