
Installation Instructions


30
Residential Carpet Tile
17.0 Residential Carpet Tile Installation
Due to the variation in tile size, shape, backing and installation methods (monolithic,
ashlar, quarter turn, etc.) follow the carpet manufacturer’s recommendations.
17.1 Layout
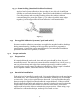
Refer to Section 5.3. To ensure straight-square installations, apply at least two
perpendicular chalk lines onto the substrate (at a 90 degree angle to each other).
These chalk lines should extend the entire length and width of the area to be
covered. A laser line can also be utilized for this purpose. The location and
intersection point of the chalk lines should be determined to achieve the design
intent and reduce waste.
NOTE: The intersection point mentioned above may or may not be in
the center of a room in order to achieve the design intent.
17.2 Floor-Applied Adhesive Application
Generally, a thin film of pressure-sensitive adhesive is applied and allowed to
completely dry. The adhesive is engineered to prevent lateral movement of carpet
tiles and for easy removal/replacement. Due to varying carpet tile backing,
adhesive recommendations will differ. Follow manufacturer’s recommendations.
NOTE: In order to prevent adhesion issues or contamination, old
adhesive residue must be removed and encapsulated prior to
application of new adhesive.
17.3 Pre-Applied Adhesive Application
Refer to Section 14.4.
17.4 Tile Joints
Tile in the completed installation should be tight but not compressed. To insure
proper spacing when installing carpet tile, measure the distance covered by 10 tiles
installed on the floor with no visible gaps, peaks or overlaps. The measurement
should be equal to 10 times the tile size +/-1/4" unless otherwise stated in the
manufacturer specifications. This measurement is an indication of correct
placement of tiles to prevent compression or gapping between tiles. Take care not
to trap yarn between tiles.