
Installation Guide


RAIL INSTALLATION:
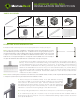
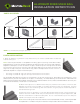
1. Carefully measure the opening between posts or walls and calculate the length of rail that needs to be cut. Divide the
trim length amount in half, and starting with the bottom rail (B), transfer and mark the measurement to each end of the
rail. For the sake of baluster spacing or personal preference, all of the trim length could be cut from one end of both
rails. Make this determination before cutting the rails.
Always refer to local building code requirements to determine the baluster spacing requirements in your area (4”
maximum is typical). Carefully cut the rail. Mark top rail (A) and cut. For clearance purposes the top rail is precut 3/4”
shorter than the bottom rail.=
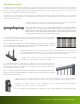
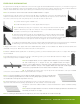
2. Install support block connectors (G) using self-drilling screws (H) to the underside
of bottom rail (B). The support block will be installed in step 10.
Note: One support block, cut from support block material (F), is recommended for
rails measuring 72” in length or less; two support blocks for longer lengths. If one
support block is required, install the support block connector (G) at center point of
bottom rail (B]. If two support blocks are required, install support block connectors
(G) equal distance from each end of the bottom rail (B).
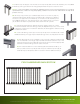
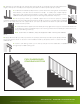
3. To assemble rail, begin with top rail (A) and insert balusters over pre-installed
connectors. Firmly tap each baluster with a rubber mallet to ensure the baluster is
fully seated against the top rail.
Note: It is recommended to use the box as a pad to prevent scuffing of the painted
finish. If installing square balusters, make sure they are properly seated in the slot
on the underside of the top rail to prevent twisting.
4. Attach balusters to bottom rail (B) beginning at one end and working to opposite end.
Stand the assembly upside down on the surface of the box and firmly tap the bottom rail
with a rubber mallet to secure the balusters in place. Stand assembly upright.
5. Slide bottom brackets (D) with screw holes down and counter bore holes facing toward
the balusters, over each end of the bottom rail (B).
6. The MoistureShield
®
Pro Rail can be installed with or without a deck board on
top of the top rail (A). If installing without a deck board on the top rail, measure up
35 1/4” (36” rail height) or 41 1/4” (42” rail height) from the floor and mark a level,
horizontal line on the post or wall.
Note: If installing with a deck board on the top rail (A) reduce the above dimensions
by the thickness of the deck board being used. Overall rail height may vary by local
code or personal preference.
7. Align screw holes in saddle bracket (C) on the horizontal line marked in step 6 making certain the
saddle bracket (C) is centered on the post. Mark screw locations. Repeat process at opposite end.
8. Attach both saddle brackets (C) with self-drilling screws (H) at the marked screw locations
completed in Step 7. Pre-drilling is recommended.
Note: If installing a deck board on the top rail (A), omit Step 9 and do not install the rail caps.
DETAIL D
SCALE 1
D
DETAIL J
SCALE .75
DETAIL K
SCALE .75
J
K
866.729.2378 | WWW.MOISTURESHIELD.COM