
User's Manual


10
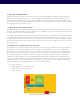
2.2. STAR Receiver Installation
The STAR is mechanically designed for post and wall mounting. Figure 6, illustrates the assembly drawing for installing
the unit on a post (i.e. installation kit is provided)
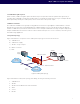
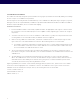
From the figure the mounting bracket is installed directly on the STAR Receiver back plate. Figure 6, Figure 7, Figure 8,
and Figure 9 show the required hardware, installation steps and final assembled and installed unit. Table 2 and Table 3
details the required hardware, which is included with shipping.
Installation instructions:
1. Product installation shall be conducted by a qualified installer. The appropriate local engineer or architect shall
be consulted to ensure the wall and/or pole mount is capable of safely supporting up to 4 times the weight of
the product.
2. Should the customer select to mount the STAR unit to a flat surface (e.g. wall), holes are provided in the main
mounting bracket to accommodate a family of hardware (customer supplied).
3. When mounting STAR unit to a flat surface, a minimum of 4 fasteners are recommended, though the exact
type is a function of the wall material and construction. Best industry practice is recommended.
a. For example: toggle bolts or Molly bolts would be the first choice on hollow walls. Lead lag shields would
be recommended on solid (cast) concrete or brick. Nails are not recommended, but could be used only if
the wood material of the wall was at least 1.5” thick.
4. The recommended mounting procedure would be as provided before for mounting to a mast, pole, pipe or
post. When securing the unit to a flat surface, it is recommended that the two end brackets be mounted to the
STAR Receiver.
5. The main bracket is mounted and (leveled if desired) to the wall using one of the techniques described
above. The STAR Receiver is then secured to the main bracket using the 1/4-20 hex bolts, washers and nuts
as illustrated in the same drawing as for mast mounting, though it is recommended that the pivot bolts be
secured first, and then the arc positioning hardware secured.
Tightening hardware, be it machine screws in Molly and Toggle bolts, Drywall Screws, 1/4-20 screws or the U-Bolts
is to be done with the appropriate tool: screwdriver or wrench. The hardware is to be “tight” to best construction
standards. For those that may have a torque wrench, the following values are recommended:
Screws: nominal 3 ft-lb +/- .5
1/4-20 hardware: 6 ft-lb +/- .5
U-Bolts: 20 ft-lb +/- 1