Aria QUICK START GUIDE
Assembly Guide Wire Nuts Bracket Screws Mounting Bracket Junction Box (not included) Gasket
Mounting Base Mounting Base Screw Bracket Screw Floodlight
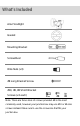
What’s Included Aria Floodlight Gasket Mounting Bracket Screwdriver Wire Nuts (x3) #8 Long Bracket Screw #10, #8, #6 Short Bracket Screws (x2 each) #10 #8 #6 Note: There are three sizes of screws provided. #8 is the most commonly used, however your junction box may use #10 or #6 size screws instead. Make sure to use the screw size that fits your junction box.
Before you Begin Shut OFF the power at the fuse or circuit breaker box. DO NOT rely on a wall switch alone to turn off the power. If you’re unsure which switch it is to turn off the floodlight power, please consult with a licensed electrician. Make sure your setup location will have strong Wi-Fi reception. WARNING: Failing to shut off the power could result in a serious injury, electrical shock, and/or risk of fire.
Step 1: Download the app Download the Momentum App from the Apple App Store or Google Play. You may also scan the QR code above for the direct link to the app. Create a new account if you don’t have one already. Important: Make sure the app you download matches the same logo as shown above.
Step 2: Remove your existing floodlight Use a screwdriver or another tool to remove your existing floodlight from the junction box. Disconnect the three sets of wires from the floodlight. If there is a mounting bracket attached to your junction box, you may remove that as well.
Step 3: Install the bracket and gasket Use the provided screws in the box to install the mounting bracket onto your junction box. Make sure it is tight and secure. With the provided gasket, peel off the white tape and stick that side around the opening in the wall. Make sure the center hole lines up with the center bracket hole and that there are no openings around the gasket.
Step 4: Connect the wires You should see three sets of wires from both your wall and the Aria mounting base: a ground wire (usually green or copper), black wire, and white wire. Use the provided wire nuts to twist the open ends of the matching wires together.
Step 5: Install the mounting base First, make sure that the Aria mounting base is set properly. With the provided long screw, push the screw through the middle screw-hole of the mounting base. Use the provided screwdriver to tightly secure it. Ensure that the gasket and base is tight and does not move.
Step 6: Mount the Aria floodlight The floodlight can now be mounted onto the mounting base. Make sure the screw-hole at the top matches on both the mounting plate and the floodlight, then use the provided screw and screwdriver to screw them tightly in place.
Step 8: Pair the Aria Turn on the power from the power breaker. Once the power is back on, a sound will play from the Aria notifying you that it’s ready to pair. Go back into the Momentum app and follow the in-app screens to complete the pairing process.
Quick tips Reset 1. To perform a factory reset, you must open the camera and hold its internal reset button for 10 seconds. 2. If you want to pair the Aria to a different Wi-Fi network, hold the reset button for 3 seconds and redo the pairing process again.
Quick tips Light Indicators & Status 1. Solid Red – Booting 2. Blinking Red – Failed to connect to Wi-Fi 3. Double Blinking Blue – Ready to connect to Wi-Fi 4. Blinking Blue – Aria is connected to Wi-Fi 5.
Apollo Tech USA, Inc. 8608 Utica Ave. #220, Rancho Cucamonga, CA 91730 Customer Service: +1 888 818 0436 E-mail: help@momentumcam.com Version 1.
www.momentumcam.