
User manual


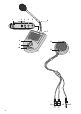


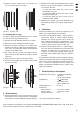

Fig. 3 Mounting by glueing
4.2 Mounting by screwing
Via the supplied screws the calling station can be
mounted to a thin partition (e. g. glass pane).
1) Drill a hole with a diameter of 50 mm at the partition.
2) Screw off the rear part of the calling station.
3) Loosen the rubber washer at the front part so that
the connection cables can be removed from the lat-
eral cable guidance. Then attach the washer again
to the front part.
4) At the front, place the front part before the hole in
the partition and guide the cables backwards
through the hole.
5) Guide the cables through the rear part.
6) With the three longer screws supplied, screw the
rear part to the front part.
Fig. 4 Mounting by screwing
5 Connection
1) Connect the gooseneck microphone (6) to the XLR
jack (7) of the base station. The sliding switch (2)
must be in position EM (= electret microphone).
2) Connect the three cables of the calling station to the
matching jacks at the base station:
– the red phono plug (13) to the red jack MIC (3)
– the white phono plug (14) to the white jack SP (4)
– the 3.5 mm plug (15) to the 3.5 mm jack (5)
CALL-LAMP
3) Connect the plug-in power supply unit to the power
supply jack (1) of the base station and to a socket
(230 V~ / 50 Hz).
6 Operation
Switch on the system by turning up the control (9). The
operating indications (8, 11) light up.
Audio transmission calling station → base station:
Go close to the calling station (optimum distance
10 to 20 cm) and talk. At the base station, adjust the
speaker volume with the control (9). The person at
the calling station can release a signal sound by
pressing the button CALL (12).
Audio transmission base station → calling station:
For an announcement keep the TALK button (10)
pressed and talk into the gooseneck microphone
(6). The announcement is reproduced via the
speaker of the calling station. After the announce-
ment release the button.
To switch off the system, turn the control (9) counter-
clockwise until it locks in position OFF. If the system is
not operated for a longer time, the power supply unit
should be disconnected from the socket because it has
a low power consumption even if the system is
switched off.
7 Specifications
Gooseneck microphone: . . electret microphone
cartridge, cardioid,
300 mm gooseneck
Power supply: . . . . . . . . . . 9 V /300 mA via
supplied plug-in
power supply unit
(230 V~/50 Hz/7 VA)
Ambient temperature: . . . . 0 – 40 °C
Dimensions
Base station: . . . . . . . . . 115 × 65 × 170 mm
Calling station: . . . . . . . ∅ 85 mm × 35 mm
Cable length: . . . . . . . . . 3 m
Subject to technical modification.
7
GB
All rights reserved by MONACOR
®
INTERNATIONAL GmbH & Co. KG. No part of this instruction manual may
be reproduced in any form or by any means for any commercial use.