
Operation Manual
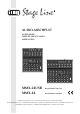


5) Feed an audio signal to the corresponding
input channel (e. g. sing into a microphone,
play a musical instrument).
6) To adjust a mono channel,
set the control LEVEL (10) to mid-position.
Adjust the control GAIN (3) so that the LED
level indicators (15) light up at 0 dB. Use the
three EQ controls (4) to adjust the sound. If
required, press the button (5) to suppress
low-frequency interference (e. g. impact noise,
hum). Then, if necessary, use the control
GAIN to correct the level adjustment. The
LED PEAK (8) should briefly flash for signal
peaks only. If it lights permanently, turn back
the control GAIN and / or the equalizer con-
trols accordingly.
To adjust a stereo channel,
turn up the control LEVEL (10) so that the
LED level indicators (15) light up at 0 dB. If
you have to turn up the control considerably,
press the button +4/
-
10 (6) to boost the level
(12 dB) for the channel. If you have to turn
back the control considerably and the LED
PEAK (8) of the channel lights permanently,
attenuate the output level of the audio
source.
7) After adjusting a channel, turn back its control
LEVEL to the left stop, and then adjust the
next channel.
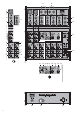
5.2 Mixing audio sources
1) Slide up the control MASTER (16) so that the
mixing ratio of the audio sources can be
adjusted in an optimum way.
2) When all level matching adjustments and
all sound adjustments have been made
(
chapter 5.1), use the controls LEVEL
(10) to mix the signals of the input channels
in the volume ratio desired. Always turn the
controls LEVEL of the channels not used
back to the left stop.
3) For the mono channels, use the panorama
controls PAN (9) to place the mono signals in
the stereo sound. For the stereo channels,
use the controls BAL (9) to adjust the balance
of the stereo signals.
4) When an effect unit has been connected,
please refer to chapter 5.2.1.
5) To add the input signal of the jacks TAPE IN
(17) and of the USB port (28)* to the signal
sum, press the button TAPE[/ USB*] TO MIX
(19).
Note: If, during recording via the jacks TAPE OUT
or the USB port*, the recording signal is sent as an
input signal to the jacks TAPE IN or to the USB
port*, make sure that the button TAPE[/ USB*] TO
MIX is not pressed; otherwise, there will be feed-
back.
6) Use the control MASTER (16) to adjust the
definitive volume of the sum signal; check the
LED level indicators (15) while adjusting the
volume. Make sure that none of the two
buttons (20, 21) for the monitor function is
pressed; otherwise, the LED level indicators
will not indicate the level of the sum signal. In
case of overload, the red LEDs CLIP of the
level indicators will light up.
5.2.1 Adjusting the effect send way
Connect the effect unit to the output AUX SEND
(13) and to the LINE input (2) of an input channel
not used.
1) To make sure that the subsequent effect
adjustments are audible, first set the follow-
ing controls approximately to mid-position:
– AUX SEND MASTER (25)
– the control LEVEL (10) of the channel to
which the effect unit has been connected
2) Use the controls AUX SEND (7) to add the
signals of the input channels to the effect
way. The signal will be picked up after the
control LEVEL (10), i. e. the effect part of a
channel is always proportional to the channel
level adjusted.
Note: Turn back the control AUX SEND of the chan-
nel to which the effect unit has been connected to
the left stop; otherwise, there will be feedback.
3) Use the control AUX SEND MASTER (25) to
adjust the level for the output signal of the
effect way (sum of all signals added to the
effect way) so that the effect unit will not be
overloaded.
4) Use the control LEVEL (10) of the channel to
which the effect unit has been connected to
add the effect signal to the sum signal.
5.3 Monitoring via headphones
and monitor system
The two assign buttons (20, 21) for the monitor
function define which signal will be monitored via
the outputs BOOTH OUT (12) and PHONES
(14) and indicated by the LED level indicators
(15):
– If none of the buttons is pressed, the sum sig-
nal adjusted with the control MASTER (16) will
be monitored and indicated.
– If only the button TAPE TO BOOTH / PHONES
(20) is pressed, the input signal of the jacks
TAPE IN (17) and of the USB port (28)* will
be monitored and indicated (e. g. to check a
recording).
– If the button AUX SEND TO BOOTH (21) is
pressed, the signal of the effect way will be
monitored and indicated, ahead of the output
control AUX SEND MASTER (25). In this
case, the position of the button TAPE TO
BOOTH / PHONES is irrelevant.
Use the control BOOTH / PHONES (23) to adjust
the monitoring volume.
6 Specifications
Input sensitivity
Mic: . . . . . . . . . . . . . . 0.5 mV
Line (mono channel): . 1 mV
Line (stereo channel): 10 mV
Tape In: . . . . . . . . . . . 100 mV
Output level
Master Out/Tape Out: 650 mV
(at indication 0 dB)
Booth Out: . . . . . . . . . 2 V (at indication 0 dB)
Aux Send: . . . . . . . . . 9.5 V max.
Headphone impedance: ≥ 8 Ω
USB interface*: . . . . . . . USB 2.0
(Full Speed)
Frequency range: . . . . . 20 – 20 000 Hz
THD: . . . . . . . . . . . . . . . < 0.05 %
S/N ratio: . . . . . . . . . . . . > 74 dB (A weighted)
Crosstalk: . . . . . . . . . . .
-
63 dB
Equalizer controls
LOW: . . . . . . . . . . . . . ±15 dB/80 Hz
MID: . . . . . . . . . . . . . ±15 dB/2.5 kHz
HIGH: . . . . . . . . . . . . . ±15 dB/12 kHz
Low Cut filter: . . . . . . . . 75 Hz
Phantom power: . . . . . . +48 V
Power supply: . . . . . . . . 18 V~ via power
supply unit provided,
connected to 230 V~/
50 Hz
Ambient temperature: . . 0 – 40 °C
Dimensions (W × H × D)
MMX-24USB: . . . . . . . 220 × 65 × 260 mm
MMX-44: . . . . . . . . . . 280 × 50 × 260 mm
Weight
MMX-24USB: . . . . . . . 2.1 kg
MMX-44: . . . . . . . . . . 2.2 kg
Suitable operating systems for data transfer via
USB interface*:
Windows 2000, Windows XP or subsequent
Windows versions
Mac OS 9.0.4 or later, Mac OS X
Windows is a registered trademark of Microsoft Corporation in the USA
and other countries. .
Mac OS is a registered trademark of Apple Computer, Inc. in the USA
and other countries.
Subject to technical modification.
9
GB
All rights reserved by MONACOR
®
INTERNATIONAL GmbH & Co. KG. No part of this instruction
manual may be reproduced in any form or by any means for any commercial use.
* for model MMX-24USB only